To Know Various Ways to Specify Recipients
You can specify recipients by entering the destination, such as a telephone number, or by using the one-touch button or consulting the Address Book.
The following describes different methods for specifying recipients.
- Specifying a Recipient by Entering the Number
- Specifying a Recipient with a One-Touch Button
- Specifying a Recipient Using Address Book of Each App
- Specifying a Recipient Using Address Book via Home
- Specifying a Recipient Among Favorites
- Specifying a Recipient with Redialing
- Specifying a Recipient with a Chain Dial
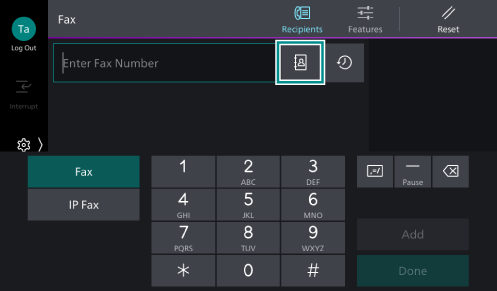
Specifying a Recipient by Entering the Number
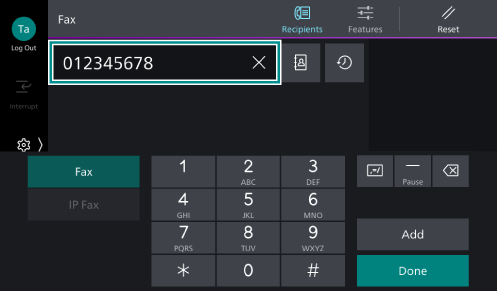
The following describes the steps to specify a fax recipient by entering the dial number.
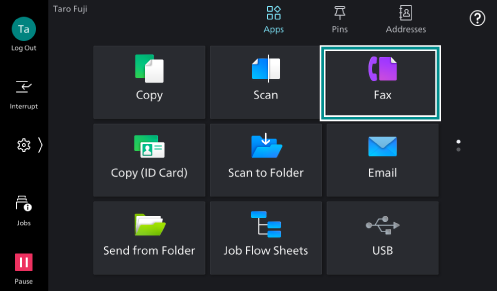
- Tap on [Fax] on the Home screen.
- Enter the number with the keypad.
Note
If you have entered a wrong value, tap [×] and specify a correct recipient.
- To specify an additional recipient, tap [Next Recipient].
- Tap on [Done].
Note
In order to enforce double-checking of recipients to prevent fax mistransmission, administrators can set so that a screen prompting users to re-enter the recipient will be displayed. To do this, in Administrator Mode, set
 > [Device] > [App Settings] > [Fax Settings] > [Fax Controls] > [Re-enter Recipient] to [On]. When [On] is selected, a screen prompting users to re-enter the recipient will be displayed; transmission can be done only when the recipient entered twice exactly matches.
When [Re-enter Recipient] is set to [On], a screen prompting users to re-enter recipients can be displayed at the time of Multi-Address Fax Transmission. To do this, tap on [Re-enter Recipient - Broadcast] on the [Fax Controls] screen, and from the displayed menu select [Enabled (Enter Recipients Twice)].
When [Re-enter Recipient] is set to [On], a confirmation screen can be displayed when users specify recipients from the Address Book. To do this, tap on [Recipient Selected from Address Book] on the [Fax Controls] screen, and from the displayed menu select [Display Confirmation Screen].
Specifying a Recipient with a One-Touch Button
You can assign a frequently used recipient to a one-touch button number, allowing you to easily specify the recipient by tapping a single button.
Note
When
> [Device] > [App Settings] > [Address Book Settings] > [Display Address Number] is set to [On] in Administrator Mode, the registration numbers of 1-72, that are assigned to the recipients in the Address Book, are automatically tied to the numbers on one-touch buttons. In this case, you do not need to do the assignment.
Setting One-Touch Buttons to be Displayed
- Log in to Administrator Mode.
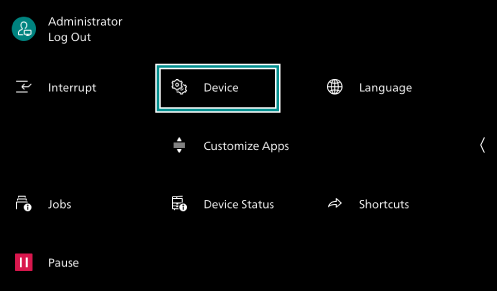
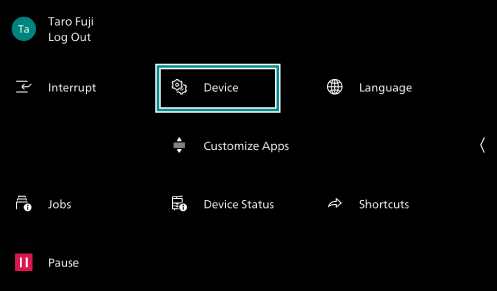
- Tap on on the Home screen.
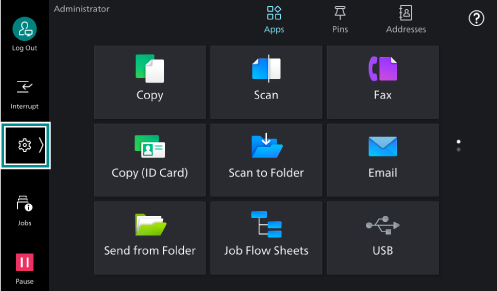
- Tap on [Device].
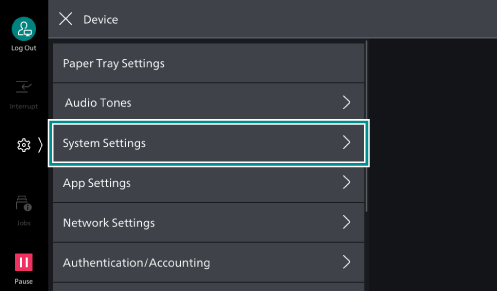
- Tap on [System Settings].
- Tap on [Screen/
Button Settings ].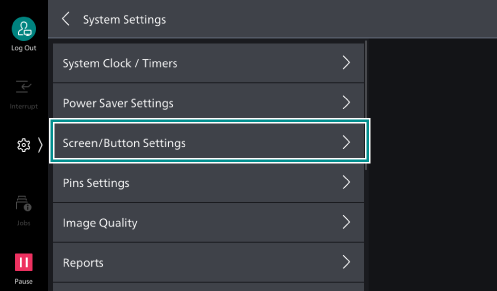
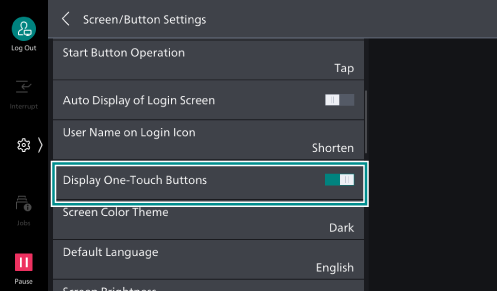
- Tap on [Display One-Touch Buttons] to enable.
Assigning to One-Touch Buttons (When Setting on the Control Panel)
- Tap on on the Home screen.
- Tap on [Device].
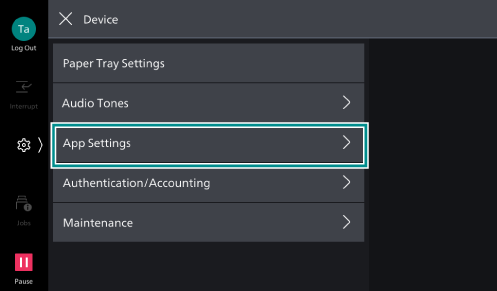
- Tap on [App Settings].
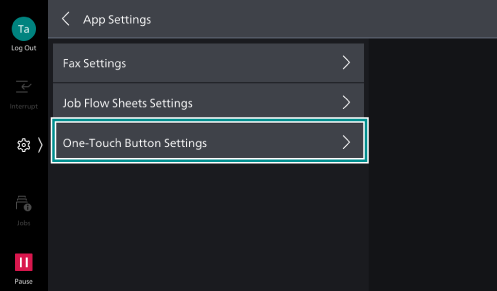
- Tap on [One-Touch Button Settings] or [One-Touch Button and Address Number Settings].
- Tap on an unused one-touch button you want to register with.
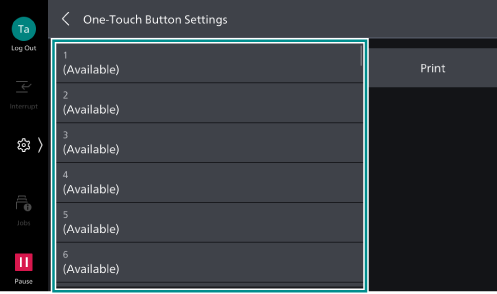
- From the list of destinations, select a destination you want to assign to the selected one-touch button, and tap on [OK].
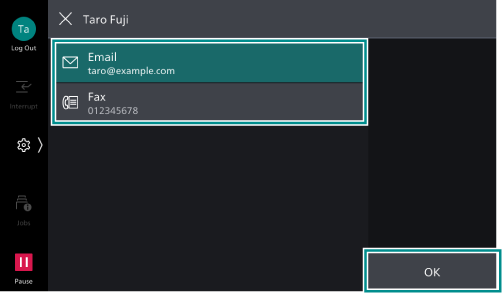
- Tap on [OK].
Note
Tapping on [Print] allows you to print the settings for one-touch buttons.
To unassign one-touch buttons, tap on
 for the number you want to unassign, and from the displayed menu select [Unregister].
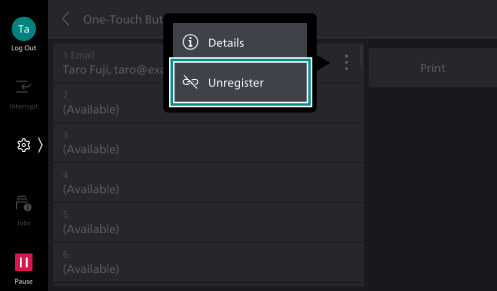
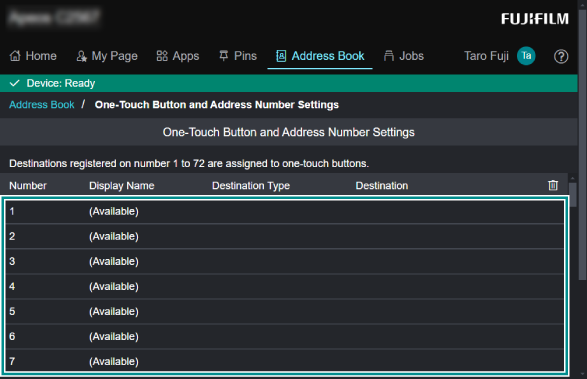
Assigning to One-Touch Buttons (When Setting on the Internet Services)
- Access Internet Services.
Refer
For details, refer to Using Internet Services.
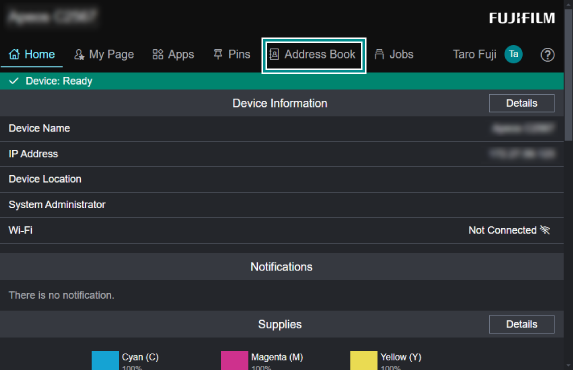
- Click [Address Book].
- Click [One-Touch Button Settings] or [One-Touch Button and Address Number Settings].

- Click an unregistered button you want to register a destination with.
Note
To unassign one-touch buttons, click the delete icon
 for the number you want to unassign.
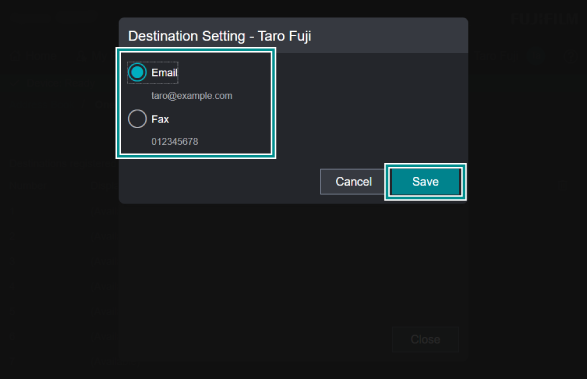
- From the list of destinations, select a destination you want to assign to the selected one-touch button.
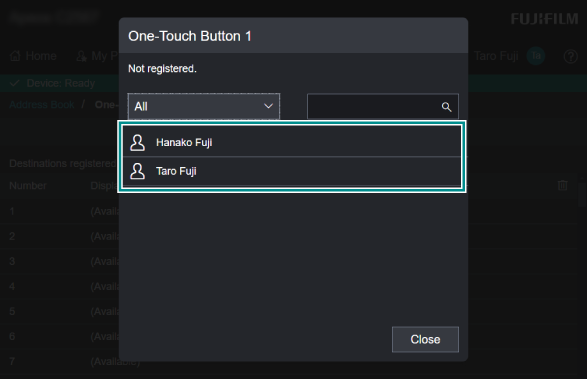
- Select a destination type and click [Save].
Sending with One-Touch Buttons
This section explains the steps with [Fax] as an example.
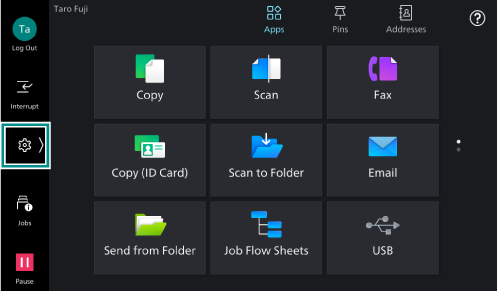
- Tap on [Fax] on the Home screen.
- Tap on the one-touch button for the recipient you want to send data to.
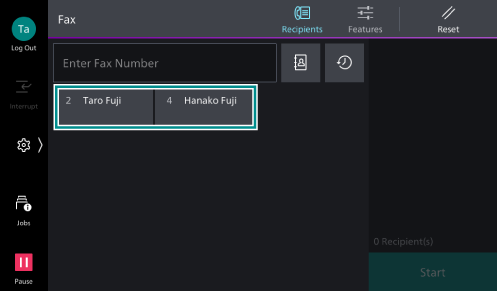
- Check that the recipient (number) you specified with one-touch buttons is displayed.

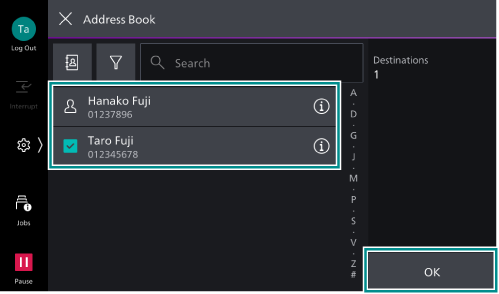
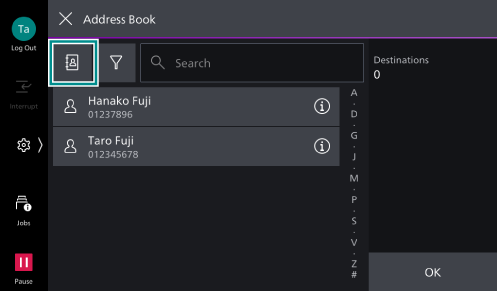
Specifying a Recipient Using Address Book of Each App
You can refer to the Address Book from an App screen, such as Fax or Scan, and specify the registered recipients.
The following steps show you an example of using the [Fax] app.
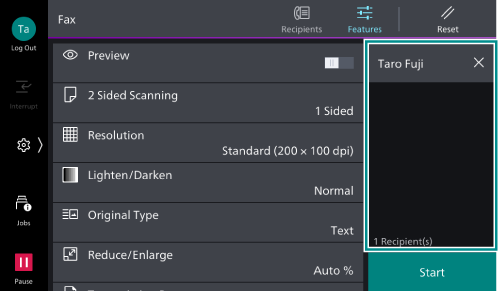
- Tap on [Fax] on the Home screen.
- Tap on the Address Book icon
 .
.
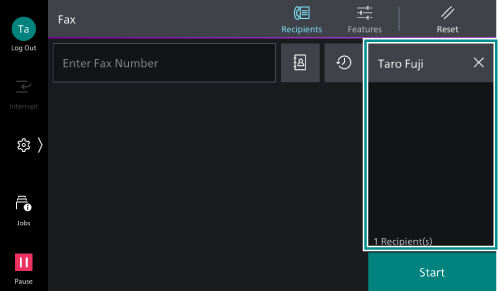
- Select a recipient and tap on [OK].
Note
When Multi-Address Fax Transmission is enabled, destinations for Internet Fax can be selected along with destinations for Fax. In this case, it is not possible to transmit to destinations for Internet Fax only on the displayed Fax screen. Make sure you select at least one destination for Fax transmission. This is also applicable when transmitting from the Internet Fax screen.
On the Fax and Internet Fax operation screens, both the Fax and Internet Fax destinations are displayed on the Address Book. By setting
> [Device] > [App Settings] > [Fax Settings] (or [Internet Fax Settings]) > [Fax Controls] > [Recipients to Display] to [Fax or Internet Fax] in Administrator Mode, only the Fax destinations can be displayed on the Fax operation screen, and Internet Fax destinations on the Internet Fax operation screen.Tapping on the Address Book icon
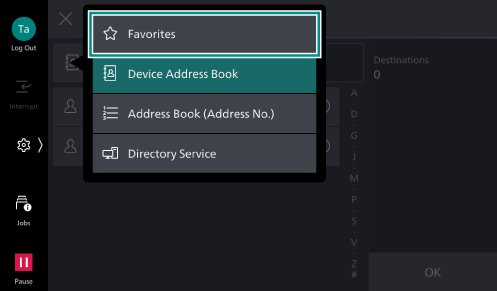
in the upper left of the screen allows you to select a type of Address Book, making it easier to find the target recipient.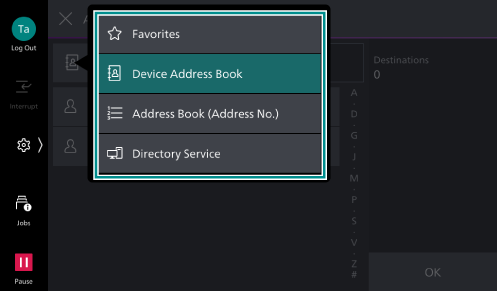
Select [Address Book (Address No.)] if you want to view destinations sorted in the order of the registration numbers. This option appears when
> [Device] > [App Settings] > [Address Book Settings] > [Display Address Number] is set to [On] in Administrator Mode.
- Check that the destination is set correctly.
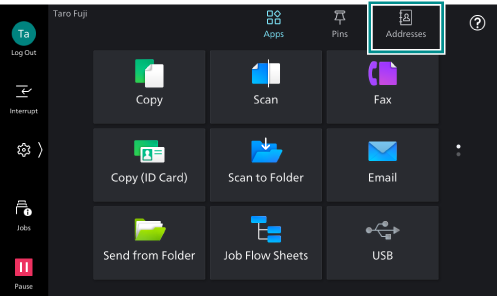
Specifying a Recipient Using Address Book via Home
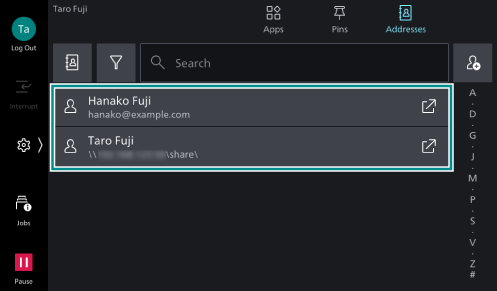
- Tap on [Addresses] on the Home screen.
- Select a contact.
Note
Tapping on
 of a contact allows you to launch the corresponding app for the registered destination type. If you do so, proceed to step 5.
By tapping
 and selecting a feature from the displayed menu, only the recipients for the selected feature can be displayed in the list.
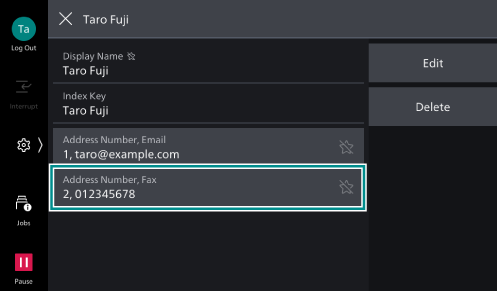
- Select an address or number to use.
For example, to scan your document and send it via email, select a registered email address.
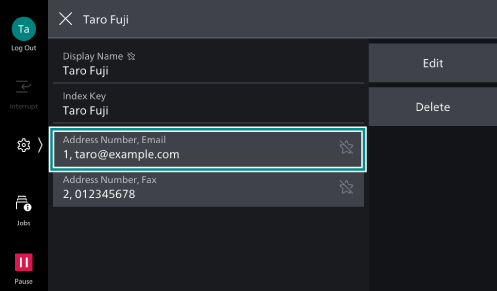
To send your document via Fax, select a registered fax number.
- Tap on [Send to This Contact].
- Check that the destination is set correctly.
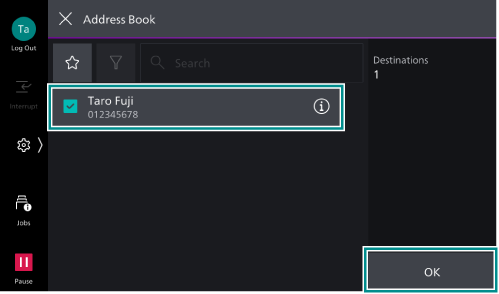
Specifying a Recipient Among Favorites
You can filter the recipients to display only those marked as [Favorites], making it easier to select frequently used destinations.
The following steps show you an example of using the [Fax] app.
- Tap on [Fax] on the Home screen.
- Tap on the Address Book icon .
- Tap on the Address Book icon .
- Tap on [Favorites].
- Select a recipient and tap on [OK].
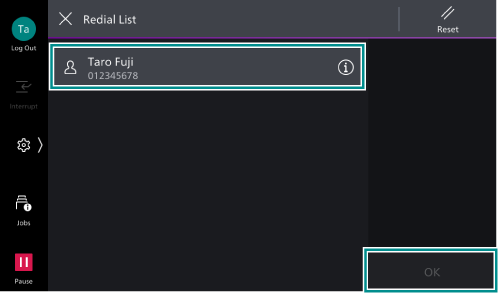
Specifying a Recipient with Redialing
The Redial feature enables you to specify a recipient from your sending history.
The Redial feature is available in Fax and Internet Fax.
Note
If transmitting to particular recipients is prohibited in Administrator Mode, [Redial List] cannot be used for the recipients.
The maximum allowed number of recipients for redialing and available target recipients depend on the settings made in Administrator Mode.
- Tap on [Fax] on the Home screen.
- Tap on the redial icon
 .
.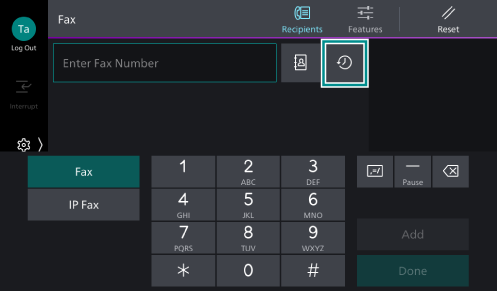
- Select a recipient and tap on [OK].
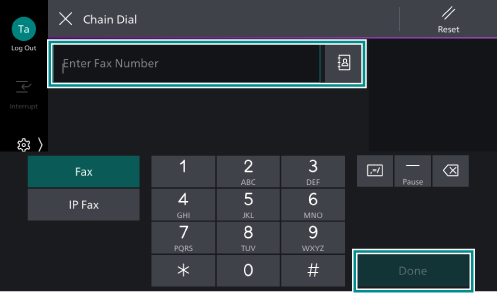
Specifying a Recipient with a Chain Dial
You can specify a single recipient by combining fax number of recipient registered with the Address Book with an entered number. This feature is called Chain Dial.
Note
Whether to use chain dialing can be set in Administrator Mode under
> [Device] > [App Settings] > [Fax Settings] > [Fax Controls] > [Chain Dial].
- Tap on [Fax] on the Home screen.
- Tap on
 ([Features]) at the top of the screen.
- Tap on [More Features], and then tap on [Chain Dial] among the displayed menu.
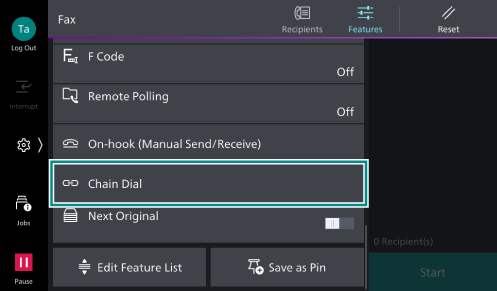
Note
Depending on the customization, [Chain Dial] appears even when you do not tap on [More Features].
- Specify the recipient by using the Address Book, or by entering a dial number. After completing combining the dial number with the entered number, tap [Done].