Home Screen
This is the screen to access the various features of the machine.
You can display only the feature used frequently or change the display order.
Note
You can change the default settings of the Home screen. For details, refer to Changing the Screen to be Initially Displayed.

1. App Display Area
Select [Apps] on the home tab, and then available apps are displayed.
If logging in as a system administrator or an authenticated user, you can change apps to display or display position. For details, refer to Customizing the Home Screen.
App Name |
Function Overview |
|---|---|
[Copy] |
Operate the copy function. Refer
|
[Scan] |
Transfer the scanned data to the client computer on the network. You can also perform [URL], [Email] and [My Folder]. Refer
|
[Fax] |
Operate the fax function using the telephone line. Refer
|
[Copy (ID Card)] |
Both the front and rear of documents whose size cannot be automatically detected, such as an ID card, can be copied onto a single sheet of paper. |
[Scan to Folder] |
Save the scanned data in the folder on the machine. |
[Email] |
Attach scanned data to an Email and send. Refer
|
[Send from Folder] |
Operate the data saved in the folder on the machine. |
[Job Flow Sheets] |
Scan the data using the job flow sheet (series of operations) registered in the machine. |
[USB] |
You can save the scanned data in the USB memory device, or print data saved in the USB memory device. Note
|
[Internet Fax] |
Operate the Internet fax function. |
[Store Files for Polling] |
Store the data and send it by operations from another party. |
[Scan to Desktop] |
Saves the scanned data to a specified client computer. |
[Web Applications] |
Access the web server via the network from the browser programed in the machine, then save or display the data. |
[Remote Assistance] |
Enables you to resolve problems while sharing the screen with an operator. When using it for the first time, you must agree to the terms of use in Administrator Mode. Note
|
[Private Charge Print] |
Print private charge print files. Refer
|
[Secure Print] |
Print secure print files (files with password set). |
[Sample Set] |
Print the remaining number of copies of the file specified for Sample Set (printing one copy for trial). |
[Delayed Print] |
Delayed print files (files with specified print time) can be printed before specified time. |
[Charge Print] |
Print charge print files. |
[Folder N] |
Shortcut to the file destination folder that you set for each telephone line. Note
|
[Scan (ID Card)] |
Both the front and back of an ID card can be scanned onto a single page. |
[Connect to Print Utility] |
Displays the QR code for connection. |
[ScanAuto] |
You only load originals and tap on [Start] and the scanned file with suitable settings can be sent. |
[Settings Backup] |
You can store the setting information of the machine to a computer, cloud services, or copy it to another machine. |
[Updating for Add-on Apps] |
You can automatically or manually update add-on applications and certificates. |
[Private Charge Print (All)] |
You can print all the files that have not been printed and are stored as private charge print jobs by a login user. |
[Smart Card Registration] |
Users can easily register their own IC Cards for authentication with the machine. |
[Check Smart Card ID] |
Users can check the information registered with their IC Cards. |
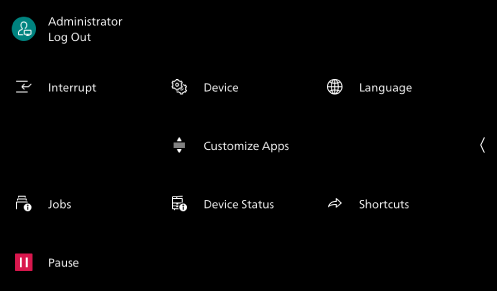
2. Control Tab
Tap on ![]() and then the control menu opens. To close, tap on
and then the control menu opens. To close, tap on  on the right side of the screen.
Feature Name |
Listed Location/Description |
|---|---|
[Interrupt] |
During consecutive copying or printing, this feature allows you to give priority to another operation by suspending the operation being performed. |
[Jobs] |
You can check active jobs (both running and waiting) and completed jobs. It is also possible to cancel printing and print a job that is waiting to be printed or waiting for operation. |
[Pause] |
During scanning of originals or running of a print job, tapping this button allows you to select whether to continue or stop the current processing. Note
|
[Device] |
Allows you to set various features of the machine. |
[Customize Apps] |
|
[Device Status] |
You can confirm the status of the machine or print the report. |
[Language] |
Switches the displayed language and keyboard layout. |
[Shortcuts] |
Register the frequently used features with shortcuts, and you can invoke them from Note
|
[Auto Printing] |
When [Disabled] is selected, printing can be temporarily disabled. When [Enabled] is selected, printing is enabled. |
 displayed on the right of each feature in Administrator Mode, you can change the display order or delete the feature from the list. Tap on [Reset] to restore the list to the state at factory shipment.
Note
The feature icon displayed on the left side of the screen can be displayed and tapped even when the control menu is closed.
In order to make [Auto Printing] visible in the control menu, [Printer Lockout] under
 > [Device] > [System Settings] > [System Clock /
Timers ] must be set to [Allow User to Lock Out] in Administrator Mode.
Refer
You can modify which feature is shown and adjust their positions on the Control Menu. For details, refer to Layout of Features on the Control Menu.
3. Login Information Field (Login Icon/Logout Icon)
Different icons appear according to types of login status or logged in user.
Tap this area to perform the login and logout operations when using the system administration mode or the authentication feature.
Note
In Administrator Mode, when
> [Device] > [Authentication/Accounting ] > [Authentication/Security Settings ] > [Authentication] > [User Details Setup] > [Logout Confirmation Screen] is enabled, a confirmation screen is displayed before you are logged out.
Refer
For details, refer to Logging in to Authentication Mode.
4. Home Tab
Switches between the Home screens.
Note
The tab to be initially displayed can be changed in [Home Screen Default] under
> [Device] > [System Settings] > [Screen/Button Settings ] in Administrator Mode.
Tab Name |
Listed Location |
|---|---|
[Apps] |
|
[Pins] |
To Execute Jobs With the Same Settings Using Job History and Pins |
[Addresses] |
To Register/Modify/Delete Address Book Data Such as Recipients |
5. Help Icon
Displays the guide for operation. When using it for the first time, you must agree to the terms of use in Administrator Mode.
Refer
For details, refer to Using the Help.