Features List
Refer
Refer to Feature List Screen of Apps for how to use the feature list.
Item |
Description |
|
|---|---|---|
[Quantity] |
Enter the number of copies. |
|
[Output Color] |
Set [Output Color] when copying. Note
|
|
[2 Sided] |
Set whether to scan both sides of the document and whether to print on both sides of the paper. |
|
[Paper Supply] |
Select the paper tray. If [Auto Select] is selected, an appropriate paper tray will be selected. |
|
[Reduce/ |
Set the percentage reduction/enlargement when copying. When [Auto %] is selected, the appropriate percentage is set from the document size and the paper size. When entering the value, you can copy with specified reduce/enlarge value. When [Slight Reduction] is enabled, copy slightly smaller than the selected percentage, so that an image is not clipped. |
|
[Pages per Side] |
Multiple page documents can be copied onto 1 page. Specify the layout and the orientation of the loaded documents set when copying. |
|
[Lighten/ |
Adjust the copy to lighten/darken it. |
|
[Staple] |
Set the position for stapling. |
|
[Hole Punch] |
Set the position of the hole punch. |
|
[Folding] |
Fold the copied paper and output. If [Print Position] is displayed, set whether the print position is on the inside or on the outside. Note
|
|
[Copy Output] |
Set the direction for outputting the paper. |
|
[Output Destination / |
Select the destination paper tray. Also, sets to stack by alternately shifting the stacking position of paper so that the partitions can be easily seen. |
|
[Original Type] |
Set the document type. |
|
[Mixed Size Originals] |
You can scan documents of various sizes at one time and make copies on each size or a single size of paper. Note
|
|
[Original Orientation] |
Set the orientation in which you load the document in the document glass or the document feeder. |
|
[Original Size] |
Specify the size when scanning documents of irregular sizes or copying different sizes. Note
|
|
[Sharpness] |
Adjust the sharpness. |
|
[Saturation] |
Adjust the saturation. |
|
[Image Enhancement] |
Remove the background color or adjust the contrast on newspapers or documents with a background color. Note
|
|
[Background Suppression] |
Remove the background color on newspapers or documents with a background color. Note
|
|
[Color Effects] |
Select a color effect from choices, and [Image Enhancement], [Lighten/ Note
|
|
[Color Balance] |
Adjust the strength to [Highlights]/[Midtones]/[Shadows] for each of the four colors: [Yellow], [Magenta], [Cyan], and [Black]. With [Lighten/ |
|
[Color Shift] |
Adjust the color shift of color documents. |
|
[Book Copying] |
Copy the pages of double-page spread such as books separately in page order. Note
|
|
[2 Sided Book Copying] |
Copy double-pages of books, booklets, etc. on both sides of paper, allocating pages so that the copied document can be viewed in the same way as the document. Also, the starting page and the ending page can be specified for the left and right of double-page spreads, and the range for elimination of the center binding shadow can be specified. |
|
[Edge Erase] |
When a document is copied with the document cover opened or when a booklet is copied, a dark shadow can be formed around the periphery or in the center binding part. In these cases erase the shadows when copying. Note
|
|
[Image Shift] |
Move the position of the image of the document vertically and horizontally, move the center of the document onto the center of the paper, and copy. Also, copying can be performed with top and bottom and left and right margins (binding margins) applied. For 2 sided printing, you can set the moving positions both for [Side 1] and [Side 2]. |
|
[Mirror Image] |
Copy a document image with the left-right direction reversed. |
|
[Negative Image] (color models) |
Copy an original image in reverse. Note
|
|
[Negative Image] (black and white models) |
An original image is reversed to monochrome and copied. Note
|
|
[Image Rotation] |
When the orientation of the loaded original differs from that of the paper loaded in the tray, the machine rotates the scanned image to align their orientations. Additionally, you can select the reference position for alignment that applies when both portrait and landscape originals are loaded. |
|
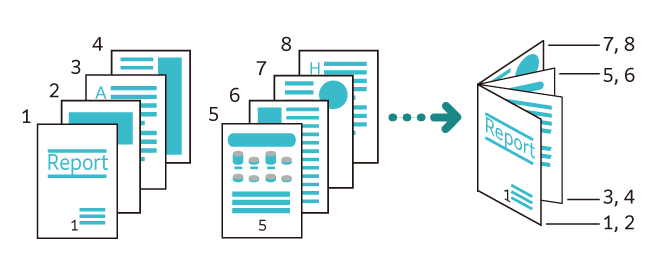
[Booklet Creation] |
Copy the document copied on multiple pages with the page sequence allocated so that it forms a booklet (saddle stitched booklet). Also, when producing a booklet, the center binding margin and covers can be set.
Note
|
|
[Covers] |
Copy with covers. Different paper (colored paper, heavyweight paper, etc.) can be used as the first page of a document and copied as the front cover and back cover. |
|
[Front Cover] |
|
|
[Back Cover] |
Note
|
|
[Poster] |
Divide the scanned image into multiple sheets and copy enlarged. By pasting the divided copies, a large size poster can be produced. There is a margin for glue, so that the copied sheets can be cut and pasted. The margin for glue is fixed at 10 mm. Note
|
|
[Repeat Image] |
Copy a scanned image repeatedly a specified number of times onto a single sheet of paper. When the magnification or reduction is automatically specified, the repeated image is copied so that it fits onto the selected paper. Also, the arrangement direction of the scanned image can be specified. |
|
[Preset Repeat Image] |
Copy the same image of a single document repeatedly onto a single sheet of paper that is uniformly divided in accordance with the specified number. |
|
[Annotations] |
Combines and copies text at any position on the paper. Sets whether to add a predetermined string, such as [CONFIDENTIAL] or [Copy Prohibited], date, or page number. The details such as the print position or size can be selected from formats prepared in advance. Note
|
|
[Watermark] |
Copies a set string of characters repeatedly and thinly composited over the entire background of the paper. When you print [Control Number], for example, if the starting number is set to “1”, then “1” will be printed on every page of the first copy, and “2” will be printed on every page of the second copy. This can be used as a serial number that associates each distributed copy with a person, in order to prevent duplication of confidential documents, etc., distributed at a meeting. Note
|
|
[Secure Watermark] |
Control the security by embedding information in the document to deter duplication, restricting duplication of a document, embedding digital codes, and analyzing documents (“when”, “from which device”, and “by whom” the document was output). Note
Refer
|
|
[Combined Job] |
Change and save the settings for each page or bundle of pages of a document, and finally copy the document together with the different settings as a single job. Also the separator can be insert before the document. |
|
[Sample Job] |
When making multiple sets of copies, you can print a sample set to check the output and then print the remaining copy sets. You can select whether to continue or cancel the job after the confirmation. Also, the number of copy sets can be changed. The sample copy is included in the total number of copy sets. |
|
[Delete Outside / |
Copy only the required area. Set the area by specifying two points on the image, and extract or delete it. Up to three areas can be specified. Also, the target side of the document can be specified. |
|
[Form Overlay] |
The first original is stored as the form original for overlay, and is copied overlaid on the second and subsequent originals. |
|
[Next Original] |
Set this item to copy the number of sheets that exceed the maximum of available number of sheets loaded at a time in the document feeder and to copy multiple documents as a single job using the document glass. |
|