[Maintenance]
- [Partner Support Code]
- [Print Maintenance Reports]
- [EP Registration]/[EP Diagnostics Request /
Repair Request ] - [Quick Setup Home]
- [Check EP Connection]
- [Software Options]
- [Software Options - USB]
- [Software Update]
- [Power On Self-Test]
- [Check IC Card Details]
- [Delete All Certificates /
Initialize Settings ] - [Image Quality]
- [Adjust Finisher]
- [NVM Read/
Write ] - [Quality/
Speed Preference ] - [Altitude Settings]
- [Adjust Fusing Temperature]
- [Toner Density Settings]
- [Primary Transfer Current Adjustment]
- [Tray 5 Guide Adjustment]
[Partner Support Code]
Input the partner support code.
[Print Maintenance Reports]
Note
You can register the shortcut of this item to [Shortcuts] of the control menu by tapping on [Shortcut].
[Folder List]
Prints the list of settings and processing methods during folder storage for folders in the range of specified numbers.
[Job Counter Report]
Refer
For the job counter report, refer to [Print Reports].
[Accounting Reports]
Enables printing of accounting reports by user. The accounting reports that can be output varies depending on whether the accounting feature is enabled.
If [Authentication/Accounting Settings ] is set to something other than [Local]
The following screen is displayed, and a meter report (print jobs) can be printed. This enables confirmation of total pages printed with the machine, and the total sheets of paper used, for each client (job owner).
Note
[Meter Report (Print Jobs)] counts from the time that data was initialized.
If [Authentication/Accounting Settings ] is set to [Local]
The [Accounting Reports] screen is displayed. This enables printing by feature of accounting reports by user for features for which the accounting feature has been set to [Enable Accounting].
Refer
Refer to [Accounting].
To print an accounting report, select any accounting report, and specify the range of user numbers.
Note
The [No.] indicated on the report is the No. (user control no.) set at account setup with [Accounting] and [Authentication/
Security Settings ].
Item |
Description |
|---|---|
[Accounting Report (Copy Jobs)] |
Enables confirmation of total pages copied, or pages printed, with the machine. If page limits have been set, those limit values are displayed. [Accounting Report (Copy Jobs)] counts from the time that data was initialized. |
[Accounting Report (Print Jobs)] |
Enables confirmation of total pages printed with the machine, and the total sheets of paper used, for each client (job owner). [Accounting Report (Print Jobs)] counts from the time that data was initialized. Note
|
[Accounting Report (Scan Jobs)] |
Enables confirmation of total pages scanned with the machine. If page limits have been set, those limit values are displayed. [Accounting Report (Scan Jobs)] counts from the time that data was initialized. |
[Accounting Report (Fax Jobs)] |
Enables confirmation by user of data such as communication sessions, and number of documents sent. |
[NVM Read/Write History Report ]
You can print the history changed in [NVM Read/
[EP Registration]/[EP Diagnostics Request / Repair Request ]
If checking or repair is needed, contact our company.
[Quick Setup Home]
Confirms that quick setup for using the machine is finished. The setting screen can be started from here for items that have not been finished with quick setup.
[Check EP Connection]
Checks whether communication with the EP-BB service is operating correctly.
Note
There are countries and regions where the EP-BB service is not available.
Refer
Refer to our official website for information on the EP-BB service.
[Software Options]
Set by a service representative.
[Software Options - USB]
Enables use of options by mounting a USB dongle.
[Software Update]
Updates software when the software version needs to be updated.
Important
Do not turn off power until the software update is finished.If power is turned off midway through, the software will be incomplete, and it may be impossible for the machine to start.
Note
When the software is downloaded, the machine restarts and updates the software.The machine restarts again and displays the Home screen then the software update is finished.
[Power On Self-Test]
Enables self testing when machine power is turned on.
If a problem is found in the self test, such as intentional rewriting of the program, startup is stopped, and a record is left in the audit log.
[Check IC Card Details]
If [Check IC Card Details] is selected, and the IC Card being used is touched to the IC Card reader, IC Card details are displayed on the touch panel display.
Note
Information used for authentication is set with Internet Services.
[Delete All Certificates / Initialize Settings ]
Deletes all certificates and initializes settings. This is used when certificate data can no longer be used for reasons such as errors with certificate files, even though the machine has been set to use certificates with [Network Settings] > [Security Settings] > [SSL/
[Image Quality]
Note
The following items can be used when there is free capacity of the total amount of folder spaces. Before adjustment, check [Stored File List] under [Print Reports] to confirm that there is free space in the folder.
[Combined Calibration]
[Print Head Alignment]
[Adjust Image Transfer]
[Save Diagnostic Charts]
For the items with [Shortcut] displayed on the top right of the screen, you can register the shortcut of this item to [Shortcuts] of the control menu.
If the situation does not improve even though image quality adjustment is regularly carried out, contact your local representative.
Item |
Description |
|---|---|
[Calibration] |
Calibrates gradations when the color gradations of print image quality have shifted. Calibration enables print image quality of the machine to be maintained at a fixed level. Note
|
[Combined Calibration] |
Automatically adjusts the image quality when the image quality of a copy or print becomes poor. [Calibration], [Spots/ |
[2 Sided Color Scanning Calibration] |
Adjusts the difference of the color between the both side of paper when you load the document with the document feeder. Note
|
[Print Head Alignment] |
Adjusts periodic unevenness in vertical density. Note
|
[Adjust Paper Registration] |
Adjusts position of image for printing on paper. Note
Refer
|
[Adjust Image Transfer] |
Enables setting of the optimal image transfer voltage for each paper type when the toner image is not transferred in the optimal condition to paper. Specify the percentage of the voltage value to be applied numerically, or adjust it using a sample print. |
[Save Diagnostic Charts] |
Diagnoses the image when the image failure occurs. Note
|
[Adjust Color Registration] |
Adjusts color registration when a shift in color registration has occurred in the print results. Note
|
[Adjust Paper Registration]
Adjusts the output image position per each paper tray.
Adjust the output image position when it is misaligned due to paper stretching, cutting accuracy, or paper storage conditions.
Adjustment Procedure
- Load the paper for adjustment in the tray for adjustment.
Note
When printing the sample chart for adjustment, load either A3
 , A4
, A4 , 11 x 17″
 or Letter
 paper.
- Log in to Administrator Mode.
- Tap on
 > [Device] > [Maintenance] > [Image Quality] > [Adjust Paper Registration].
 - Tap on [Paper Supply], and select the tray where paper was loaded in step 1.
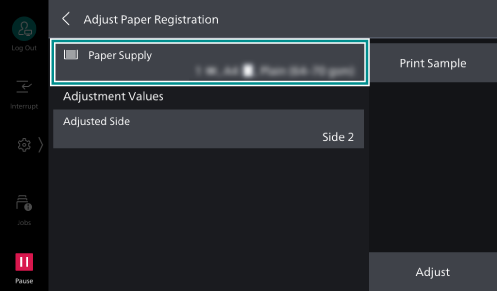
- Select the printing side for adjustment with [Adjusted Side].
- Tap on [Print Sample] to specify the number of prints of the sample.
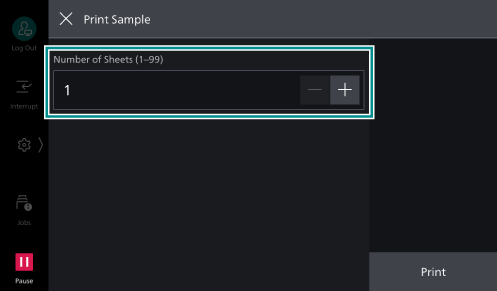
Note
Due to image variation, it is recommended to print 3 or more copies of the sample.
- Tap on [Print].
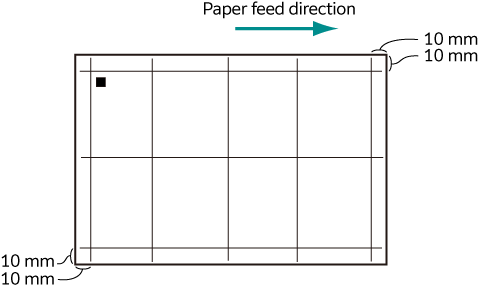
- Confirm the printed sample, and input the adjustment values.
Note
Square black marks are printed at the back edge of the paper to indicate the paper feed direction. One black square is printed on side 1, two black squares are printed on side 2.
Refer
Adjustment if performed in the following sequence.
- Tap on [Adjust].
The adjustment values are applied.
- Tap on [Print Sample] > [Print].
The sample copy reflecting the adjustment value you entered is printed.
[Perpendicularity] Adjustment
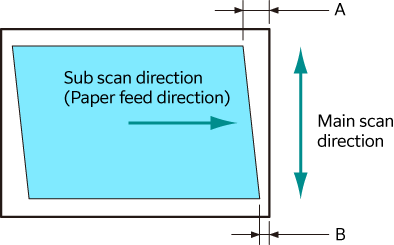
Adjusts image distortion (parallelogram) in the sub scan direction (paper feed direction).

Note
Adjustment cannot be done for each tray/adjusted side.
- Tap on [Perpendicularity].
- Enter the value obtained by adding the adjustment amount to the current setting (1 step = 0.1 mm).
Note
Adjustment amount (mm) = Inclination amount (A - B) (mm) x 400 ÷ (width in main scanning direction of paper (mm) - 20)
- Tap on [OK].
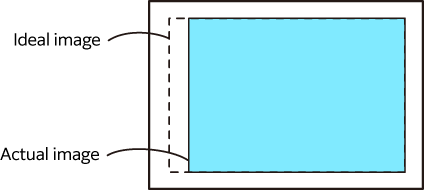
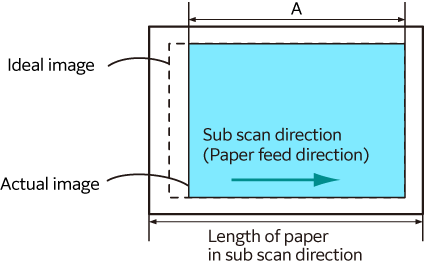
[Slow Scan %] Adjustment
Adjusts reduce/enlarge of image in sub scan direction (paper feed direction).
- Tap on [Slow Scan %].
- Enter the value obtained by adding the adjustment amount to the current setting (1 step = 0.025%).
Note
Adjustment amount (%) = (Paper length in sub scan direction (mm) - 20 - A) ÷ (Paper length in sub scan direction (mm) - 20) x 100
- Tap on [OK].
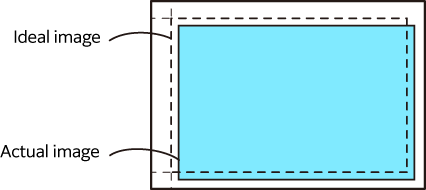
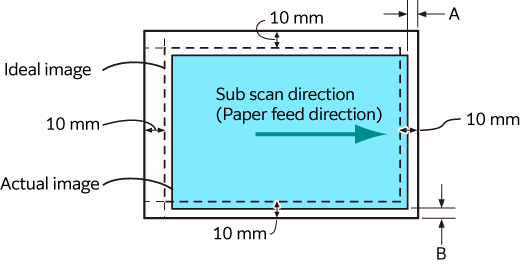
[Lead/Side Registration ] Adjustment
Adjusts position of image in sub scan direction (paper feed direction) and main scan direction (perpendicular direction with respect to the paper feed direction).
- Tap on [Lead/
Side Registration ]. - Enter the value obtained by adding the adjustment amount to the current setting.
The number of values you can enter in one step when tapping on
 /
/  varies depending on the model.
Note
[Lead Registration (L)]
Adjustment amount (mm) = 10 - A (mm)
[Side Registration (S)]
Adjustment amount (mm) = 10 - B (mm)
- Tap on [OK].
[Adjust Finisher]
Note
The displayed items differ depending on the machine configurations.
Item |
Description |
|---|---|
[Booklet Fold Position Adjustment] |
Sets booklet fold position for, respectively, smaller than JIS B4, and JIS B4 or larger. Refer
|
[Punch Position Adjustment] |
Sets punch position for, respectively, smaller than JIS B4, and JIS B4 or larger. |
[Fold Position Adjustment] |
Registers the folding positions and the adjustment value according to paper type or number of sheets. Note
Refer
|
[Staple-Free Stapling Strength] |
Sets stapling strength when using staple-free stapling. |
[Stapling Preference] |
Sets whether to prioritize stapled stapling with staples or staple-free stapling. Note
|
[Punch Unit] |
Set the punch unit. |
[Fold Assist Crease] |
Enables folding (creasing) for curbing bulge in case of saddle stapling. A larger number of creases alleviates bulge more effectively, but slows down output speed. |
[Fold Position Adjustment] Type Setup
Assign the names for each type, and by following the screen, set the adjustment value for fold position for Single Fold, Booklet, C Fold, Z Fold, and Z Fold Half Sheet.
Folding
Single Fold |
Booklet Creation |
Booklet Creation + Staple |
|---|---|---|
|
|
|
C Fold |
Z Fold |
Z Fold Half Sheet |
|---|---|---|
|
|
|
Refer
Refer to “Convenient Usage” in User Guide, for how to adjust the folding position.
[NVM Read/Write ]
Set the details of the machine operation.
Main Features That Can Be Set
Setting Number |
Description |
Setting |
|---|---|---|
785 - 070 |
Set whether to reset all documents or reset all but the ejected documents when the paper jam or multi-feeding occurs. |
1: Start over from the first document 2: Restart from the jammed document (default) |
Changing the Setting Value of [NVM Read/Write ]
- Log in to Administrator Mode.
- Tap on
 > [Device] > [Maintenance] > [NVM Read/
Write ]. - Enter the settings number in [Chain-Link].
The current value of the settings number is displayed on [Current Value].
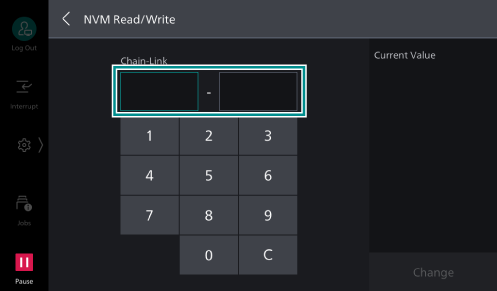
- Tap on [Change].
- Enter the setting value to be changed and tap on [OK].
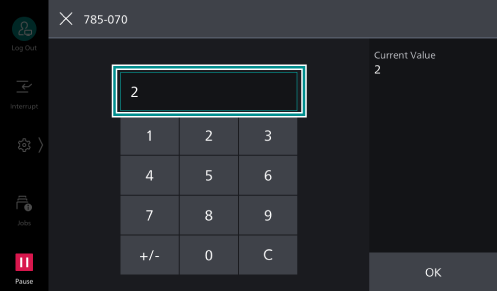
[Quality/Speed Preference ]
Set whether to prioritize the image quality or printing speed.
[Altitude Settings]
Set the altitude of the place the machine is located.
Setting the correct altitude helps the machine to secure the print quality and display the accurate remaining amount of toners.
[Adjust Fusing Temperature]
Adjusts the fusing temperature per paper type.
[Toner Density Settings]
Adjusts the maximum density for printing on paper. Lowering the density saves toner, while increasing the density produces clearer print results.
[Primary Transfer Current Adjustment]
You can adjust the black toner transfer output when unintended images are output due to transfer failure.

|
If an unintended image is printed darkly on the surface, increase the value of [Black Offset Adjustment]. |

|
If an unintended image is printed faintly on the surface, decrease the value of [Black Offset Adjustment]. |
[Tray 5 Guide Adjustment]
Adjusts detection precision of guide width of [Tray 5].


