Using the Wireless Network
When connecting network using the wireless LAN, install the Wireless Network Kit in the machine.
It is necessary to log in to Administrator Mode to perform settings.
Note
Before using this function, make sure to set [Country/
Region ] correctly.
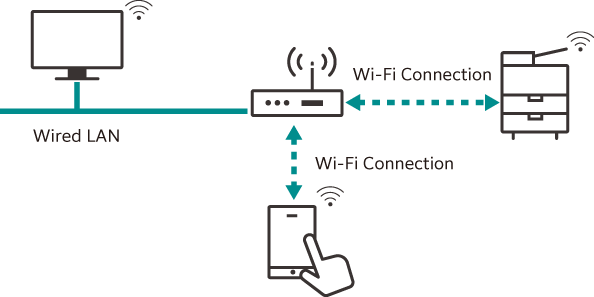
Wi-Fi
Connect the machine and mobile device via the wireless LAN access point.
Wi-Fi Connection Settings
- Tap on
 > [Device] > [Network Settings] > [Wireless LAN Settings].
 - Tap on [Common Settings].
- Tap on [Enabled] > [OK].
Note
When connecting to a wireless LAN access point that uses RADIUS server authentication (IEEE802.1X authentication), it is necessary to set the certificate in Internet Services.
- Tap on [Confirm].
The machine restarts.
- Tap on > [Device] > [Network Settings] > [Wireless LAN Settings].
- Tap on [Wi-Fi Connection Settings].
- Connect to the wireless network using one of the following methods.
Note
The wireless LAN access point SSID and authentication information (WEP key, Passphrase, etc.) are required.
Selecting from the list
- Tap on the access point to connect.
If the access point has no security settings, setup is complete.
If the access point has security settings, proceed to step 2.
Note
A maximum of five wireless LAN access points are displayed in the list in the order of the strongest signal first.
When connecting to another access point, a screen to confirm the disconnection appears.
- Enter the required information and then tap on [OK].
- Confirm that the settings updated and then tap on [Confirm].
The machine restarts and then the settings are enabled.
Manual Settings
- Tap on [Manual Settings].
- Set each item and tap on [OK].
Setting Item
Detail
[SSID]
Set the name that identifies the wireless network. Alphanumerics up to 32 characters can be entered.
[Encryption Settings]
Set the encryption method.
Note
[WEP], [WPA/
WPA2 Personal ], and [WPA/WPA2 Enterprise ] are not displayed when [Security Level] is set to [High (Recommended)].
[No Encryption]
No encryption is set.
[WEP]
Up to 4 WEP keys can be registered. Select the WEP key to be used from among them with the [Transmit Key] screen.
[WPA3 Personal]
Set the passphrase.
[WPA2/
WPA3 Personal ][WPA2 Personal]
[WPA/
WPA2 Personal ][WPA2/
WPA3 Enterprise ]Set the authentication method.
If PEAP is selected, also set [Identity], [User Name] and [Password].
When using EAP, it is necessary to set the certificate in Internet Services and details for the authentication method.
[WPA3 Enterprise]
[WPA2 Enterprise]
[WPA/
WPA2 Enterprise ] - Confirm that the settings updated and then tap on [Confirm].
The machine restarts and then the settings are enabled.
WPS (Push Button)
- Tap on [WPS (Push Button)].
- Tap on [Start] and then press the WPS button on the wireless LAN access point within 2 minutes.
- Confirm that the settings updated at the screen on the machine and then tap on [Confirm].
The machine restarts and then the settings are enabled.
WPS (PIN Code)
- Tap on [WPS (PIN Code)].
- Tap on [Start] and then enter the displayed PIN code at the wireless LAN access point within 2 minutes.
- Confirm that the settings updated at the screen on the machine and then tap on [Confirm].
The machine restarts and then the settings are enabled.
Connecting using Internet Services
IEEE802.1X authentication can be used for the machine’s Wi-Fi connection. When using the IEEE802.1X authentication method, request the certification authority to issue a certificate and then import the issued certificate to the machine using Internet Services.
Certificate |
EAP-TLS |
EAP-TTLS |
PEAP |
|---|---|---|---|
CA Certificate |
Required |
Required |
Optional*1 |
Client Certificate |
Required |
- |
- |
- Required when verifying a server certificate.
Note
HTTP communication must be encrypted to import certificates using Internet Services.
Certificate standards
X.509 Certificate (DER/PEM) (Root CA Certificate)
PKCS#7 (DER) (Root CA Certificate)
PKCS#12 (DER) (Device Certificate (is the Client Certificate)/Root CA Certificate)
Refer
Refer to Internet Services help for the types of certificates.
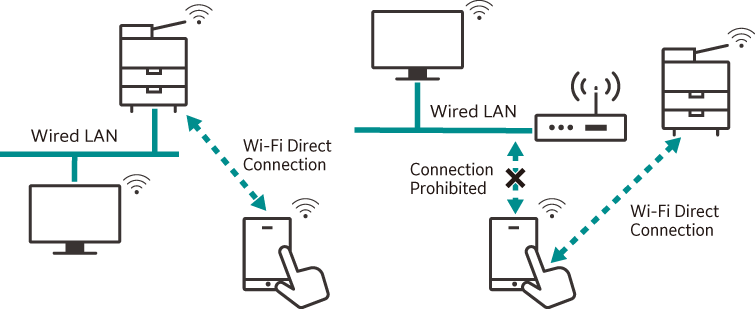
Wi-Fi Direct
Connect the machine and mobile device directly without using the wireless LAN access point.
Note
Wi-Fi Direct cannot be used in an IPv6 environment.
Up to five units can be connected simultaneously with Wi-Fi Direct.
Wi-Fi Direct Connection Settings
Note
You can also set these settings from Internet Services.
- Enable wireless LAN settings.
Refer
Refer to steps 1 to 4 in Wi-Fi Connection Settings.
- Tap on > [Device] > [Network Settings] > [Wireless LAN Settings].
- Tap on [Wi-Fi Direct Settings].
- Tap on [Enabled].
- Set each item and tap on [OK].
Group Settings
Setting Item
Detail
[Auto]
Select this when not fixing the machine to a Group Owner.
[Device Name]
Enter the name of the machine identified by the Wi-Fi Direct network using alphanumerics up to 32 characters. The name set here will be displayed when selecting the machine to connect to from a mobile device.
[Group Owner]
Set the machine as the Group Owner of the Wi-Fi network. Setting it as the Group Owner will enable the machine to be detected from a mobile device at the same time as the wireless LAN access point.
[SSID Suffix]
Displays the name of the network identified by Wi-Fi Direct. Alphanumerics up to 23 characters can be entered for the section that follows “DIRECT-”. The name set here will be displayed when selecting the network to connect to from a mobile device.
[Passphrase]
Enter at least 8 and up to 63 alphanumeric characters as the passphrase. When connecting to the Wi-Fi Direct network from a mobile device, enter the passphrase displayed here.
Note
When connecting a device that does not support Wi-Fi Direct such as an iOS terminal, set it to [Group Owner].
Connecting Mobile Devices
Auto connection (Android OS)
- Open the Wi-Fi settings screen on the mobile device and enable Wi-Fi.
- Tap on [Wi-Fi Direct].
- Select the machine from the list.
- Confirm the name of the mobile device to connect at the screen displayed on the machine and then tap on [Accept].
Manual connection (Android OS/iOS)
Note
It is necessary to set [Group Settings] to [Group Owner] in [Wi-Fi Direct Settings].
- Tap on > [Device Status] > [Wireless LAN Status].
- Confirm [SSID] and [Passphrase] of [Wi-Fi Direct Connection].
- Open the Wi-Fi settings screen on the mobile device and enable Wi-Fi.
- Select the SSID for the machine checked on step 2 from the list and then enter the passphrase.
Disconnecting from Wi-Fi Direct
Machine Screen
Disconnecting
- Tap on > [Device Status] > [Wireless LAN Status].
- Tap on [Disconnect Wi-Fi Direct].
All currently connected mobile devices are disconnected.
Note
Disconnected mobile devices cannot re-connect to Wi-Fi Direct for 30 seconds.
Canceling settings
- Tap on > [Device] > [Network Settings] > [Wireless LAN Settings] > [Wi-Fi Direct Settings].
- Change [SSID Suffix] or [Passphrase].
The Wi-Fi Direct group is rebuilt using the new SSID and passphrase.
Mobile Device Screen
Disconnecting
- Open the Wi-Fi settings screen and cancel the Wi-Fi connection.
Deleting connection information
- Open the Wi-Fi settings screen and select the SSID of the machine in connection.
- Delete Wi-Fi connection settings information.