Setting Cabinet Information
Set the basic information of the created cabinet, member, administrator, drawer, access permission mask, status definition, and custom attribute.
Setting Basic Information
1.
On the [Cabinet List] screen, click a cabinet name.
The [Cabinet Information] screen appears.
2.
Click the [Basic Information] tab.
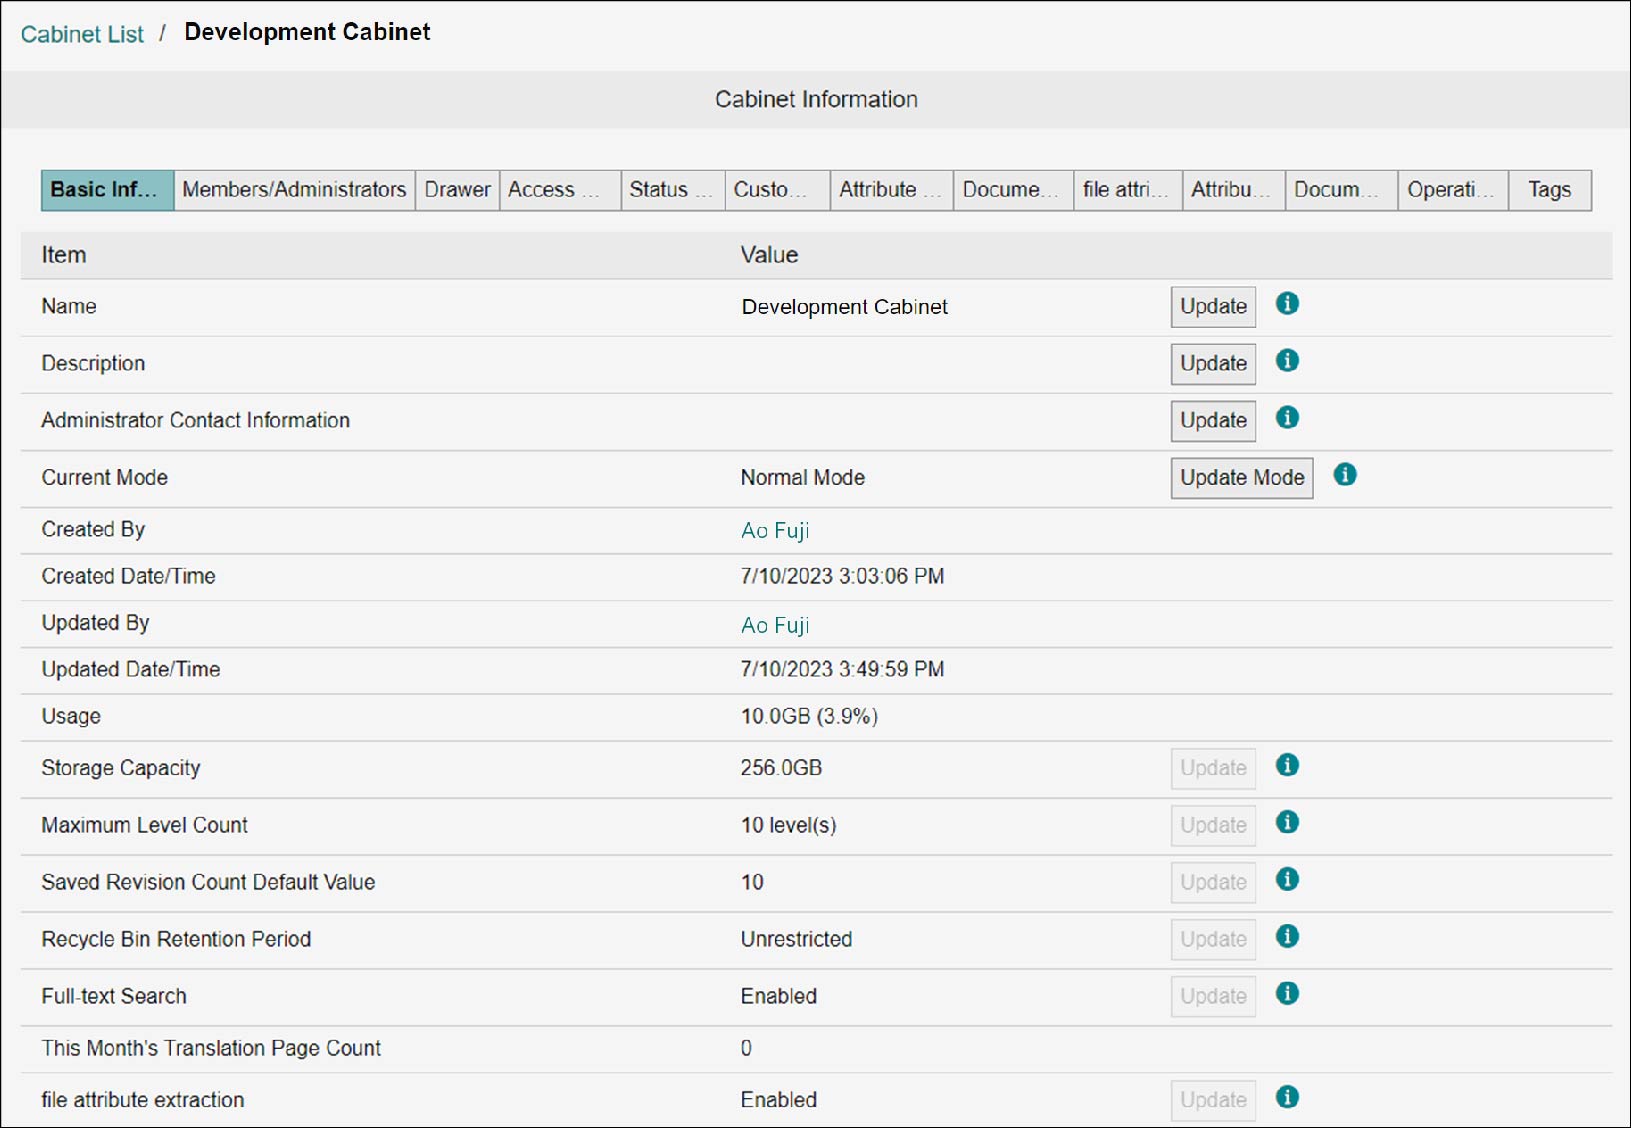
3.
Click [Update] or [Update Mode] of the information you want to set.
The update screen for each piece of information appears.
Note
The displayed screen differs depending on the selected information.
4.
Update the information as necessary and click [Update] or [OK].
The basic information will be updated.
Note
- On the [Update Cabinet Mode] screen, clicking [Update] displays the [Cabinet Mode Update Complete] screen. Click [Close].
- If another user is performing operation when updating the mode, the mode may enter the standby mode. Many operations become restricted in the standby mode. After a certain period of time elapses, perform the mode update again to change the mode to the normal or maintenance mode.
- If you change the mode to maintenance mode, change to normal mode after all operations are completed.
Configuring Alert Notification
1.
In [Alert Notification], click [Update].
The [Alert Notification] screen is displayed.
2.
Select [On] for [Alert Notification].
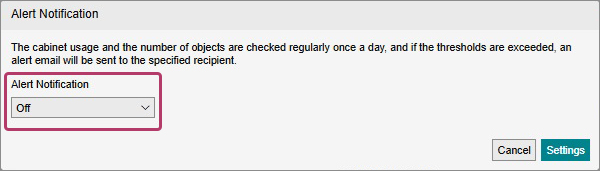
3.
Select the threshold for alert notification and the users to notify.
Note
Up to three users can be notified. To add a user to notify, click [Add], then select the user from the address book.
4.
Click [Settings].
Setting Cabinet Administrator
1.
On the [Cabinet List] screen, click a cabinet name.
The [Cabinet Information] screen appears.
2.
In the [Basic Information] tab, set [Current Mode] to the maintenance mode.
Note
- When [Maintenance Mode] is set, the target cabinet cannot be used on the document screen.
- Change to normal mode after all operations are completed.
3.
Click the [Members/Administrators] tab.
Note
If the user is not the cabinet administrator, [Permitted Users/Groups] will not be displayed.
Setting Access Permissions
1.
In [Permitted Users/Groups], click [Add].
The [Address Book] screen appears.
2.
Select [Search Target] and [Search Conditions], and click [Search].
A search result appears.
3.
Select the checkbox of the user or group you want to add, and click [Add].
The [Add Results] screen appears.
4.
Click [Close] repeatedly until all the screens are closed.
The selected user or group will be added.
Note
- You can select multiple users or groups to add.
- You can add the maximum of 100 users or groups to [Permitted Users/Groups].
Deleting Access Permissions
1.
In [Permitted Users/Groups], select the checkbox of the user or group you want to delete, and then click [Delete].
The [Confirm Member Deletion] screen appears.
Note
You can select multiple members for deletion.
2.
Click [OK].
The selected user or group becomes deleted, and the [Member Deletion Complete] screen appears.
3.
Click [Close].
Batch Setting Access Permissions
1.
In [Permitted Users/Groups], click [Import].
The [Import Cabinet Member] screen appears.
2.
Click [Select].
The file selection screen appears.
3.
Select the XML file you want to import, and click [Open].
In [XML files], the selected XML file name appears.
4.
Click [Import].
The [Confirm Import] screen appears.
5.
Click [OK].
The permitted user or group is imported, and the [Import Complete] screen appears.
6.
Click [Close].
Exporting Access Permission Information
1.
In [Permitted Users/Groups], click [Export].
A list of permitted members for the displayed cabinet is downloaded as an XML file.
Note
The file name becomes as follows: "cabinetAvailableUsers_{yyyyMMddHHmmss}.xml"
Adding Cabinet Administrators
1.
In [Cabinet Administrators], click [Add].
The [Address Book] screen appears.
2.
Select [Search Target] and [Search Conditions], and click [Search].
A search result appears.
3.
Select the checkbox of the user or group you want to add, and click [Add].
The [Add Results] screen appears.
4.
Click [Close] repeatedly until all the screens are closed.
The selected user or group will be added.
Note
- You can select multiple users or groups to add.
- You can add the maximum of three users or groups to [Cabinet Administrators].
- On the [Update Administrator Settings] screen that is displayed by clicking [Update], you can change the administrator privilege access permission of cabinet administrator.
Deleting Cabinet Administrator
1.
In [Cabinet Administrators], select the checkbox of the user or group you want to delete, and then click [Delete].
The [Confirm Member Deletion] screen appears.
Note
You can select multiple cabinet administrators for deletion.
2.
Click [OK].
The selected user or group becomes deleted, and the [Member Deletion Complete] screen appears.
3.
Click [Close].
Batch Setting Cabinet Administrators
1.
In [Cabinet Administrators], click [Import].
The [Import Cabinet Administrators] screen appears.
2.
Click [Select].
The file selection screen appears.
3.
Select the XML file you want to import, and click [Open].
In [XML files], the selected XML file name appears.
4.
Click [Import].
The [Confirm Import] screen appears.
5.
Click [OK].
The cabinet administrator is imported, and the [Import Complete] screen appears.
6.
Click [Close].
Exporting Cabinet Administrator
1.
In [Cabinet Administrators], click [Export].
A list of displayed cabinet administrators is downloaded as an XML file.
Note
The file name becomes as follows: "cabinetAdministrator_{yyyyMMddHHmmss}.xml"
Setting Drawer
Refer
refer to "2.7 Setting Drawer".
Setting Access Permission Mask
1.
On the [Cabinet List] screen, click a cabinet name.
The [Cabinet Information] screen appears.
2.
In the [Basic Information] tab, set [Current Mode] to the maintenance mode.
Note
- When [Maintenance Mode] is set, the target cabinet cannot be used on the document screen.
- Change to normal mode after all operations are completed.
3.
Click the [Access Permission Mask] tab.
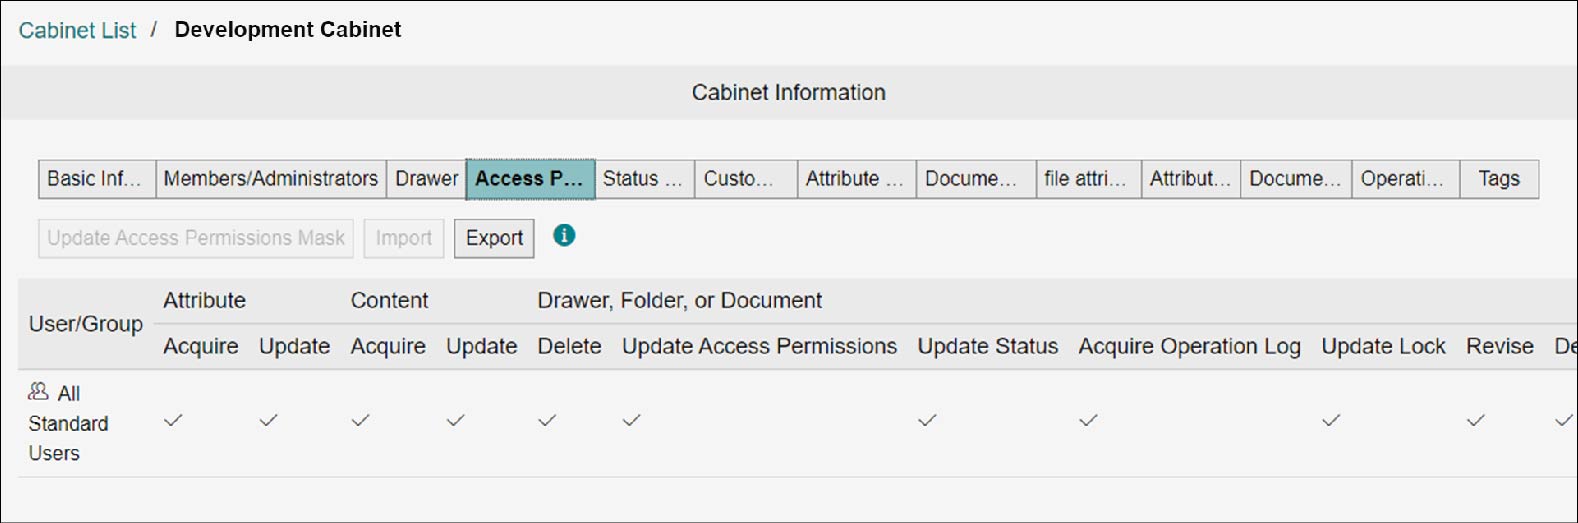
The [Access Permission Mask] tab appears.
Updating Settings
1.
Click [Update Access Permission Mask].
The [Update Access Permission Mask] screen appears.
2.
Change the checkbox for the right of user or group, and click [Update].
The access permission mask will be updated.
Note
- By selecting [Add from Address Book] from [Add], you can add users or groups.
- By selecting [Add [All Standard Users]] from [Add], you can add built-in groups.
- Select the checkbox of a user or group and click [Delete], and the user or the group can be deleted.
- Select [Allow All], [Allow All Except Delete], [Allow Acquire/Create], [Allow Acquire], or [Reject All] from [Select Check Pattern], and the presence/absence of rights for the selected user or group can be changed collectively.
- The change made by either clicking [Add] or [Delete] or selecting from [Select Check Pattern] will be implemented when [Update] is clicked on the [Update Access Permission Mask] screen.
Refer
For setting items, refer to "Appendix A Access Permissions of Drawers, Folders, and Documents".
Importing
1.
Click [Import].
The [Import Access Permission Mask] screen appears.
2.
Click [Select].
The file selection screen appears.
3.
Select the XML file you want to import, and click [Open].
In [XML files], the selected XML file name appears.
4.
Click [Import].
The [Confirm Import] screen appears.
5.
Click [OK].
The access permission mask is imported, and the [Import Complete] screen appears.
6.
Click [Close].
Exporting
1.
Click [Export].
The information of displayed access permission mask is downloaded as an XML file.
Note
The file name becomes as follows: "cabinetAclMasks_{Cabinet Name}_{yyyyMMddHHmmss}.xml"
Setting Status Definition
1.
On the [Cabinet List] screen, click a cabinet name.
The [Cabinet Information] screen appears.
2.
In the [Basic Information] tab, set [Current Mode] to the maintenance mode.
Note
- When [Maintenance Mode] is set, the target cabinet cannot be used on the document screen.
- Change to normal mode after all operations are completed.
3.
Click the [Status Definition] tab.
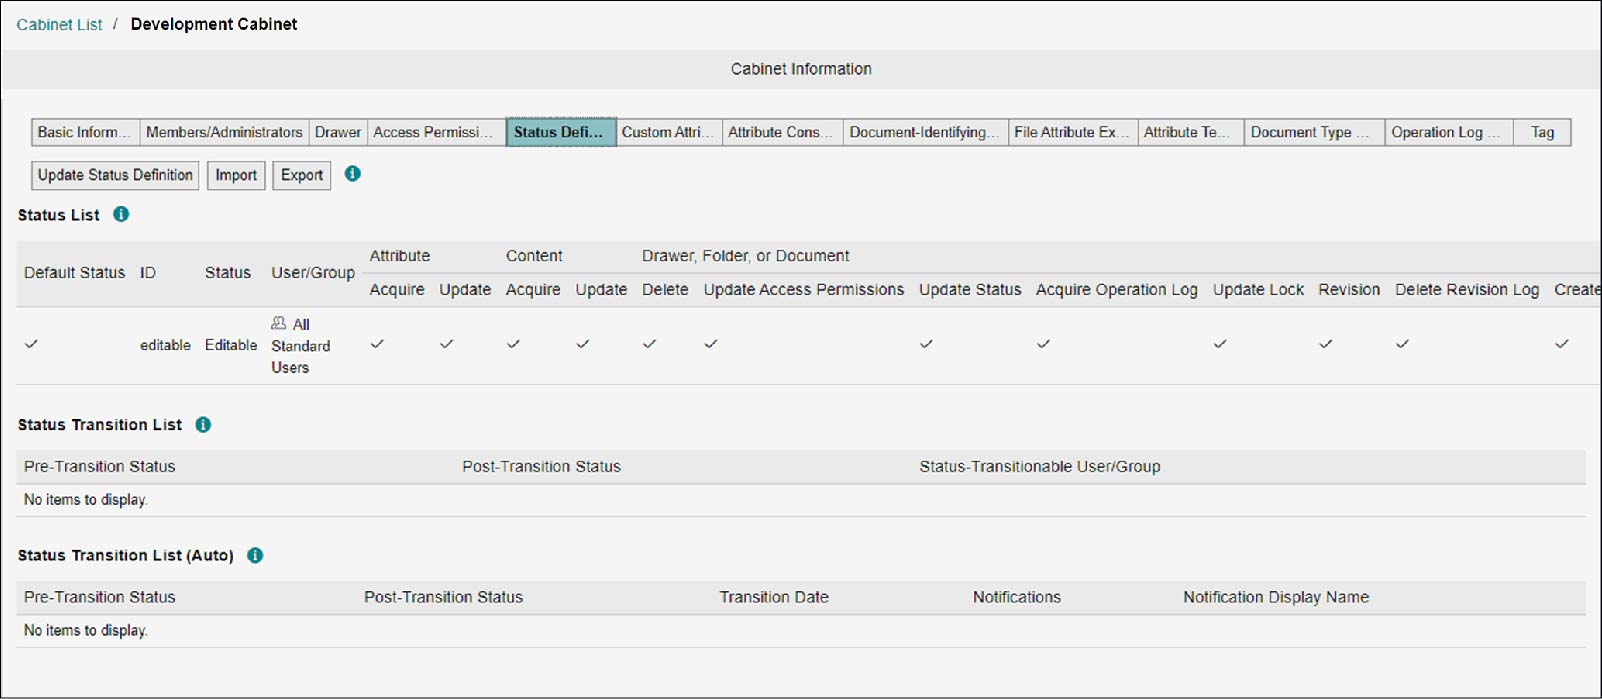
Creating Status
1.
Click [Update Status Definition].
The [Update Status Definition] screen appears.
2.
Click [Create Status].
The [Create Status] screen appears.
3.
Enter [ID] and other items, and click [Create].
The status definition will be created.
Note
- By selecting [Add from Address Book] from [Add], you can add users or groups.
- By selecting [Add [All Standard Users]] from [Add], you can add built-in groups.
- Select the checkbox of a user or group and click [Delete], and the user or the group can be deleted.
- Select [Allow All], [Allow All Except Delete], [Allow Acquire/Create], [Allow Acquire], or [Reject All] from [Select Check Pattern], and the presence/absence of permissions for an arbitrary user or group can be changed collectively.
- The change made by either clicking [Add] or [Delete] or selecting from [Select Check Pattern] will be implemented when [Create] is clicked on the [Create Status] screen.
Updating Status
1.
Click [Update Status Definition].
The [Update Status Definition] screen appears.
2.
From [Status List], click [Update] of the status you want to update.
The [Update Status] screen appears.
3.
Change the checkbox for the permission of user or group, and click [Update].
The status definition will be updated.
Creating Status Transition
1.
Click [Update Status Definition].
The [Update Status Definition] screen appears.
2.
Click [Create Status Transition].
The [Create Status Transition] screen appears.
3.
Set [Pre-Transition Status] and other items, and click [Create].
The status transition will be created.
Note
- By selecting [Add from Address Book] from [Add], you can add users or groups.
- By selecting [Add [All Standard Users]] from [Add], you can add built-in groups.
- Select the checkbox of a user or group and click [Delete], and the user or the group can be deleted.
- The change made by either clicking [Add] or [Delete] will be implemented when [Create] is clicked on the [Create Status Transition] screen.
Changing Status Transition
1.
Click [Update Status Definition].
The [Update Status Definition] screen appears.
2.
From [Status Transition List], click [Update] of the status transition you want to update.
The [Update Status Transition] screen appears.
3.
Change [Pre-Transition Status] and other items, and click [Update].
The status transition will be updated.
Creating Status Auto Transition
Status transitions can be automated based on specific conditions such as scheduled date and time. Email notifications can also be sent upon status transition.
1.
Click [Update Status Definition].
The [Update Status Definition] screen appears.
2.
Click [Create Auto Transition].
The [Create Auto Transition] screen appears.
3.
Set each item.
Note
- A Date Type custom attribute or some basic attributes that have been added to the cabinet can be set from [Select] of [Reference Time].
- A User/Group Type custom attribute or basic attributes that have been added to the cabinet can be set from [Select] of [Recipient].
4.
Click [Create].
Status auto transition is created.
Updating Status Auto Transition
1.
Click [Update Status Definition].
The [Update Status Definition] screen appears.
2.
Click [Update] of the status auto transition you want to change from [Status Auto Transition List].
The [Update Auto Transition] screen appears.
3.
Change each item and click [Update].
Importing
1.
Click [Import].
The [Import Status Definition] screen appears.
2.
Click [Select].
The file selection screen appears.
3.
Select the XML file you want to import, and click [Open].
In [XML files], the selected XML file name appears.
4.
Click [Import].
The [Confirm Import] screen appears.
5.
Click [OK].
The status definition is imported, and the [Import Complete] screen appears.
6.
Click [Close].
Exporting
1.
Click [Export].
The information of displayed status definition is downloaded as an XML file.
Note
The file name becomes as follows: "cabinetStateDefinition_{Cabinet Name}_{yyyyMMddHHmmss}.xml"
Setting Custom Attributes
1.
On the [Cabinet List] screen, click a cabinet name.
The [Cabinet Information] screen appears.
2.
In the [Basic Information] tab, set [Current Mode] to the maintenance mode.
Note
- When [Maintenance Mode] is set, the target cabinet cannot be used on the document screen.
- Change to normal mode after all operations are completed.
3.
Click the [Custom Attributes] tab.
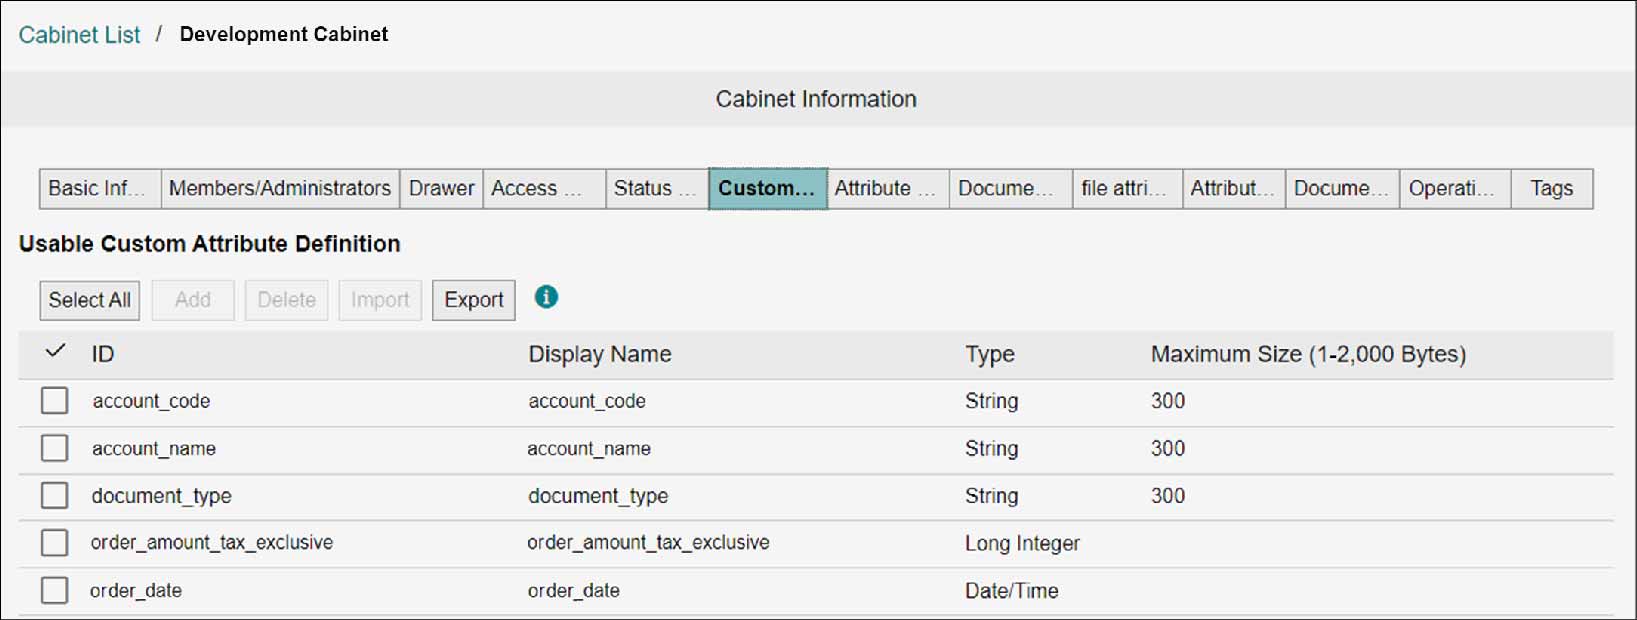
Adding
1.
Click [Add].
The [Add Usable Custom Attribute Definition] screen appears.
2.
Select the checkbox of the custom attribute definition you want to add, and click [Add].
The usable custom attribute definition you selected will be added.
Deleting
1.
Select the checkbox of the custom attribute definition you want to delete, and click [Delete].
The [Confirm Usable Custom Attribute Definition Deletion] screen appears.
Note
You can select multiple usable custom attribute definitions for deletion.
2.
Click [OK].
The selected custom attribute definition becomes deleted, and the [Usable Custom Attribute Definition Deletion Complete] screen appears.
3.
Click [Close].
Importing
1.
Click [Import].
The [Import Usable Custom Attribute Definition] screen appears.
2.
Click [Select].
The file selection screen appears.
3.
Select the XML file you want to import, and click [Open].
In [XML files], the selected XML file name appears.
4.
Click [Import].
The [Confirm Import] screen appears.
5.
Click [OK].
The usable custom attribute definition is imported, and the [Import Complete] screen appears.
6.
Click [Close].
Exporting
1.
Select the checkbox of target custom attribute definitions and click [Export].
The information of usable custom attribute definition that is displayed is downloaded as an XML file.
Note
The file name becomes as follows: "cabinetAvailableCustomAttributes_{Cabinet Name}_{yyyyMMddHHmmss}.xml"
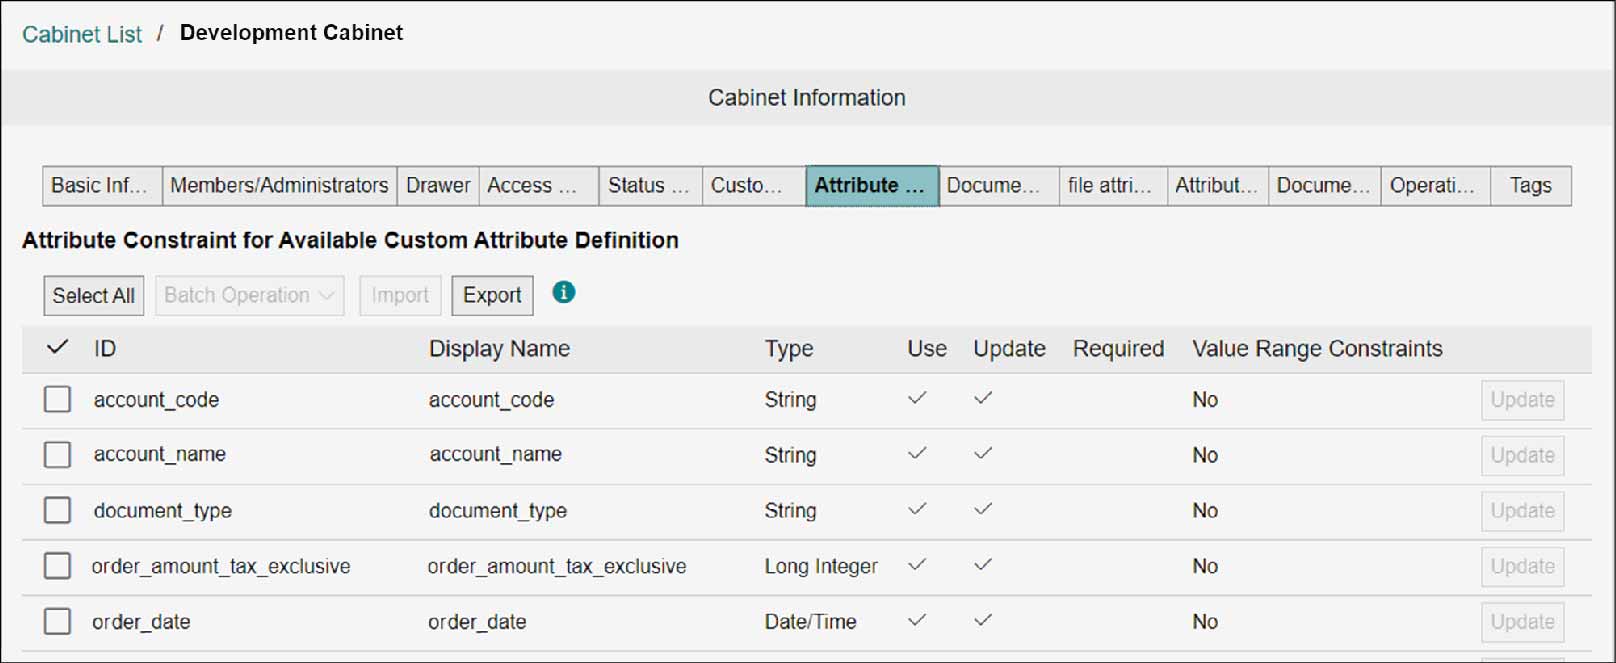
Setting Attribute Constraints
For custom attribute definitions, set constraints such as usage and change permission of the user or the range of values that can be entered.
Note
The attribute constraints set on this screen are enabled when the document type is not set.
1.
On the [Cabinet List] screen, click a cabinet name.
The [Cabinet Information] screen appears.
2.
In the [Basic Information] tab, set [Current Mode] to the maintenance mode.
Note
- When [Maintenance Mode] is set, the target cabinet cannot be used on the document screen.
- Change to normal mode after all operations are completed.
3.
Click the [Attribute Constraints] tab.
Importing Attribute Constraints
1.
Click [Import].
The [Import Attribute Constraints] screen appears.
2.
Click [Select].
The file selection screen appears.
3.
Select the XML file you want to import, and click [Open].
The selected file name is displayed on [XML Files].
4.
Click [Import].
The [Confirm Import] screen appears.
5.
Click [OK].
The attribute constraints are imported and the [Import Complete] screen appears.
6.
Click [Close].
Exporting Attribute Constraints
1.
Click [Export].
The attribute constraints information of the displayed custom attribute definitions is downloaded as an XML file.
Note
The file name is "attributeValueFacetCustomDefinitions_{yyyyMMddHHmmss}.xml."
Updating Attribute Constraints of Custom Attribute Definitions
1.
Click [Update] of the custom attribute definitions whose attribute constraints are to be updated.
2.
Change the settings and click [Update].
The attribute constraints are updated.
Updating Attribute Constraints of Multiple Custom Attribute Definitions
1.
Select the checkbox of custom attribute definitions to be updated the attribute constraints, then select content from [Batch Operation].
The selected attribute constraints of custom attribute definitions are updated.
Note
- The [Value Range Constraints] cannot be set from [Batch Operation].
- A regular expression specified in [Value Range Constraints] finds a partial match. To find exact match, add "^" and "$" to the start and end of the regular expression string, respectively.
Setting Document-Identifying Attributes
Document-identifying attributes are used to manage document uniqueness, and up to three custom attributes can be set. When setting document-identifying attributes for the same document type in the same cabinet, duplicate attribute values cannot be set.
Important
"Capture" and "Rules" described on this page refer to the features in the old product Smart Workstream Data Entry option. These are provided in File Management as compatibility features available only to customers who have purchased the old product.
Note
- You can use custom attributes of "String", "Short Integer", "Integer" and that are permitted to be used in the attribute constraint.
- An error occurs when multiple custom attributes are set and the values of all set attributes match.
- When [Auto Revise] is set to [Yes] in the capture rule setting, it will be automatically revised. For details, refer to "Setting Destination".
- The setting applies to documents and folders in the recycle bin as well as to custom attributes of documents and folders to which you do not have access permissions. Matching values for these attributes also result in an error.
1.
On the [Cabinet List] screen, click a cabinet name.
The [Cabinet Information] screen appears.
2.
In the [Basic Information] tab, set [Current Mode] to the maintenance mode.
Note
- When [Maintenance Mode] is set, the target cabinet cannot be used on the document screen.
- Change to normal mode after all operations are completed.
3.
Click the [Attribute Constraints] tab.
The [Attribute Constraint for Available Custom Attribute Definition] screen appears.
4.
Click [Update] of the custom attribute definitions whose attribute constraints are to be updated.
5.
Select the checkbox of [Usage Allowed], and click [Update].
The attribute constraints are updated.
6.
Click the [Document-Identifying Attributes] tab.
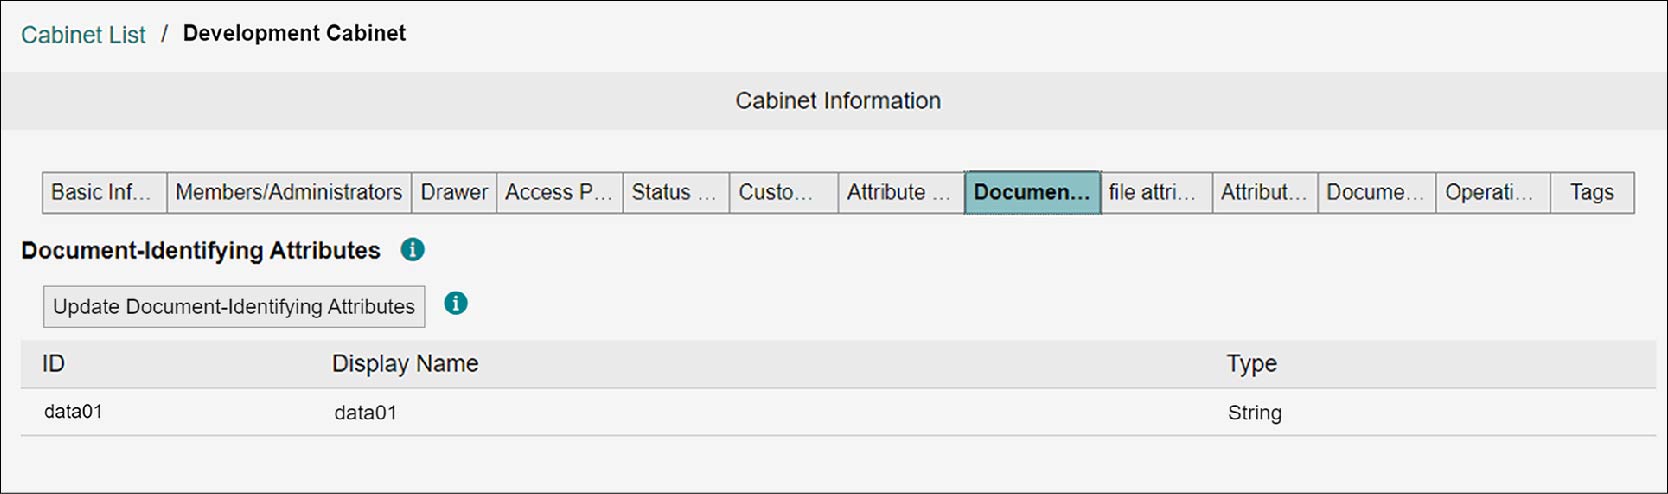
7.
Click [Update Document-Identifying Attributes].
The [Update Document-Identifying Attributes] screen appears.
8.
Select the attribute to be used for document-identifying attributes, and click [Update].
The document-identifying attributes are updated.
Note
- In [Candidate] and [Selected], selecting the checkbox and clicking [Add] or [Exception] will move the selected attribute.
- If the target custom attribute has a set value, and if a document or folder with document type "Unspecified" is registered in the cabinet, document-identifying attributes cannot be set.
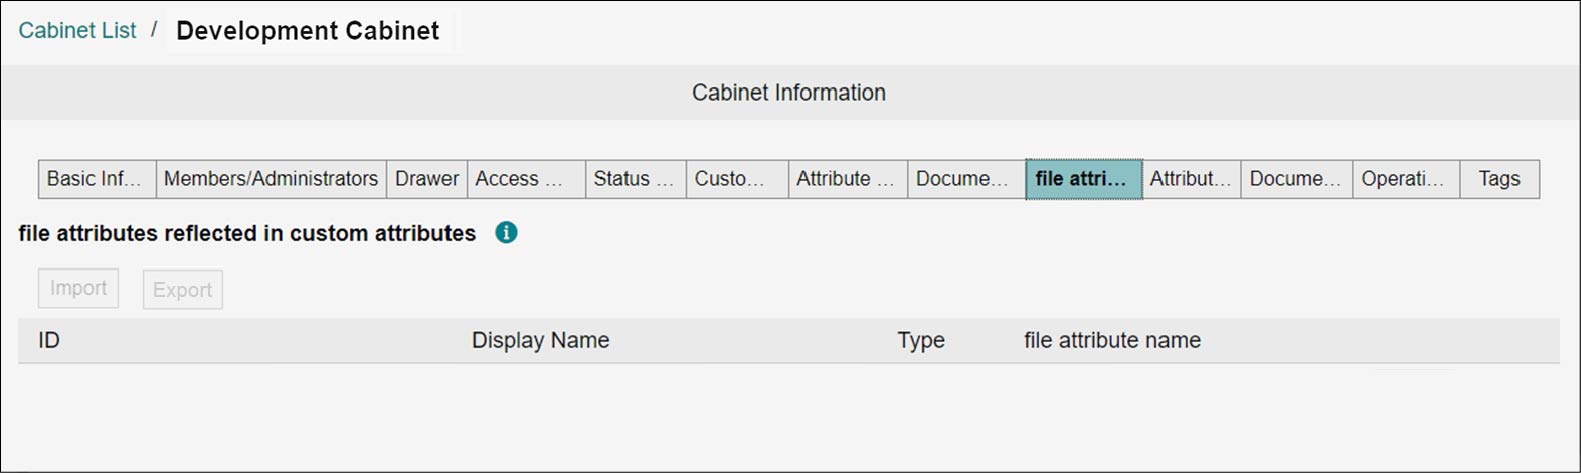
Setting File Attribute Extraction
When you upload a PDF document or DocuWorks document to a cabinet for which file attribute extraction has been set, the file attributes are extracted and assigned as custom attributes of the target document.
Note
- The information extracted as file attributes is as follows.
- DocuWorks document: User definition attributes
- PDF document: The information displayed in the "General" and "Custom Properties" sections of the document's Properties - To use the file attribute extraction feature, set [File Attribute Extraction] to [Enabled] in the [Basic Information] tab. When set to [Enabled], the default setting is created for custom attributes of String type that are available in the cabinet and have display names in the language set in [Primary Language] of the Office Basic Information. By default, for the display name for the file attribute name corresponding to the custom attribute, the language set in the Office Basic Information [Primary Language] of the custom attribute is used.
- For PDF documents, "General" and "Custom Properties" of the document property are extracted. When the same attribute values are assigned to the "General" and "Custom Properties" attribute names, the value assigned to "Custom Properties" will be given priority.
- To extract each attribute from the document property "General" of a PDF document, you need to convert each attribute name of "General" as follows when setting [File Attributes to be Applied to Custom Attributes].
- Created CreationDate
- Modified ModDate
- Application Creator
1.
On the [Cabinet List] screen, click a cabinet name.
The [Cabinet Information] screen appears.
2.
In the [Basic Information] tab, set [Current Mode] to the maintenance mode.
Note
- When [Maintenance Mode] is set, the target cabinet cannot be used on the document screen.
- Change to normal mode after all operations are completed.
3.
Click the [File Attribute Extraction] tab.
The [File Attributes to be Applied to Custom Attributes] screen appears.
Importing the File Attributes to be Applied to Custom Attributes
1.
Click [Import].
The [Import File Attribute Settings to be Applied to Custom Attributes] screen appears.
2.
Click [Select].
A screen for selecting files appears.
3.
Select an XML file to be imported and click [Open].
The selected file name is displayed on [XML File].
4.
Click [Import].
The [Confirm Import] screen appears.
5.
Click [OK].
6.
Click [Close].
Exporting the File Attributes to be Applied to Custom Attributes
1.
Click [Export].
The file attribute information is downloaded as an XML file.
Changing the File Attributes to be Applied to Custom Attributes
1.
Click [Update] for the file attribute you want to change.
2.
Change the file attribute name, and click [Update].
The file attribute name is updated.
Setting Attribute Templates to Use for Cabinet
Set attribute templates to be used for cabinet when attribute templates are not set in activity settings.
1.
On the [Cabinet List] screen, click a cabinet name.
The [Cabinet Information] screen appears.
2.
In the [Basic Information] tab, set [Current Mode] to the maintenance mode.
Note
- When [Maintenance Mode] is set, the target cabinet cannot be used on the document screen.
- Change to normal mode after all operations are completed.
3.
Click the [Attribute Templates] tab.
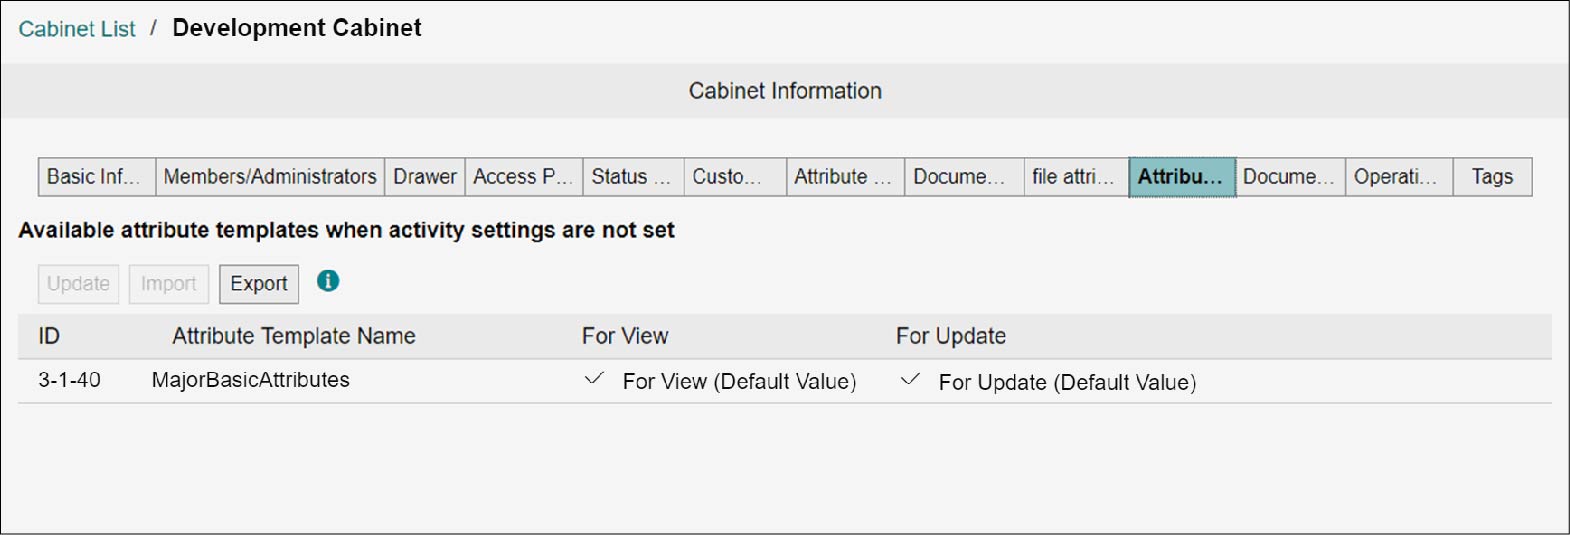
Updating Attribute Templates to Use for Cabinet
1.
Click [Update] of the displayed attribute templates.
The [Update Available Attribute Templates] screen appears.
2.
Set the attribute templates to use and click [Update].
The selected attribute templates are updated.
Importing Attribute Templates to Use for Cabinet
1.
Click [Import].
The [Import Available Attribute Templates] screen appears.
2.
Click [Select].
The file selection screen appears.
3.
Select an XML file to be imported and click [Open].
The selected file name is displayed on [XML Files].
4.
Click [Import].
The [Confirm Import] screen appears.
5.
Click [OK].
The attribute template is imported, and the [Import Complete] screen appears.
6.
Click [Close].
Exporting Attribute Templates to Use for Cabinet
1.
Click [Export].
The displayed attribute templates information is downloaded as an XML file.
Note
- The file name is "cabinetDefaultAttributeTemplateAssignment_{yyyyMMddHHmmss}.xml."
- Cabinet export data with attribute templates other than "MajorBasicAttributes" set in "Available attribute templates when activity settings are not set" cannot be imported into other offices.
Setting Document Type to Use for Cabinet
Set the document type to use for cabinet and the users/groups to be updated the document type.
1.
On the [Cabinet List] screen, click a cabinet name.
The [Cabinet Information] screen appears.
2.
In the [Basic Information] tab, set [Current Mode] to the maintenance mode..
Note
- When [Maintenance Mode] is set, the target cabinet cannot be used on the document screen.
- Change to normal mode after all operations are completed.
3.
Click the [Document Type Definition] tab.
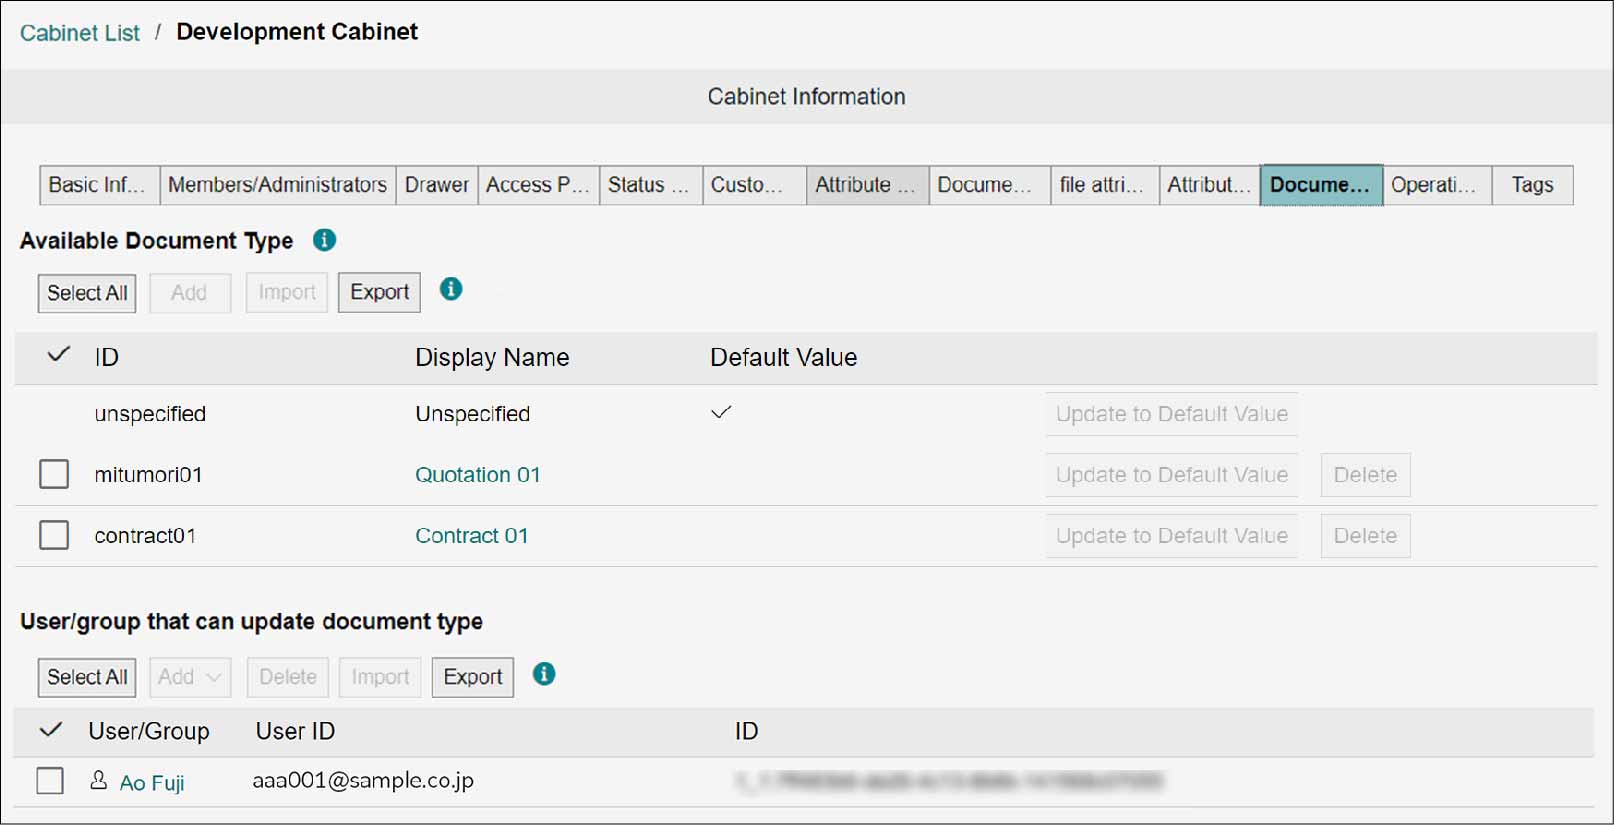
Adding Document Type to Use for Cabinet
1.
Click [Add] of [Available Document Type].
The [Add Available Document Type] screen appears.
2.
Select the checkbox of target document type and click [Add].
The selected document type is added.
Importing Document Type to Use for Cabinet
1.
Click [Import] of [Available Document Type].
The [Import Document Type] screen appears.
2.
Click [Select].
The file selection screen appears.
3.
Select an XML file to be imported and click [Open].
The selected file name is displayed on [XML Files].
4.
Click [Import].
The [Confirm Import] screen appears.
5.
Click [OK].
The document type is imported and the [Import Complete] screen appears.
6.
Click [Close].
Exporting Document Type to Use for Cabinet
1.
Click [Export] of [Available Document Type].
The displayed document type information is downloaded as an XML file.
Note
The file name is "cabinetAvailableDocumentTypes_{yyyyMMddHHmmss}.xml."
Setting Attribute Constraints of Custom Attribute Definitions for Each Document
1.
Click the document type name in [Available Document type] to set the attribute constraints.
The [Document Type Information] screen appears.
2.
Set the attribute constraints by referring Setting Attribute Constraints".
Setting Document-Identifying Attributes for Each Document Type
1.
Click the display name of document type in [Available Document Type] to set the document-identifying attributes.
The [Document Type Information] screen appears.
2.
Click the [Attribute Constraints] tab.
The [Attribute Constraint for Available Custom Attribute Definition] screen appears.
3.
Click [Update] of the custom attribute definitions whose attribute constraints are to be updated.
4.
Select the checkbox of [Usage Allowed], and click [Update].
The attribute constraints are updated.
5.
Click the [Document-Identifying Attributes] tab.
6.
Refer to steps 7 and 8 in "Setting Document-Identifying Attributes” to set the document-identifying attribute.
Setting the File Attributes to be Applied to Custom Attributes for Each Document Type
1.
In [Available Document Type], click the display name of the document type for which you want to set the file attributes to be applied to the custom attributes.
The [Document Type Information] screen appears.
2.
Click the [File Attribute Extraction] tab.
The [File Attributes to be Applied to Custom Attributes] screen appears.
3.
Refer to "Setting File Attribute Extraction" and set the file attributes to be applied to the custom attributes.
Setting Document Type as Default Value to Use for Cabinet
1.
Click [Set as Default] in [Available Document Type] to set the document type as a default value.
The selected document type is set as a default value.
Note
The document type set as a default value cannot be deleted.
Deleting Document Type to Use for Cabinet
1.
Click [Delete] in [Available Document Type] to delete the document type.
The [Available Document Type Deletion Confirmation] screen appears.
2.
Click [OK].
The selected document type is deleted and the [Document Type Deletion Complete] screen appears.
3.
Click [Close].
Adding Permitted User/Group to Update Document Type
1.
Click [Add from Address Book] under [Add] in [Permitted User/Group to Update Document Type].
2.
Select [Search Targets] and [Search Conditions], and click [Search].
A search result appears.
3.
Select the checkbox of target users/groups, and click [Add].
The [Add Results] screen appears.
4.
Click [Close] repeatedly until all the screens are closed.
The selected user or group will be added.
Note
To add all users, click [Add [All Standard Users]] under [Add] in [Permitted User/Group to Update Document Type].
Importing Permitted User/Group to Update Document Type
1.
Click [Import] in [Permitted User/Group to Update Document Type].
The [Import Members Who Can Update Document Type] screen appears.
2.
Click [Select].
The file selection screen appears.
3.
Select the XML file you want to import, and click [Open].
The selected file name is displayed on [XML Files].
4.
Click [Import].
The [Confirm Import] screen appears.
5.
Click [OK].
The users/groups to be updated the document type are imported and the [Import Complete] screen appears.
6.
Click [Close].
Exporting Permitted User/Group to Update Document Type
1.
Click [Export] in [Permitted User/Group to Update Document Type].
The displayed user information is downloaded as an XML file.
Note
The file name is "cabinetDocumentTypesChangeableMembers_{yyyyMMddHHmmss}.xml".
Deleting Permitted User/Group to Update Document Type
1.
Select the checkbox of target users/groups from [Permitted User/Group to Update Document Type], and click [Delete].
The [Deletion Confirmation of Permitted User/Group to Update Document Type] screen appears.
2.
Click [OK].
The selected users/groups are deleted and the [Deletion Completion of Permitted User/Group to Update Document Type] screen appears.
3.
Click [Close].
Setting Operation Log
The custom attribute definition will be recorded in a cabinet operation log. With the selected cabinet, display the list of operation log custom attribute definitions by the following procedure.
1.
On the [Cabinet List] screen, click a cabinet name.
The [Cabinet Information] screen appears.
2.
In the [Basic Information] tab, set [Current Mode] to the maintenance mode.
Note
- When [Maintenance Mode] is set, the target cabinet cannot be used on the document screen.
- Change to normal mode after all operations are completed.
3.
Click the [Operation Log Settings] tab.
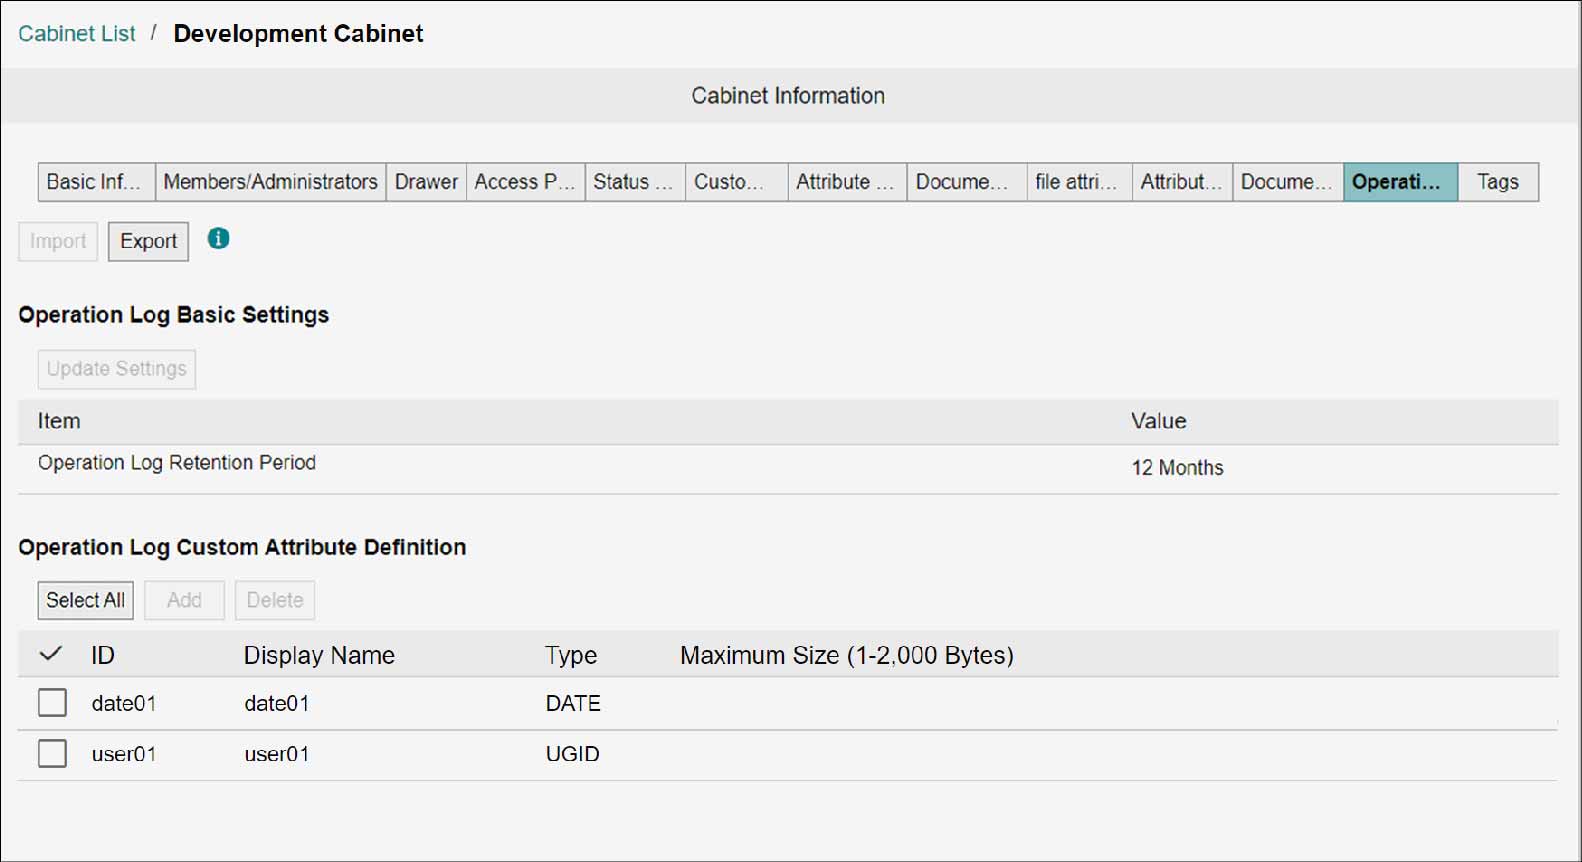
Changing the Operation Log Retention Period
1.
Click [Update Settings].
The [Update Operation Log Basic Settings] screen appears.
2.
Enter a time period for which the operation log will be retained, and click [Update].
The [Confirm] screen appears.
3.
Click [OK].
Adding Custom Attribute Definition
1.
Click [Add].
The [Add Operation Log Custom Attribute Definition] screen appears.
2.
Select the checkbox of the custom attribute definition you want to add, and click [Add].
The selected operation log custom attribute definition will be added.
Deleting Custom Attribute Definition
1.
Select the checkbox of the custom attribute definition you want to delete, and click [Delete].
The [Confirm Operation Log Custom Attribute Definition Deletion] screen appears.
Note
You can select multiple operation log custom attribute definitions for deletion.
2.
Click [OK].
The selected operation log custom attribute definition becomes deleted, and the [Operation Log Custom Attribute Definition Deletion Complete] screen appears.
3.
Click [Close].
Importing Custom Attribute Definition
1.
Click [Import].
The [Import Operation Log Custom Attribute Definition] screen appears.
2.
Click [Select].
The file selection screen appears.
3.
Select the XML file you want to import, and click [Open].
In [XML files], the selected XML file name appears.
4.
Click [Import].
The [Confirm Import] screen appears.
5.
Click [OK].
The operation log custom attribute definition will be imported. The operation log custom attribute definitions that were set until that point in time become deleted and updated in accordance with the contents of imported XML file, and then the [Import Complete] screen appears.
6.
Click [Close].
Exporting Custom Attribute Definition
1.
Click [Export].
The information of displayed operation log custom attribute definition is downloaded as an XML file.
Note
The file name becomes as follows: "cabinetOperationLogCustomAttributes_{Cabinet Name}_{yyyyMMddHHmmss}.xml"
Setting Automatic Tag Assignment
Set whether to automatically assign keywords from folder names and images.
1.
On the [Cabinet List] screen, click a cabinet name.
The [Cabinet Information] screen appears.
2.
In the [Basic Information] tab, set [Current Mode] to the maintenance mode.
Note
- When [Maintenance Mode] is set, the target cabinet cannot be used on the document screen.
- Change to normal mode after all operations are completed.
3.
Click the [Tag] tab.
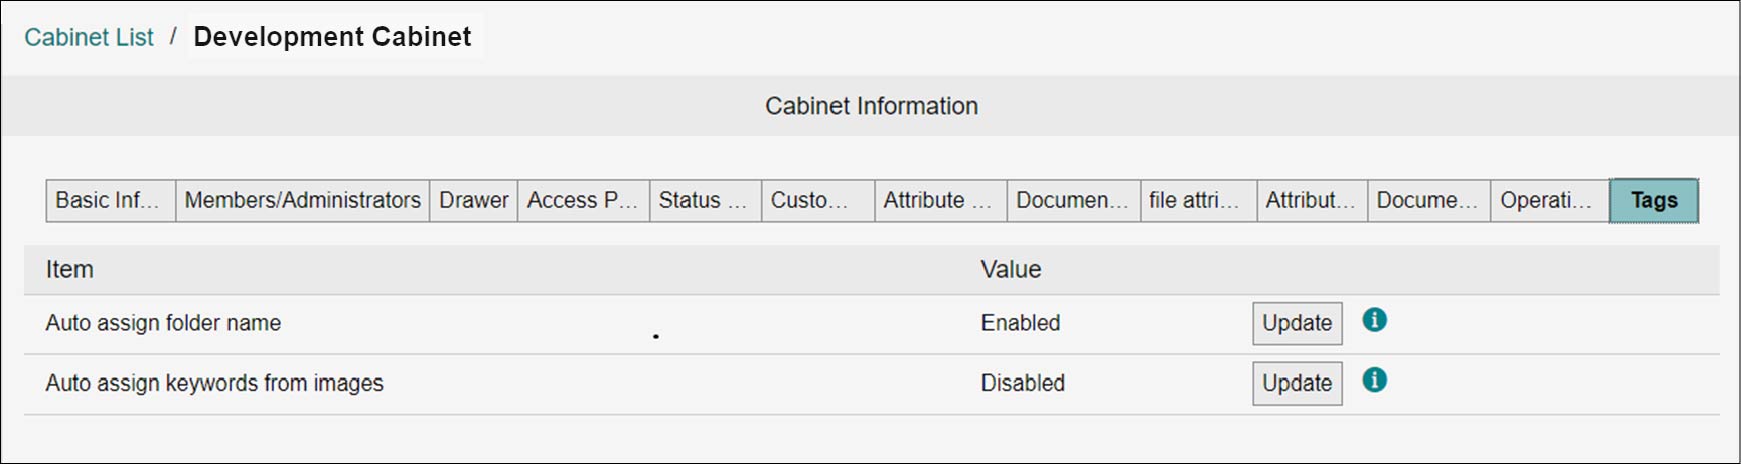
Assigning Folder Name Automatically
1.
Click [Update] for [Auto-Add Folder Name].
2.
Click [OK].
Adding Keywords from Images Automatically
1.
Click [Update] for [Auto-Add Keywords from Image].
2.
Select [Enabled (Japanese)] or [Enabled (English)] or [Disabled], and then click [Update].
Note
To enable [Auto-Add Keywords from Image], [Full-Text Search] option in cabinet settings must be set to [Enabled].