[Rule] Screen
Display the [Rule] screen by the following procedure.
Important
"Capture" and "Rules" described on this page refer to the features in the old product Smart Workstream Data Entry option. These are provided in File Management as compatibility features available only to customers who have purchased the old product.
1.
Click  in the upper left corner of the screen and click [File Management] in the Admin menu.
in the upper left corner of the screen and click [File Management] in the Admin menu.2.
From the menu, go to [Capture] and click [Rule].
Note
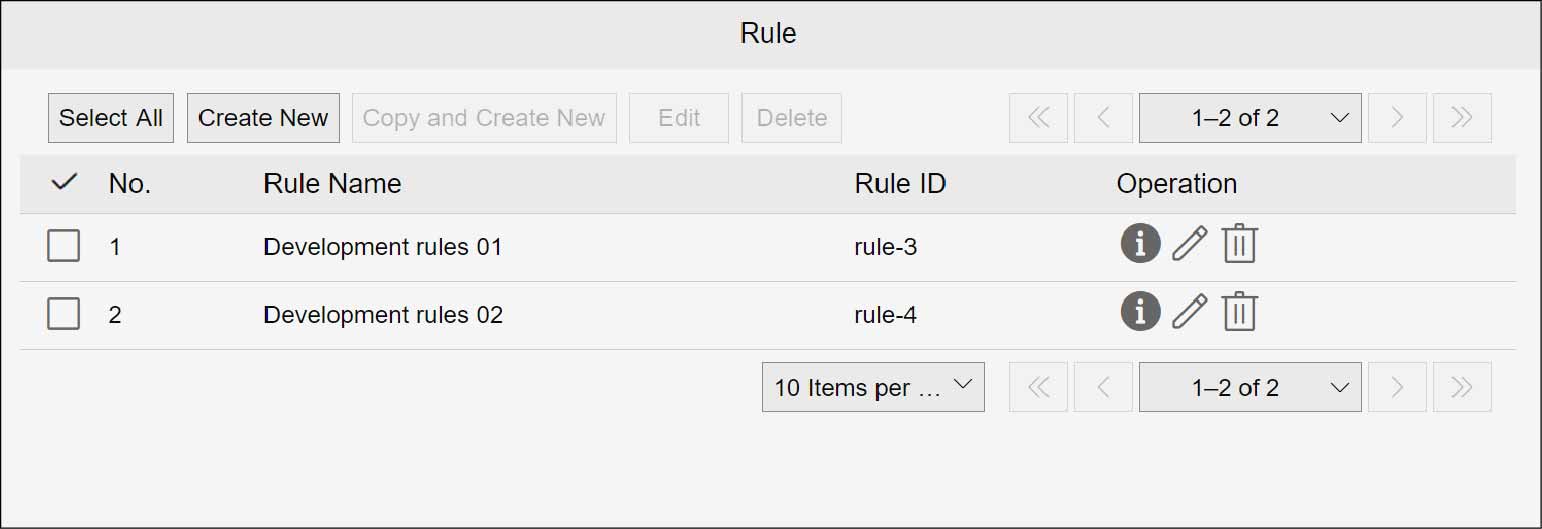
On the [Rule] screen, you can check the rule name and rule ID.
Creating New
Important
"Capture" and "Rules" described on this page refer to the features in the old product Smart Workstream Data Entry option. These are provided in File Management as compatibility features available only to customers who have purchased the old product.
1.
On the [Rule] screen, click [Create New].
The [Rule Settings] screen appears.
Note
- You can also create a new rule by copying the already created rule.
- When creating anew by copying, the setting contents of copy source are inherited.
2.
Click the [Scan Parameters] tab, [Document Processing] tab, [Destination] tab, and [Registration Process Parameter] tab, and set each of the items.
Note
- On the [Document Processing] and [Destination] tabs, you can set the following values: User Name $ {user Name}; Imported Date/Time (year) $ {yyyy}; Imported Date/Time (month) $ {MM}; Imported Date/Time (date) $ {dd}; Imported Date/Time (hour) $ {HH}; Imported Date/ Time (minute) $ {mm}; Imported Date/Time (second) $ {ss}; Page Count (after split) $ {pages}; File Name (before split) $ {originalFileName}; and Rule Name${ruleName}.
- When "$ {originalFileName}" is specified, it is set to a file name other than the extension.
Refer
- For the scan parameter, refer to "Setting Scan Parameters".
- For the document processing, refer to "Setting Document Processing".
- For the registration destination, refer to "Setting Destination".
- For registration process parameters, refer to "Setting Registration Process Parameters".
Setting Scan Parameters
(1) Click the [Scan Parameters] tab.
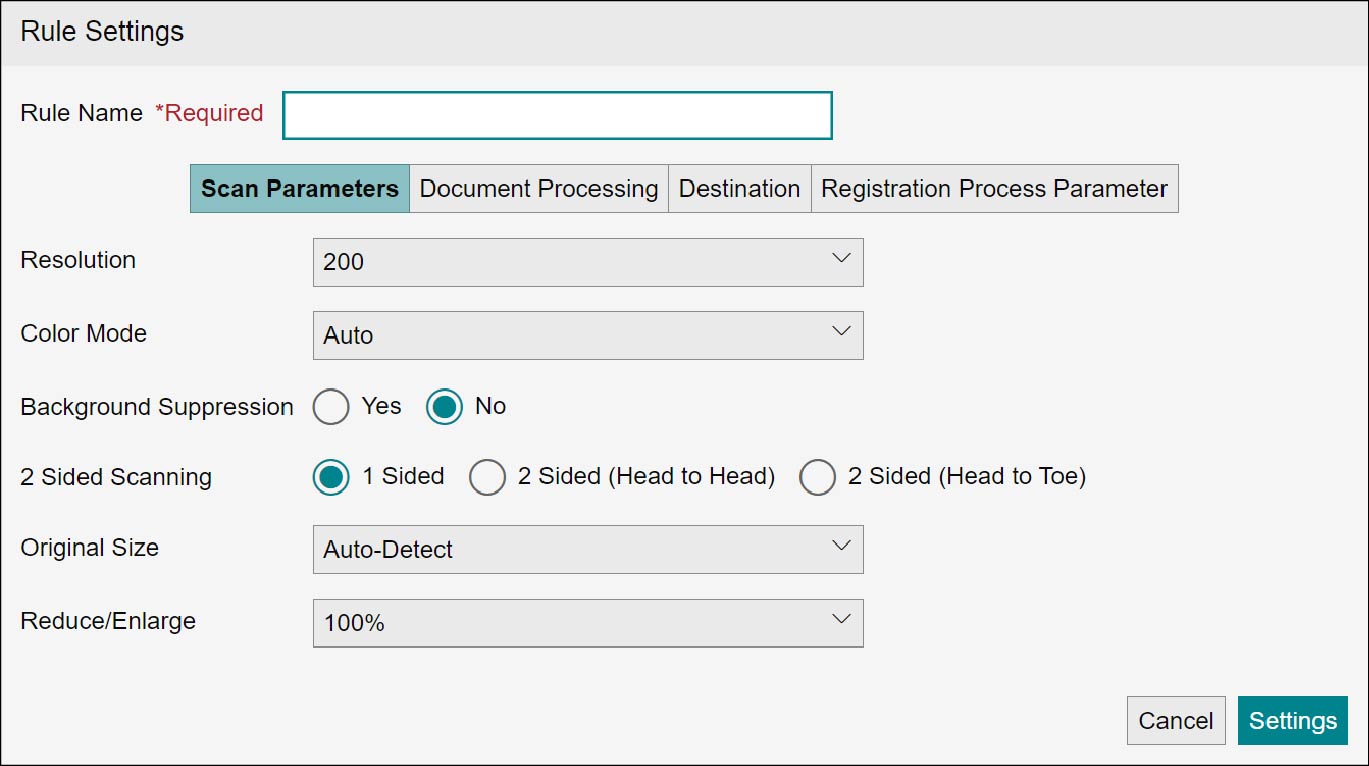
(2) Set [Resolution] and other items.
The following items can be set.
The following items can be set.
| Item | Description |
|---|---|
| Resolution | Select the scan resolution. The default value is 200. |
| Color Mode | Select the color mode. The default value is auto. |
| Background Suppression | Select whether to perform background suppression. The default value is No. |
| 2 Sided Scanning | Select the method of 2 sided scanning. The default value is 1 sided. |
| Original Size | Select the original size. The default value is auto-detect. |
| Reduce/Enlarge | Select reduce/enlarge. The default value is 100 %. |
Setting Document Processing
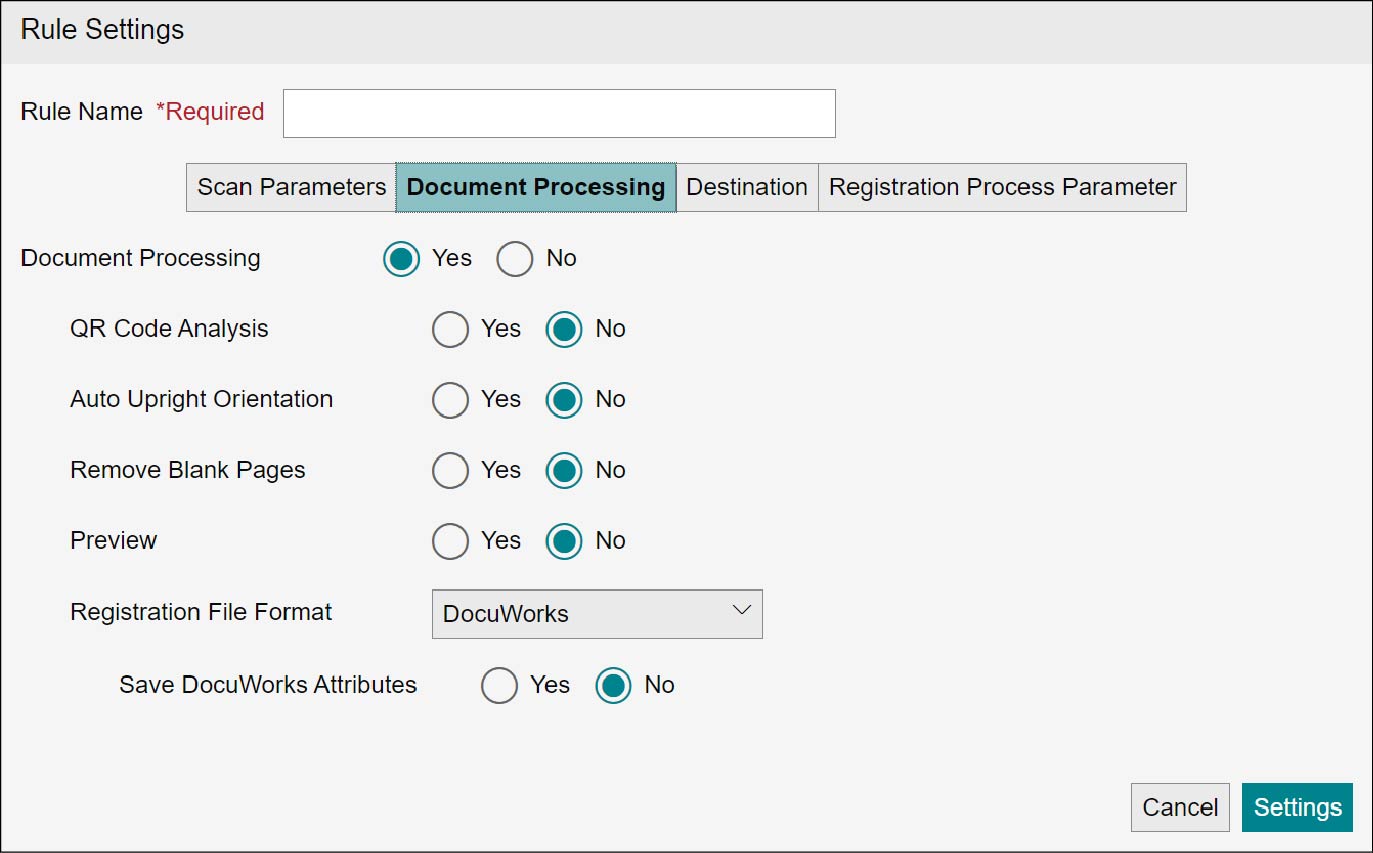
(1) Click the [Document Processing] tab.
Note
When [Yes] is selected with [QR Code Analysis], to the prefix, specify the string embedded in the leading part of QR code that is to be analyzed. The analysis will not be performed with QR codes having other than the string starting with prefix.
When empty string is specified, all the QR codes are analyzed.
(2) Set [Document Processing] and other items.
The following items can be set.
The following items can be set.
| Item | Description | ||
|---|---|---|---|
| Register As-Is | Select whether to register the document after processing it. The default value is No. |
||
| QR Code Analysis | Select whether to perform the QR code analysis in the document. If there is a QR code containing a prefix string in the document, the split document is created on the QR code page. Also, if various attributes are specified in the QR code, the contents of the rule or CSV parameter file are overwritten. The default value is No. |
||
| Scan Mode | Select the scan mode for QR code analysis. The default value is prioritize speed. | ||
| Scan Range | Select the range of the page to scan the QR code. The default value is all pages. | ||
| Prefix String | Specify the character string described in the first line of the character string in the QR code.Up to 100 characters can be entered. The analysis target is only the QR code whose specified character string is listed in the first line. The default value is no text. Specify "PROCESS" when using the QR created by the [Acquire QR Cover Sheet] operation of the process. |
||
| Delimiter Page | Select whether to delete the QR code. The default value is Do Not Delete. | ||
| Auto Upright | Select whether to perform the auto upright orientation by detecting Japanese in the document. The default value is No. |
||
| Remove Blank Pages | Select whether to remove blank pages. The default value is No. | ||
| Preview | Select whether to confirm the scanned document and attribute to be set before registering documents. If [Yes] is selected, automatic registration is not performed. Perform the registration or cancellation. When using this item for [Capture], the settings of [Capture] is prioritized. The default value is No. |
||
| Registration File Format | Select the registration file format for [Document]. The default value is DocuWorks. | ||
| Save DocuWorks Attributes | Selectable when the registration file format is DocuWorks. The default value is No. Note
|
||
Setting Destination
(1) Click the [Destination] tab.
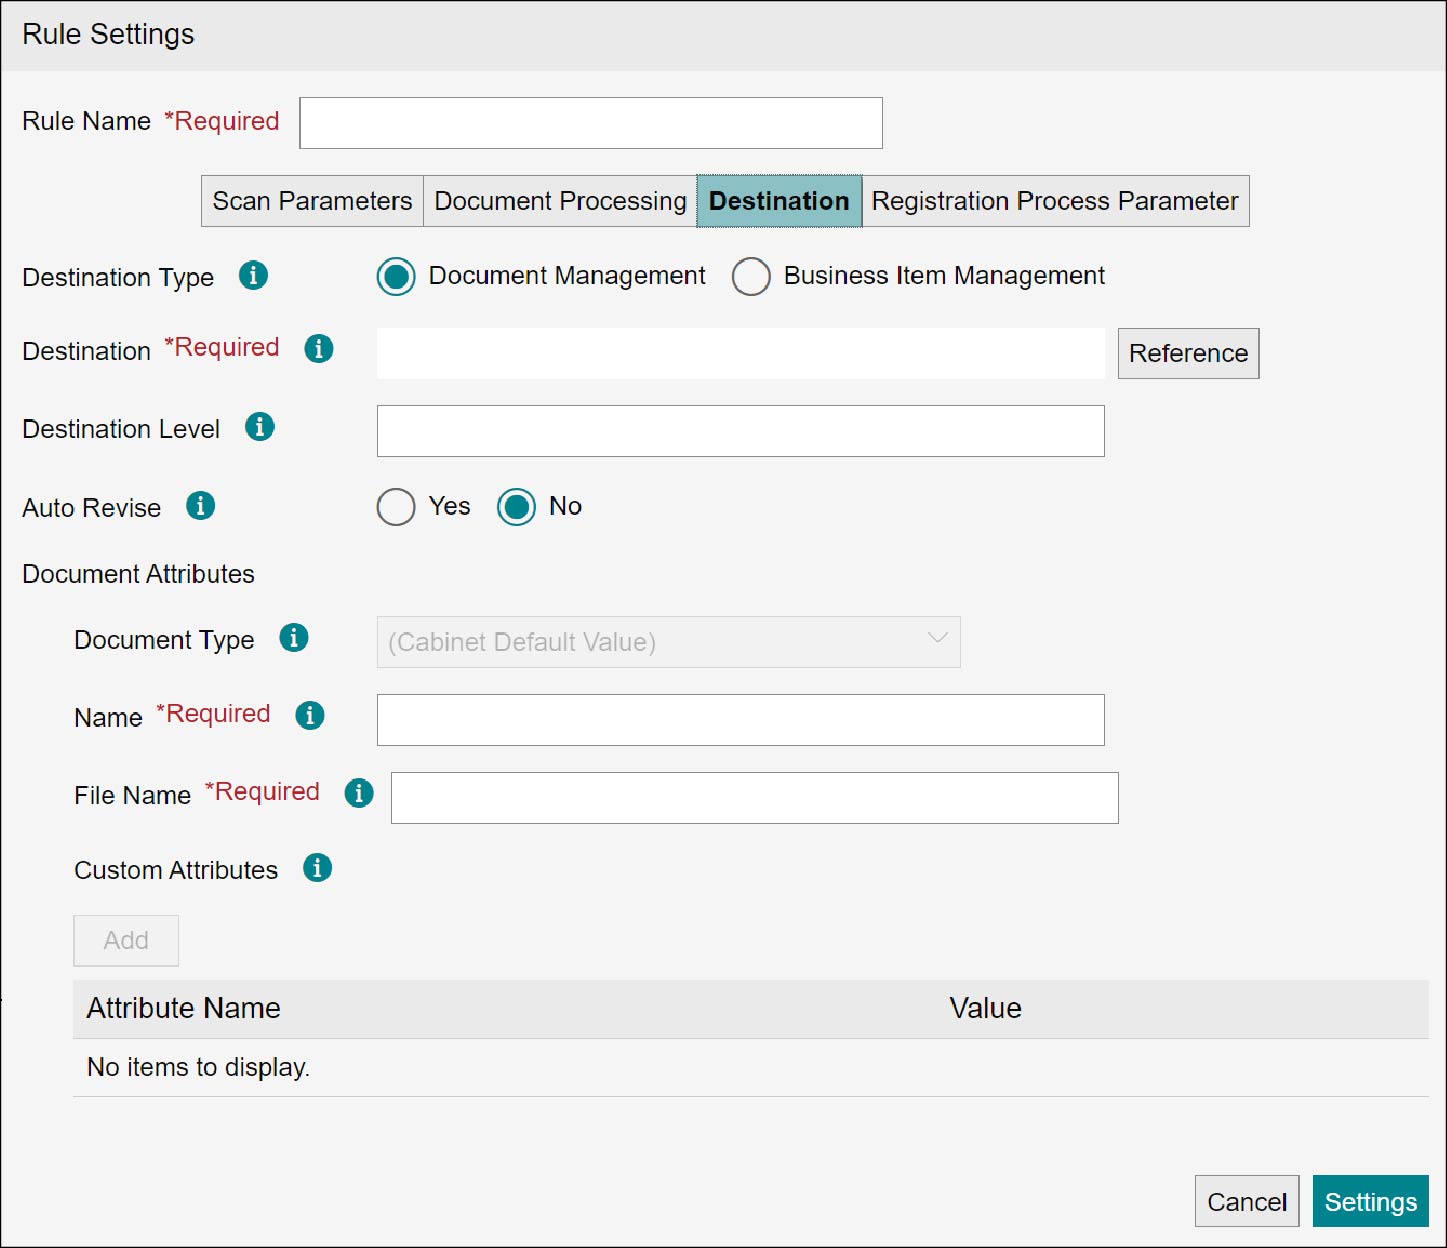
(2) Set up [Destination Type].
The items that can be set vary depending on the item selected in [Destination Type]. The following items can be set.
- When [File Management] is selected
Item Description Destination Select the destination. If [Destination Level] has been specified, it will be used as the base for [Destination Level]. Destination Level Specify the destination level by slash delimiter. The folder is created anew if the specified folder does not exist.
The default value is no text. Up to 100 characters can be entered.Auto Revise Select whether to perform auto revise.
When [Yes] is selected, the document will be automatically revised and registered if there is a document that has the same custom attribute value as a preset document-identifying attribute in the cabinet.
The default value is No.
Note- When [Yes] is selected and if a document with matching attribute value does not exist, a new document will be created.
- When [No] is selected and if a document with matching attribute value exists, the current document will not be registered, and a unique constraint violation error will occur.
- When [No] is selected and if a document with matching attribute value does not exist, a new document will be created.
ReferFor the settings of document-identifying attribute, refer to “Setting Document-Identifying Attributes” and “Setting Document-Identifying Attributes for Each Document Type”.Document Type Select the document type.
The default value is the cabinet default value.
NoteYou can select only the document types that are preset in the destination cabinet.Document Attributes Set up document attributes. Name Specify the name.
Up to 100 characters can be entered.File Name Specify the file name.
Up to 100 characters can be entered.Custom Attributes Specify the custom attributes.
Define custom attributes for the destination cabinet.
The following values can be specify as attributes.
- String type: up to 2,000 bytes (UTF-8 conversion)
NoteThe maximum size set in custom attribute definitions is prioritize. - Boolean value type: true or false
- Date/time type: 0001-01-01 00:00:00.000 to 2999-12-31 23:59:59.999
- Short integer type: -2,147,483,648 to 2,147,483,647
- Integer type: -9,007,199,254,740,991 to 9,007,199,254,740,991
- Decimal type: 2.2250738585072014E-308 to 1.7976931348623157E308, -2.2·250738585072014E-308 to -1.7976931348623157E308, 0
- Users/groups type: selection system
- When [Business Item Management] is selected
Item Description Process Type Select either [Register Document] or [Evidence Attribute Update]. Business Item Select the business item to register. Capture Link Settings Select the Capture Link Settings configuration to be used when registering the business item.
This option cannot be selected when [Business Item] has not been set up.Case Name Enter a name for the case.
NoteIf you choose to select [Enabled] for [Linked Attribute Name to Use as Case Key Value] set in [Capture Link Settings] under [Process], then this item should be left blank.Evidence Name Enter a name for the evidence.
NoteIf you choose to select [Enabled] for [Evidence Name Specification Method] set in [Capture Link Settings] under [Process], then this item should be left blank.Attribute Add an attribute.
Click [Add], and enter items such as [Attribute Name] and [Value].
Setting Registration Process Parameters
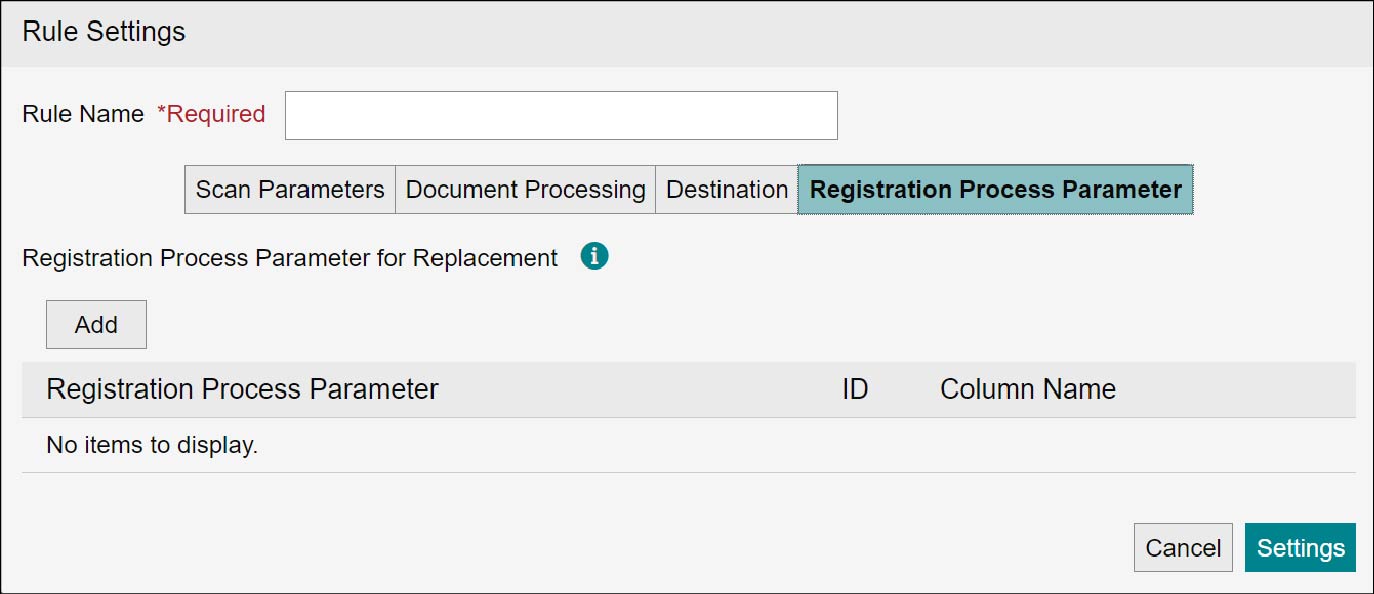
(1) Click [Registration Process Parameter].
(2) Set the targeted registration process parameters for replacement. The following items can be set:
| Item | Description | |
|---|---|---|
| Registration Process Parameter for Replacement | Configure replacement settings so that header names in CSV files or QR codes output from another system are interpreted as FUJIFILM IWpro File Management's attribute names. Click [Add] to add a registration process parameter (attribute) to be interpreted as. | |
| Registration Process Parameter | Displays attributes name added as registration process parameters. | |
| ID | Displays IDs of the attributes added as registration process parameters. | |
| Header Name | Enter the header name in CSV files to be replaced. The default value is NULL. Up to 100 characters can be entered. | |
Note
- Duplicate header names cannot be set in a rule.
- The following characters cannot be set:
- The same string as the ID for the registration process parameter
- A string beginning with the wording "custom:"
- A string beginning with the wording "dwUserAttr"
Refer
For information on registration process parameters that can be set, refer to "Capture Operation Guide."
3.
Click [Settings].
The rule will be created.
Displaying Information
Important
"Capture" and "Rules" described on this page refer to the features in the old product Smart Workstream Data Entry option.
These are provided in File Management as compatibility features available only to customers who have purchased the old product.
These are provided in File Management as compatibility features available only to customers who have purchased the old product.
1.
Click  of an arbitrary rule.
The [Rule Settings] screen for the selected rule appears.
2.
Click the [Scan Parameters] tab, [Document Processing] tab, [Destination] tab, or [Registration Process Parameter] tab.
The detailed information of selected rule is displayed.
3.
Click [Close].
Note
When the information is displayed, editing of rule becomes unavailable.
Edit
Important
"Capture" and "Rules" described on this page refer to the features in the old product Smart Workstream Data Entry option. These are provided in File Management as compatibility features available only to customers who have purchased the old product.
1.
Select the checkbox of an arbitrary rule, and click [Edit].
The [Rule Settings] screen for the selected rule appears.
Note
Clicking  of an arbitrary rule also displays the [Rule Settings] screen and allows you to edit the selected rule.
2.
For the operations thereafter, refer to procedures 2 to 3 of "Creating New".
The rule will be updated.
Delete
Important
"Capture" and "Rules" described on this page refer to the features in the old product Smart Workstream Data Entry option. These are provided in File Management as compatibility features available only to customers who have purchased the old product.
1.
Select the checkbox of the rule you want to delete, and click [Delete].
The [Confirm Deletion] screen appears.
Note
- You can select multiple rules for deletion.
- Clicking
 of an arbitrary rule also allows you to delete the rule.
2.
Click [Yes].
The selected rule will be deleted.