[Add Output Destination] Screen
This screen is displayed by clicking [Add Output Destination] or [![]() ] > [Edit] for an output destination on the [Output Destination Settings] screen.
] > [Edit] for an output destination on the [Output Destination Settings] screen.
Configures the output destination and information to output.
The displayed screen depends on the information selected in [Service].
- When registering a new file, the file is registered according to the access privileges set for the user in the storage destination service.
- The file name and folder name follow the character entry conventions of the output destination service. Check the output destination service for details.
Screen when [Service] Is Set to [Workspace]/[File Management]/[Working Folder]/[Box]/[Dropbox]/[Google Drive]/[OneDrive for Business]/[SharePoint Online]
This screen enables you to upload the file generated with attribute extraction to the selected external storage service. You can also upload original documents.
- If a folder with the same name already exists in Google Drive, do not specify the corresponding folder as the storage destination of Google Drive.
- When [OneDrive for Business] or [SharePoint Online] is set as the output destination, the link to the stored file is displayed for all users. The link also cannot be edited.
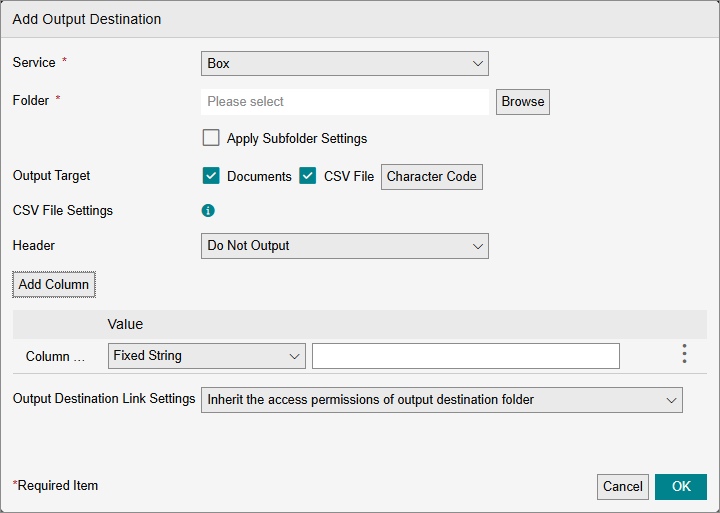
[Service]
Select the external storage to upload the files to.
- If you select [Working Folder] and multi-factor authentication is enabled in Working Folder, a login screen is displayed. You can select a folder after logging in.
[Folder]
Select the parent folder for the output destination. This is not displayed if [Default Output Destination] is selected in the list of output destinations on the [Output Destination] screen.
- A subfolder cannot be created if a Workspace personal postbox or tray is selected in [Folder].
- If [SharePoint Online] is selected in [Service], you can search for a site name on the folder selection screen to filter the displayed sites. Enter a string that can be found when searched for in SharePoint. Some sites cannot be found by entering a partial site name but can be found by entering the complete site name.
- If [Box] is selected for [Service], data is output based on the folder ID.
- Data will be output to the specified folder even if the name of the folder is changed, as the folder ID will remain the same.
- Data will be output to the specified folder even if the folder is moved to another location.
- If the specified folder is deleted and a folder with the same name is created, an error will occur when data is output because the folder ID differs. In that case, select the folder again.
- If [Workspace] is selected for [Service], data is output based on the ID of the folder, personal postbox, or tray.
- Data will be output to the specified Workspace output destination even if the name of the output destination is changed, as the ID will remain the same.
- Data will be output to the specified Workspace output destination even if the output destination is moved.
- If the specified Workspace output destination is deleted and an output destination with the same name is created, an error will occur when data is output because the ID differs. In this case, select the Workspace output destination again.
- If you select [Dropbox] for [Service] and select a Dropbox shared folder in [Folder], the folder will become unable to be identified as the output destination if sharing is canceled in Dropbox after the rule is created. In that case, set the output destination for the rule again.
- If you select [Dropbox] for [Service] and select a Dropbox team member folder in [Folder], the folder will become unable to be identified as the output destination if the user name is changed in Dropbox after the rule is created. In that case, set the output destination for the rule again.
[Apply Subfolder Setting]
Configures whether to store files in a subfolder below the folder selected in [Folder]. If a subfolder does not exist, it is created.
- When [Apply Subfolder Setting] is enabled, the files are output to the subfolder set when executing the rule. If multiple folders with the same name exist in the service of the output destination, the subfolder found first in the search is output.
- If a subfolder is not set on the [Output Destination] screen, a subfolder is not created.
[Output Target]
Selects whether to output a document or a CSV file. If you select [CSV File], [Character Code] and the CSV output settings are displayed.
[Character Code]
Select the character encoding for the CSV file on the displayed screen.
[Header]
Configures whether to output a header to the CSV file. If you select [Output], the header settings are displayed and you can configure them.
You can select an arbitrary string or attributes extracted with other operations as the header string and values to output to the CSV file.
[Line Item]
Configures whether to output line items to the CSV file. This item is displayed for a form configured to extract line items.
[CSV Format]
Select the format for outputting line items.
If you select [Table Format], a column is added to the CSV output list and the line items are added to that column.
If you select [Single Line Format], [Line Item to Output] is displayed. Select the line items to output on the screen displayed by clicking [Settings].
In either case, only the line items selected to be output in the form are displayed.
[Add Column]
Adds one column.
[Batch Add Workspace Attributes]
This is displayed when a workspace is selected in [Input]. Click this and select [Add] on the displayed screen to output the attributes configured in the input settings to the end of the CSV file.
CSV Output List
Displays the information (column number, header, value, and operation) to output to the CSV file. Click [![]() ] to enable [Move Up] and [Move Down] for moving the item.
] to enable [Move Up] and [Move Down] for moving the item.
You can click [Delete] to delete an item from the list.
- If a header or value in the CSV file to output is blank, it will also be output blank to the CSV file.
[Header]
Configure the string for the header. The header column is displayed when [Output] is set in [Header].
[Value]
Select [Fixed String] or the attribute to extract.
Value Settings
Configure the data to output as values.
[Output Destination Link Settings]
If you set [Service] to [Box], [Dropbox], or [Google Drive], you can select [Inherit the access permissions of output destination folder] or [Accessible to everyone who knows the link].
If you set [Service] to [OneDrive for Business] or [SharePoint Online], you can select [Inherit the access permissions of output destination folder] or [Follow the shared link settings of output destination service].
- [Output Destination Link Settings] is only displayed if [Service] is set to either of the following.
- Box
- Dropbox
- Google Drive
- OneDrive for Business
- SharePoint Online
Screen when [Service] Is Set to [Microsoft Teams]
This screen enables you to send the values specified in the sent message to an arbitrary channel. You can also upload files to Microsoft Teams.
- When [Microsoft Teams] is set as the output destination, the link to the stored file is displayed for all users. The link also cannot be edited.

[Service]
Select [Microsoft Teams].
[Teams]
Select one of the displayed teams as the team to set as the mention destination.
[Channels]
Select one of the channels in the team selected in [Team] as the channel to set as the mention destination.
[Register File]
Configures whether to upload files to the channel. If you select [Yes], select the destination folder in [Folder].
[Apply Subfolder Setting]
Configures whether to store files in a subfolder below the folder selected in [Folder]. If a subfolder does not exist, it is created.
[Message to Send]
Enter an arbitrary message or select one of the displayed messages.
[Mention Destination]
Configure the mention type and mention destination on the screen displayed by clicking [Add].
Screen when [Service] Is Set to [kintone]
This screen enables you to add new records to the specified kintone app.
You can specify attributes for each field. You can also specify a file in the attachment field to upload a document.
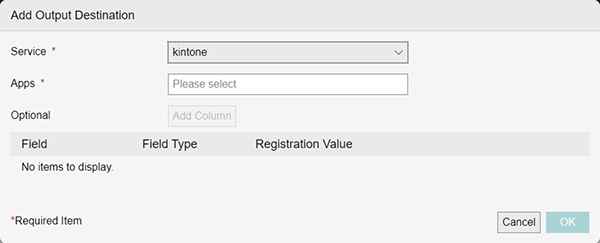
[Service]
Select [kintone].
[Apps]
Select the app to register the new record to.
[Field]/[Field Type]/[Registration Value]
Configures the required fields and optional fields. To add a field as an optional field, click [Add Column] to add a column before configuring the settings. You can click [![]() ] to delete a field.
] to delete a field.
- When registering a new record, fields cannot be added to the record if [Registration Value] is blank.
- When a date/time field is displayed in kintone, it is displayed according to the time zone settings in kintone, regardless of whether the date/time was entered in the UTC date/time format or local date/time format.
- The values of date fields and time fields are overwritten in the local date/time format of the time zone set for this service (in the rule settings) when registered.
- Apps created in a guest space of kintone are not supported.
Screen when [Service] Is Set to [Salesforce]
This screen enables you to add new opportunity records to Salesforce.
You can specify attributes for each field.
You can also upload files.
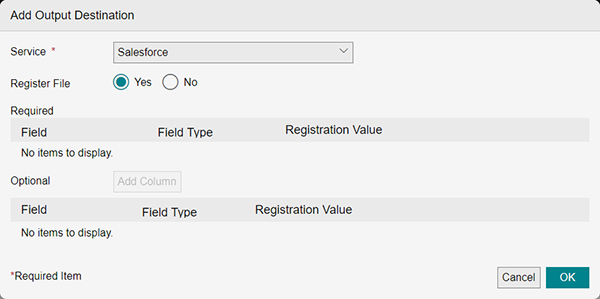
[Service]
Select [Salesforce].
[Register File]
Configures whether to upload files to a record.
[Field]/[Item Type]/[Registration Value]
Configures the required fields and optional fields. To add an item to an optional field, click [Add Column]. You can click [![]() ] to delete a field.
] to delete a field.
- When registering a new record, fields cannot be added to the record if [Registration Value] is blank.
Screen when [Service] Is Set to [Local PC] or [External Link (API Link)]
This screen enables you to upload the file generated with attribute extraction to the selected external storage service. You can also upload original documents.
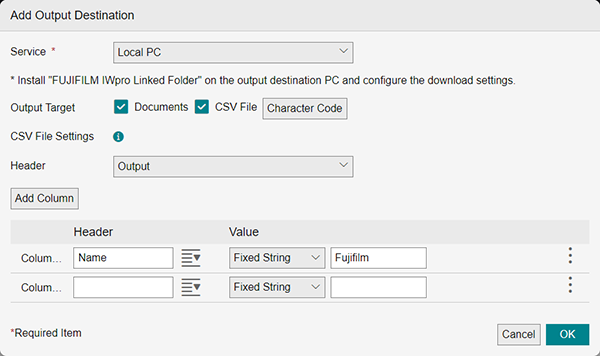
[Service]
Select [Local PC] or [External Link (API Link)].
[Apply Subfolder Setting]
Configures whether to store files in a subfolder. If a subfolder does not exist, it is created.
This setting is only valid when the output destination is set to [Local PC.]
- If multiple folders with the same name exist in the service of the output destination, the files are output to the subfolder found first in the search.
- If a subfolder is not set on the [Output Destination] screen, a subfolder is not created.
[Output Target]
Selects whether to output a document or a CSV file. If you select [CSV File], [Character Code] and the CSV output settings are displayed.
[Character Code]
Select the character encoding for the CSV file on the displayed screen.
[Header]
Configures whether to output a header to the CSV file. If you select [Output], the header settings are displayed and you can configure them.
You can select an arbitrary string or attributes extracted with other operations as the header string and values to output to the CSV file.
[Line Item]
Configures whether to output line items to the CSV file. This item is displayed for a form configured to extract line items.
[CSV Format]
Select the format for outputting line items.
If you select [Table Format], a column is added to the CSV output list and the line items are added to that column.
If you select [Single Line Format], [Line Item to Output] is displayed. Select the line items to output on the screen displayed by clicking [Settings].
In either case, only the line items selected to be output in the form are displayed.
[Add Column]
Adds one column.
[Batch Add Workspace Attributes]
This is displayed when a workspace is selected in [Input]. Click this and select [Add] on the displayed screen to output the attributes configured in the input settings to the end of the CSV file.
CSV Output List
Displays the information (column number, header, value, and operation) to output to the CSV file. Click [![]() ] to enable [Move Up] and [Move Down] for moving the item.
] to enable [Move Up] and [Move Down] for moving the item.
You can click [Delete] to delete an item from the list.
[Header]
Configure the string for the header. The header column is displayed when [Output] is set in [Header].
[Value]
Select [Fixed String] or [Data].
Value Settings
Configure the data to output as values.
Screen when [Service] Is Set to [External Link (HTTP Link)]
This screen enables you to send files (download URLs) and attributes to an external service that can receive HTTP requests.
- The request header cannot be configured.
- The authentication function of the destination service is also not supported. The customer is responsible for appropriately configuring and operating the destination service.
- For information on the settings for the destination service, see the manual of the destination service.
- For details on the HTTP requests and the API for sending notification on the results from an external service, see the following.
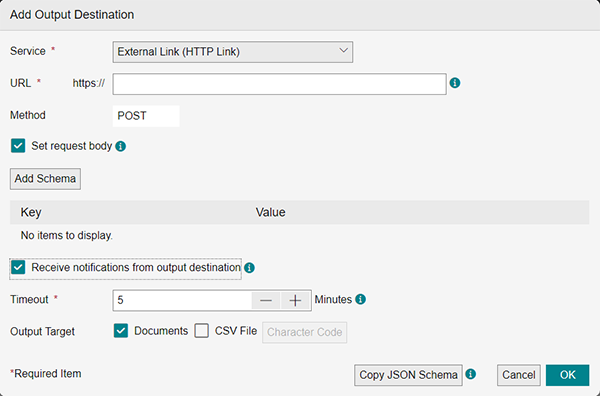
[Service]
Select [External Link (HTTP Link)].
[URL]
Enter the URL of the HTTP method for the external service including "https://".
[Set request body]
Select this check box to send the information extracted with the rule as the request body.
If you select this, the schema key and value settings are displayed and can be configured.
[Add Schema]
Adds one column.
List of Schemas
Displays the information (key and value) to output. Click [![]() ] to enable [Move Up] and [Move Down] for moving the item.
] to enable [Move Up] and [Move Down] for moving the item.
[Key]
Configure the string for the key.
[Value]
Select [Fixed String] or [Data].
[Setting value]
Configure the data to output as values.
[Receive notifications from output destination]
Select this check box to receive notifications from the destination service.
- If you select it, the timeout settings are displayed and can be configured.
- If you do not select it, Import Document jobs are displayed as having been processed, regardless of the process results of the output destination service. Check the process results of the output destination service separately.
[Timeout]
Configures the number of minutes to wait for notifications from the output destination.
[Output Target]
Selects whether to output a document or a CSV file. If you select [CSV File], [Character Code] and the CSV output settings are displayed.
- This item is not displayed if the [Store Original Document] or [Output Email Message as PDF] check box is selected on the [Output Destination] screen.
[Character Code]
Select the character encoding for the CSV file on the displayed screen.
[Header]
Configures whether to output a header to the CSV file. If you select [Output], the header settings are displayed and you can configure them.
You can select an arbitrary string or attributes extracted with other operations as the header string and values to output to the CSV file.
[Line Item]
Configures whether to output line items to the CSV file. This item is displayed for a form configured to extract line items.
[CSV Format]
Select the format for outputting line items.
If you select [Table Format], a column is added to the CSV output list and the line items are added to that column.
If you select [Single Line Format], [Line Item to Output] is displayed. Select the line items to output on the screen displayed by clicking [Settings].
In either case, only the line items selected to be output in the form are displayed.
[Add Column]
Adds one column.
[Batch Add Workspace Attributes]
This is displayed when a workspace is selected in [Input]. Click this and select [Add] on the displayed screen to output the attributes configured in the input settings to the end of the CSV file.
CSV Output List
Displays the information (column number, value, and operation) to output to the CSV file. Click [![]() ] to enable [Move Up] and [Move Down] for moving the item.
] to enable [Move Up] and [Move Down] for moving the item.
[Value]
Select [Fixed String] or [Data].
Value Settings
Configure the data to output as values.
[Copy JSON Schema]
Copies the structure of the request body to send to the external service to the clipboard in the JSON schema.
Screen when a rule with [Output Local PC Documents] set for the template is selected
This setting is used to attach and import a CSV file including parameters from FUJIFILM IWpro Linked Folder.
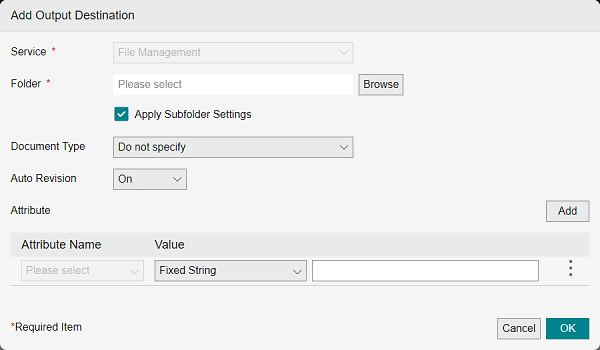
[Service]
Set to [File Management]. Cannot be changed.
[Folder]
Selects the cabinet of File Management.
[Apply Subfolder Setting]
Configures whether to store files in a subfolder below the cabinet selected in [Folder]. If a subfolder does not exist, it is created.
- When [Apply Subfolder Setting] is enabled, the files are output to the subfolder set when executing the rule. If multiple subfolders with the same name exist in the service of the output destination, the subfolder found first in the search is output.
- If a subfolder is not set on the [Subfolder Setting] screen, a subfolder is not created.
[Document Type]
Selects the document type. If you select [Do not specify], the default document type is used. If you configure input parameters, the document type that matches the input parameters is used.
[Auto Revision]
When this is set to [On], a document is automatically registered as a revision if there is a document that matches the custom attribute value set as the document identification attribute in the cabinet in advance.
- For details on [Auto Revision], see the manual for File Management.
[Attribute]
Adds one setting line to the list of attribute settings.
- For information on the types and ranges of values that can be configured, see Regarding Attributes in "Getting Started with FUJIFILM IWpro".
List of Attribute Settings
Displays the attribute settings. [Delete] can be selected by clicking [![]() ]. You can click [Delete] to delete an item from the list.
]. You can click [Delete] to delete an item from the list.
[Attribute Name]
Enables the attributes set in the cabinet selected in [Folder] to be selected.
[Value]
Select a value from the drop-down list.
If you select [Fixed String], enter an attribute value using 0 to 100 characters.