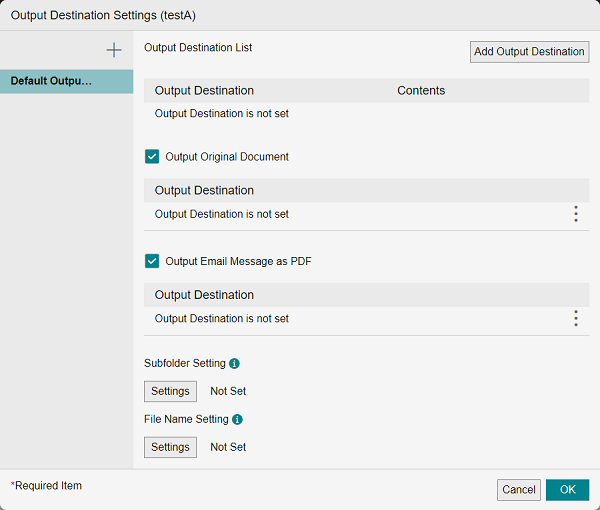
[Output Destination Settings] Screen
This screen is displayed by selecting a rule in the rule list and clicking [Output Destination Settings] on the [Rule List] screen.
It enables you to configure the output destination.
- When a rule with [Output Local PC Documents] set for the template is selected, you can only configure the output destination list, [Subfolder Setting], and [File Name Setting].

[ ]
]
Enables you to an output destination to the output destination list.
You can add up to 20 output destinations. However, only three can be added if [Identify and Output Form] or [Identify and Output Form to Workspace] is selected for the rule template.
Output Destination List
A list of the output destinations displayed in the rule chart.
[ ]
]
You can click [Move Up] or [Move Down] to change the display order.
You can click [Change Name] to change the name.
You can click [Delete] to delete an output destination from the list.
Output Conditions
Displays all the output conditions set on the [Condition Settings] screen. You can add up to 10 items. If you configure multiple conditions, all the conditions must be met.
Click [Settings] to display the [Condition Settings] screen and edit the output condition.
You can click [Delete] to delete an output condition.
[Add Condition]
Enables you to set an output condition to branch the file storage destination. Displays the [Condition Settings] screen.
Output Destination List
Displays a list of the output destinations and information to output.
[ ]
]
You can click [Move Up] or [Move Down] to change the display order.
Click [Settings] to display the [Add Output Destination] screen.
You can click [Delete] to delete an item from the list.
[Add Output Destination]
Displays the [Add Output Destination] screen.
[Output Original Document]
Configures whether to display the output destination of the original document.
Output Destination of Original Document
When the [Output Original Document] check box is selected, displays the output destination of the original document and the data that has been output.
[ ]
]
Click [Settings] to display the [Add Output Destination] screen.
You can click [Delete] to delete an item from the list.
[Output Email Message as PDF]
Configures whether to display the output destination of the e-mail message.
- This item is only displayed when importing e-mail in Exchange Online.
Output Destination of E-mail Message
When the [Output Email Message as PDF] check box is selected, displays the output destination of the e-mail message and the data that has been output.
[ ]
]
Click [Settings] to display the [Add Output Destination] screen.
You can click [Delete] to delete an item from the list.
[Subfolder Setting]
Displays the [Subfolder Setting] screen.
[File Name Setting]
Displays the [File Name Setting] screen.
When the original document is output, the string "_original" is added to the end of the file name.
When the e-mail message is output, the string "_mail" is added to the end of the file name.
If the output destination service is set to something other than [Local PC] or [External Link (API Link)], up to 100 characters can be entered for the file name. The file name cannot be left blank.
When the output destination service is set to [File Management], [Workspace], [File Management], [Working Folder], [Box], [Dropbox], [Google Drive], [OneDrive for Business], or [SharePoint Online], up to 256 characters can be entered for the combined folder path and file name.
[OK]
Saves the settings.