Perform Data Validation on Document Attribute Information
Perform Data Validation on Document Attribute Information from the Quick Menu
Refer
For information on the quick menu, refer to "Quick Menu".
Procedure
1.
Select the document to perform data validation on the attribute information.
- You can select multiple documents.
- You can select up to 100 documents at a time.
2.
From the Quick Menu, select [Data Validation].
3.
On the [Settings - Data Validation] screen, specify [Document Language].
4.
If you want to apply the user lock during Data Validation, select the [Apply user lock during Data Validation] checkbox.
5.
In the [Attributes] tab, specify [Target Attribute Group].
6.
If you want to display all the attributes registered to the document during Data Validation, select the [Display all attributes registered to the document] checkbox.
7.
Perform the following operations as necessary.
- Attributes to Overwrite After Data Validation
- Values to Validate
8.
In the [Line Items] tab, perform the following operations as necessary.
- Items to Display
- Items to Overwrite After Data Validation
- Values to Validate
9.
Click [OK].
10.
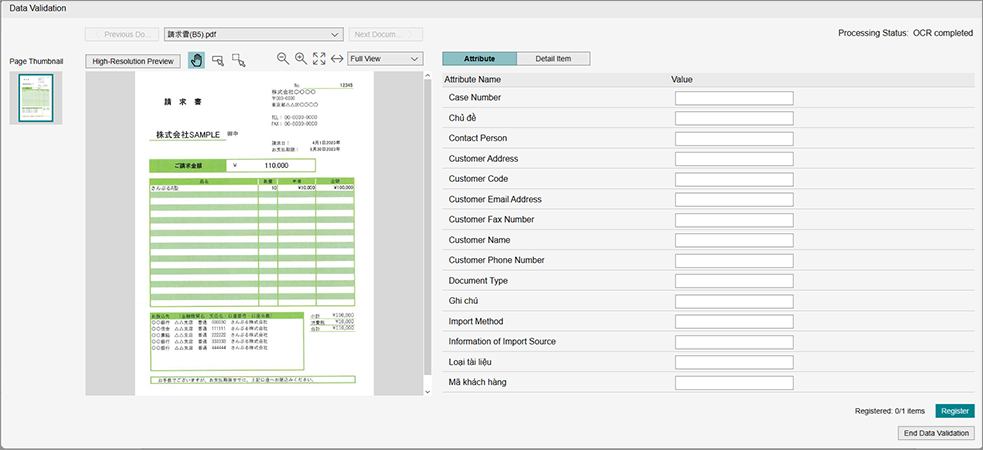
On the [Data Validation] screen, check whether the attribute values and line items read from the form are correct.
The right pane of [Attribute] displays the document attributes imported in the workspace, and the right pane of [Line Item] displays the line items.
Note
- User/group type attributes are not displayed on the [Data Validation] screen because they are not available for data validation.
- The line items are displayed with the names and order configured in the line item extraction settings. They are not displayed with the actual line item names.
Refer
- For information on configuring line item extraction, see "[Form Type Setting] Screen".
11.
To change values, perform the following operations.
-
To change a value with text entry
- Change the value in the right pane.
-
To select an item from the scanned area
- Select [
 ].
]. - Select the value to change in the right pane.
-
In the preview, click the location to set as the value.
The clicked location is read as text and set as the value.
- Select [
-
To reload values
- Select [
 ].
]. - Select the value to change in the right pane.
-
In the preview, drag the mouse to enclose the location to set as the value.
The selected location is read as text and set as the value.
For line items, you can select the detail columns to read.- Select [].
- In the right pane, select the title row of the column to change the value of, to select the column.
-
In the preview, drag the mouse to enclose the column of the line item to set as the value.
The selected column is read as text and set as a line item.
Note- If a single cell has multiple rows due to a line break, each is read as an individual row.
- All the rows in the right pane are set.
- Select [
-
To select an item from a list of candidates
- Select the candidate from the drop-down list for the item.
12.
Click [Register and Continue].
The file attributes and line items in the workspace are updated.
If there are any unregistered documents, they are displayed. Repeat steps 10 to 12.
If there are any unregistered documents, they are displayed. Repeat steps 10 to 12.
13.
Click [End Data Validation].
Adding a Tool to Perform Data Validation on Document Attribute Information
Procedure
1.
Click  on the displayed Task Navigationbar tab.
2.
Select [Data Validation] from the [Add Task Navigationbar Tool] screen, and click [Add].
3.
On the [Settings - Data Validation] screen, specify [Document Language].
4.
If you want to apply the user lock during Data Validation, select the [Apply user lock during Data Validation] checkbox.
5.
In the [Attributes] tab, specify [Target Attribute Group].
6.
If you want to display all the attributes registered to the document during Data Validation, select the [Display all attributes registered to the document] checkbox.
7.
Perform the following operations as necessary.
- Attributes to Overwrite After Data Validation
- Values to Validate
8.
In the [Line Items] tab, perform the following operations as necessary.
- Items to Display
- Items to Overwrite After Data Validation
- Values to Validate
9.
Click [OK].
Perform Data Validation on Document Attribute Information Using Tool
Procedure
1.
Select the document to perform data validation on the attribute information.
- You can select multiple documents.
- You can select up to 100 documents at a time.
2.
Select the tool added in "Adding a Tool to Perform Data Validation on Document Attribute Information" from the Task Navigationbar.
3.
On the [Data Validation] screen, check whether the attribute values and line items read from the form are correct.
The right pane of [Attribute] displays the document attributes imported in the workspace, and the right pane of [Line Item] displays the line items.
Note
- User/group type attributes are not displayed on the [Data Validation] screen because they are not available for data validation.
- The line items are displayed with the names and order configured in the line item extraction settings. They are not displayed with the actual line item names.
Refer
- For information on configuring line item extraction, see "[Form Type Setting] Screen".
4.
To change values, perform the following operations.
-
To change a value with text entry
- Change the value in the right pane.
-
To select an item from the scanned area
- Select [].
- Select the value to change in the right pane.
-
In the preview, click the location to set as the value.
The clicked location is read as text and set as the value.
- Select [
-
To reload values
- Select [].
- Select the value to change in the right pane.
-
In the preview, drag the mouse to enclose the location to set as the value.
The selected location is read as text and set as the value.
For line items, you can select the detail columns to read.- Select [].
- In the right pane, select the title row of the column to change the value of, to select the column.
-
In the preview, drag the mouse to enclose the column of the line item to set as the value.
The selected column is read as text and set as a line item.
Note- If a single cell has multiple rows due to a line break, each is read as an individual row.
- All the rows in the right pane are set.
- Select [
-
To select an item from a list of candidates
- Select the candidate from the drop-down list for the item.
5.
Click [Register and Continue].
The file attributes and line items in the workspace are updated.
If there are any unregistered documents, they are displayed. Repeat steps 3 to 5.
If there are any unregistered documents, they are displayed. Repeat steps 3 to 5.
6.
Click [End Data Validation].
Adding Attributes to Overwrite After Data Validation
Procedure
1.
In [Attributes to Overwrite After Data Validation], click [Add].
2.
In the [Attributes to Overwrite After Data Validation] dialog, select [Attribute] and enter the [Value].
3.
Click [OK].
Editing Attributes to Overwrite After Data Validation
Procedure
1.
In [Attributes to Overwrite After Data Validation], select [Edit] from  of the attribute you want to edit.
2.
In the [Attributes to Overwrite After Data Validation] dialog, change each item as necessary.
3.
Click [OK].
Deleting Attributes to Overwrite After Data Validation
Procedure
1.
In [Attributes to Overwrite After Data Validation], select [Delete] from of the attribute you want to delete.
Note
If you select the checkboxes for the attributes you want to delete and click [Delete], you can delete them all at once.
Adding Values to Validate
Procedure
1.
In the [Settings - Data Validation] dialog, click [Add] in [Values to Validate].
2.
Select [Target Attribute].
3.
If you want to replace the value with suggestions, select the [Replace value with suggestion] checkbox.
Note
If you select the [Replace value with suggestion] checkbox, you will need to specify the [Reference File] in the subsequent steps.
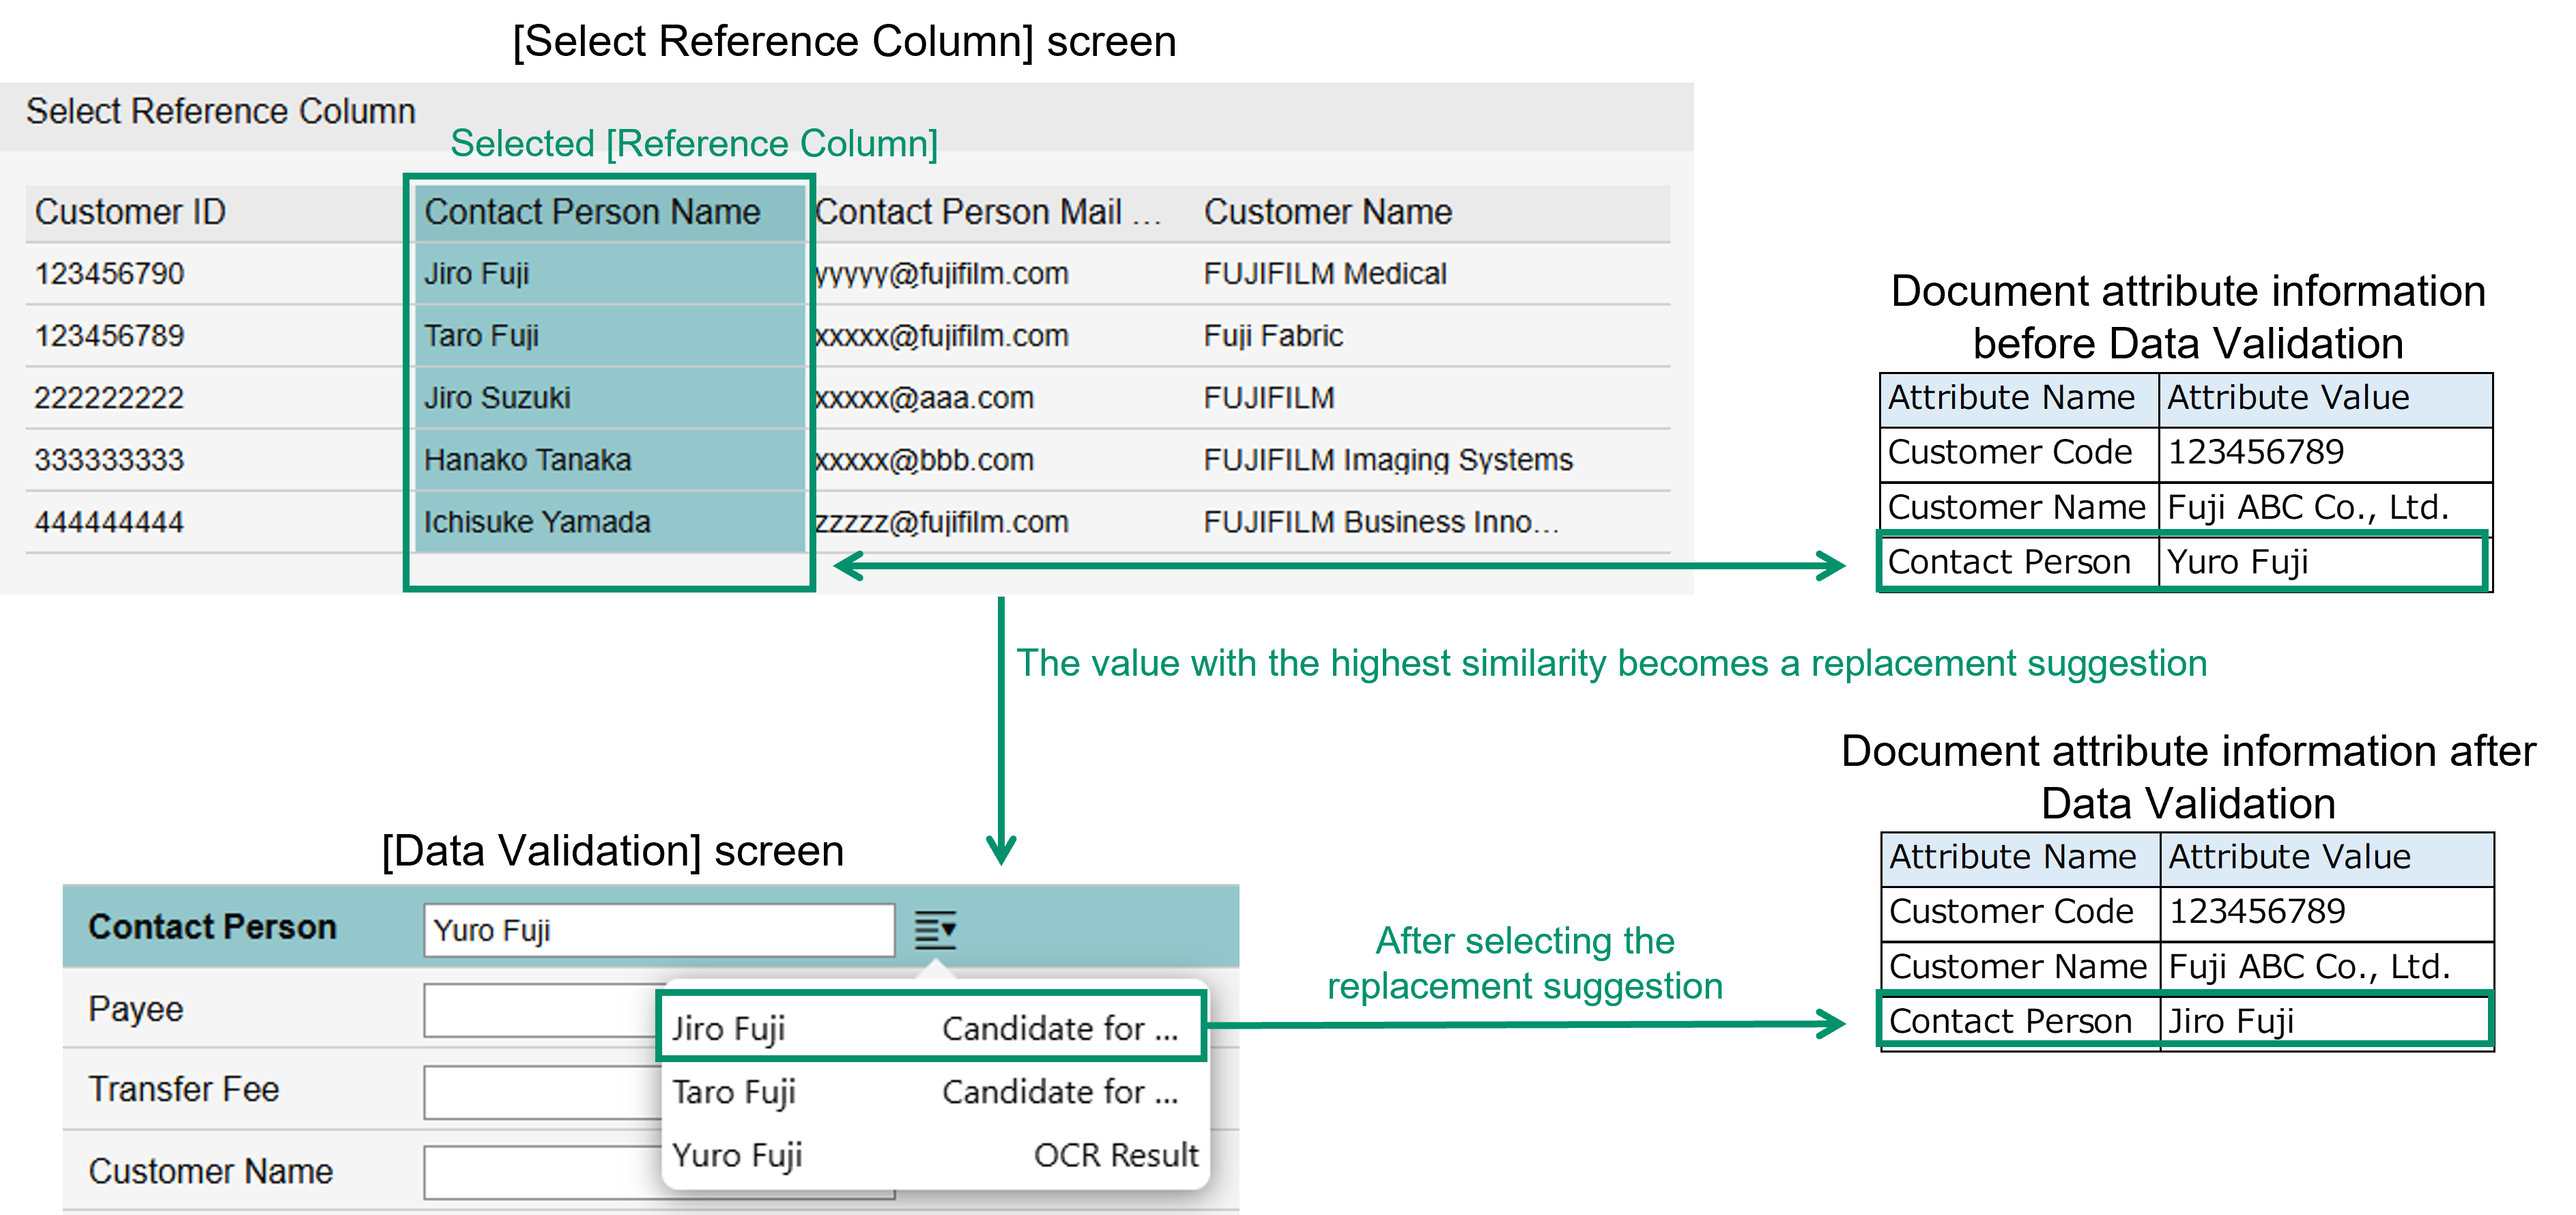
When you execute [Data Validation], the value in the [Reference Column] of the reference file that has the highest similarity to the target attribute or line item field will be displayed as a replacement suggestion. (If there are multiple values with the highest similarity, they will be displayed in ascending order of the line number in the reference file.)
* The fewer differences there are between two strings, the higher the similarity.
* If the value with the highest similarity still has a difference of 10 or more characters, no replacement suggestions will be displayed.
When you select a replacement suggestion, it will be replaced with that value.
4.
If you want to extract the value from the reference file and add it as a separate attribute, select the [Extract values from the reference file and add them as separate attributes] checkbox.
Note
If you select the [Extract values from the reference file and add them as separate attributes] checkbox, you will need to specify the [Reference File] in the subsequent steps.
When you execute [Data Validation], if the [Reference Column] in the reference file contains any item that matches the target attribute or line item field, the value of that record's [Extraction Column] will be set as the value of [Extraction Column Attribute] (or each [Column Attribute] if you want to add multiple attributes). (If there are multiple items that match the target attribute or line item field, you can select any one from them.)
If the [Replace value with suggestion] checkbox is also selected, you can select from the replacement suggestions even if there is no item in the [Reference Column] of the reference file that matches the target attribute or line item field.
The value of the [Extraction Column] in that record where the selected suggestion belongs to will be set as the value of [Extraction Column Attribute] (or each [Column Attribute] if you want to add multiple attributes).
5.
If the [Extract values from the reference file and add them as separate attributes] checkbox is selected, select [Add a single attribute] or [Add multiple attributes].
6.
If the [Replace value with suggestion] checkbox or the [Extract values from the reference file and add them as separate attributes] checkbox is selected, select the [Reference File].
If you click [Select] under [Reference File], the [Select Reference File] dialog will be displayed.
Select the [Reference File], specify [Header Row] and [Character Encoding], and click [OK].
If you click [Select] under [Reference File], the [Select Reference File] dialog will be displayed.
Select the [Reference File], specify [Header Row] and [Character Encoding], and click [OK].
Note
- If the attribute defined in the reference file is a Boolean type and the value is not lowercase (true/false), Values to Validate will not be performed correctly.
- The file that can be selected as the reference file is a csv or tsv file.
- You can specify up to the 1,000th column as the [Reference Column] or the [Extraction Column].
7.
If the [Replace value with suggestion] checkbox or the [Extract values from the reference file and add them as separate attributes] checkbox is selected, specify the [Reference Column].
Note
- By clicking [Select] under [Reference Column], you can select the column to be referenced in the [Select Reference Column] dialog.
- You can specify up to the 1,000th column as the [Reference Column].
8.
If the [Extract values from the reference file and add them as separate attributes] checkbox is selected, specify the [Extraction Column].
If you select [Add multiple attributes], you can add an [Extraction Column] by clicking [Add Extraction Column].
If you select [Add multiple attributes], you can add an [Extraction Column] by clicking [Add Extraction Column].
Note
- By clicking [Select] under [Extraction Column], you can select the column to extract in the [Select Extraction Column] dialog.
- You can specify up to the 1,000th column as the [Extraction Column].
9.
If you select [Add a single attribute] with the [Extract values from the reference file and add them as separate attributes] checkbox selected, select [Extraction Column Attribute].
If you select [Add multiple attributes], select [Column Attribute] for each [Extraction Column].
If you select [Add multiple attributes], select [Column Attribute] for each [Extraction Column].
10.
If you want to make it a required item, select the [Set as a required field] checkbox.
11.
If you want an error to be displayed when the specified conditions are not met, select the [Throw an error if the set conditions are not met] checkbox.
Note
You can select the checkbox only when [Target Attribute] is numeric type or date type.
12.
If the [Throw an error if the set conditions are not met] checkbox is selected, perform "Adding Value Check Condition" as necessary.
13.
In the [Settings - Data Validation] dialog, click [OK].
Editing Values to Validate
Procedure
1.
In the [Settings - Data Validation] dialog, select [Edit] from of the value you want to edit under Values to Validate.
2.
In the [Values to Validate] dialog, change each item as necessary.
3.
Click [OK].
Deleting Values to Validate
Procedure
1.
In the [Settings - Data Validation] dialog, select [Delete] from of the value you want to delete under Values to Validate.
Note
If you select the checkboxes for the items you want to delete and click [Delete], you can delete them all at once.
Adding Value Check Condition
Procedure
1.
In the [Values to Validate] dialog, click [Add].
2.
Select [Target Attribute].
3.
If the attribute is a numeric type, specify [Condition] and [Conditional Expression], and click [OK].
Note
You can add attributes, variables, or symbols by clicking  .
.
You can delete the last added attribute, variable, or symbol by clicking .
.
You can delete the last added attribute, variable, or symbol by clicking
4.
If the attribute is a date type, specify [Condition], [Base Date], and [Range], and click [OK].
Setting Items to be Displayed
Procedure
1.
Click [Settings] in [Items to Display].
2.
If you want to add an item to [Items to Display], select the checkbox for the item you want to add from [Items That Can Be Displayed], and click [Add].
Change the [Display Name] as necessary.
Change the [Display Name] as necessary.
Note
- You can change the display order by dragging and dropping
 of the item.
3.
If you want to add a custom item to [Items to Display], click [Add Item] and specify the [Display Name]and [Type] of the added item.
Note
- You can add up to 40 items to [Items to Display].
- You can enter up to 255 characters in [Display Name].
4.
If you want to remove an item from [Items to Display], select the checkbox for the item you want to remove in [Items to Displays], and click [Remove].
Note
You can also delete a custom item by clicking  .
.
5.
In the [Line Item Settings] dialog, click [OK].
Adding Items to Overwrite After Data Validation
Procedure
1.
In [Items to Overwrite After Data Validation], click [Add].
2.
In the [Items to Overwrite After Data Validation] dialog, select [Item] and enter the [Value].
3.
Click [OK].
Editing Items to Overwrite After Data Validation
Procedure
1.
In [Items to Overwrite After Data Validation], select [Edit] from of the item you want to edit.
2.
In the [Items to Overwrite After Data Validation] dialog, change each item as necessary.
3.
Click [OK].
Deleting Items to Overwrite After Data Validation
Procedure
1.
In [Items to Overwrite After Data Validation], select [Delete] from of the item you want to delete.
Note
If you select the checkboxes for the items you want to delete and click [Delete], you can delete them all at once.
[Data Validation] Screen
Document Selection Area
-
[Previous Document]/[Next Document]
Click these to switch the displayed document. -
Text Box
Displays the selected file name. You can select a document from the pull-down list. -
[Processing Status]
Displays the status of the selected document.
Thumbnail Area
-
Thumbnails
Displays all pages of a single job as thumbnails. The page selected here is displayed in the preview area.
The selected page is displayed larger than the other pages.
Preview Area
-
[
 ]
]
Drags the preview. -
[]
The OCR result selection mode. You can click a location to select it for use as an attribute value.
NoteYou can also enter an attribute value as text. -
[]
The OCR range selection mode. You can drag the cursor to select an area to select for use as an attribute value.
NoteYou can also enter an attribute value as text. -
[
 ]
]
Click to reduce the preview by 10%. -
[
 ]
]
Click to enlarge the preview by 10%. -
[
 ]
]
Displays the entire preview. -
[
 ]
]
Displays the preview fit to the width. -
[Full View]
Switches the display magnification of the preview. -
[Attribute]/[Detail Item]
Switches the information displayed in the right pane. -
[Registered]
Displays the number of registered documents and the total number of documents to validate. -
[Register and Continue]
Updates the attributes of the displayed file and displays the next document. -
[End Data Validation]
Closes the [Data Validation] screen.