Operating Registered Documents
This section describes management operation of registered documents such as search and deletion.
Searching by Filters
You can use filters to narrow your search for registered documents.
The available filters are as follows:
The available filters are as follows:
- Updated Date/Time
- Updated By
- Document Type
- File Format
- Tag
1.
Select the filters you want to use.
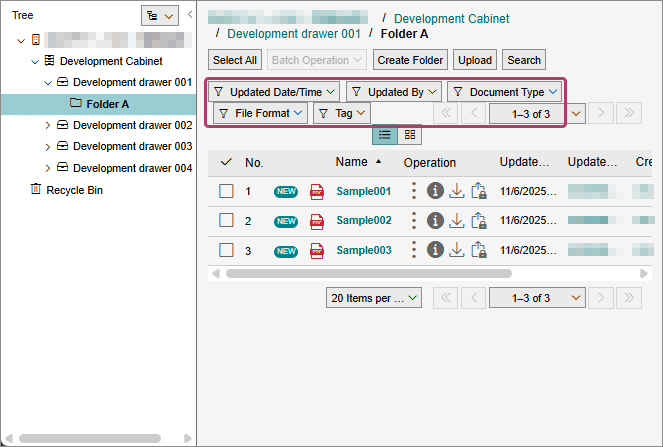
2.
Select the checkbox of the filter value.
Note
- You can select multiple filter values, except for the [Updated Date/Time].
- When filtering by [Updated By], up to ten names will be listed, starting with the person who has the highest number of updates. As you start typing a name in the search field, up to ten candidate names will be displayed
- When you select the [Tag] filter, up to 20 tags will be listed, starting with the tag that has the highest number of settings. You can select from the displayed tags or enter text in the search field.
- To cancel a tag entered in the search field, you have several options:
- Click on the corresponding tag in the options.
- Click on [x] of the tag in the search field.
- Press the <BackSpace> key in the search field
3.
Click [OK].
The filtered documents appear on the screen.
Searching in the Search Menu
You can search for registered documents by tracing the hierarchy from the tree in the navigation area or by entering conditions.

1.
Perform the following operation.
Operating on the document list area:
(1) Click [Search].
The [Search] screen appears.
Operating on the navigation area:
(1) Click  in the navigation area, and select
  [Search].
The navigation area is switched to the search view.
2.
Set the hierarchy level and type of the search object.
Note
- For hierarchy level, click [Browse], select the hierarchy level on the [Select Level] screen, and click [Select].
- The type of the search object can be narrowed down to [Document] or [Folder].
- When the attribute template has a [Candidate Value] or [Hint Value], [Candidate Value] or [Hint Value] is set in the input field.
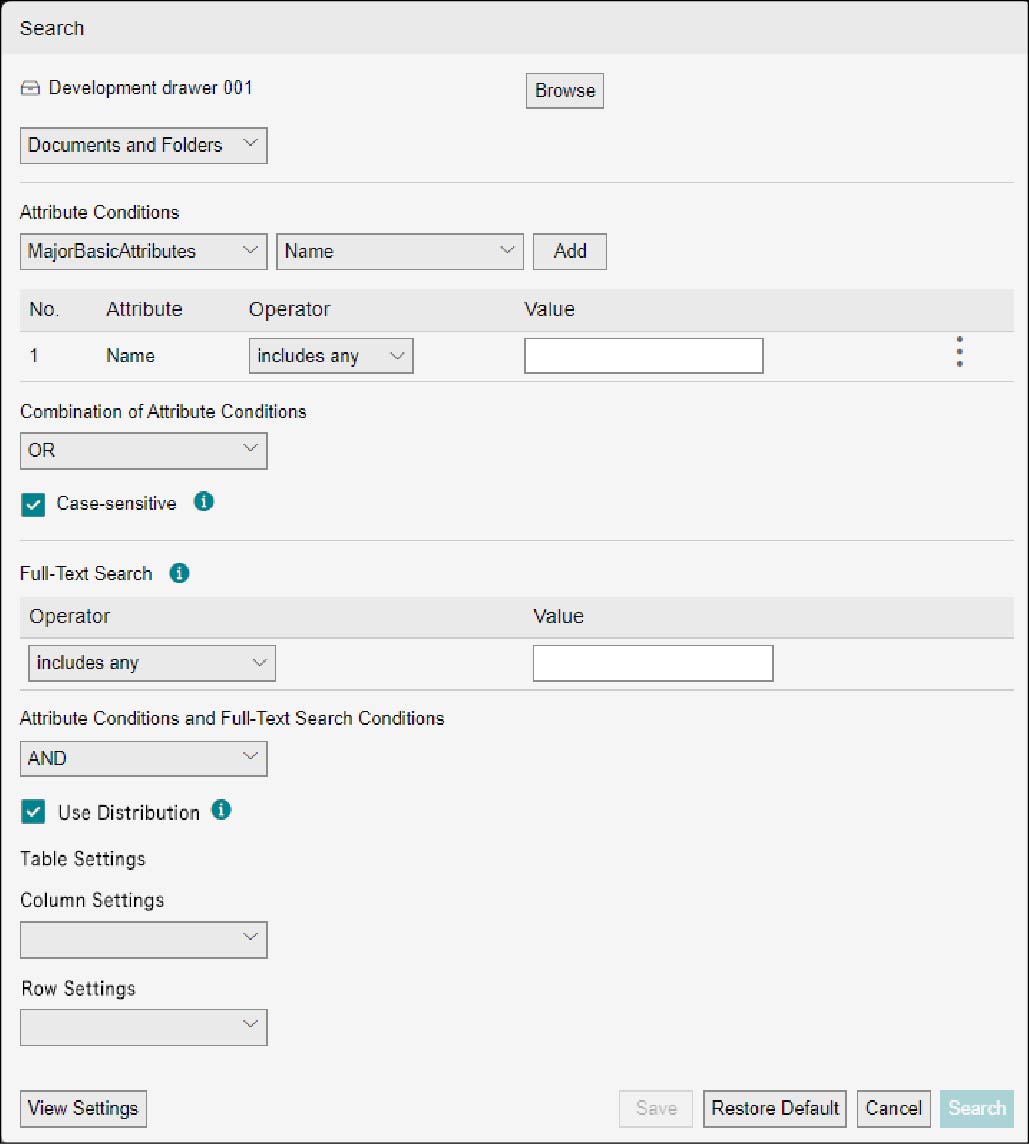
3.
Set the attribute conditions of the search target.
Note
- Switch [Main Basic Attribute] to another attribute template as necessary. To add an attribute condition, select the attribute name from [Name] and click [Add]. For how to create attribute template, refer to <Administrators Guide>.
- When the attribute template has a [Candidate Value] or [Hint Value], [Candidate Value] or [Hint Value] is set in the input field.
- When the selected attribute is [Name] or [File Name] and [Operator] is set to [exact match], as you type a character in [Value], the field displays 10 candidates that start with that character and match the following criteria:
- The user who is searching has access permissions
- The name or file name satisfies the condition specified as search targets - To perform AND search of multiple attributes, select [AND], and to perform OR search, select [OR] from [Combination of Attribute Conditions]. You can combine AND and OR in the conditional expression.
4.
When searching a string in a file, set the full-text search conditions of the search target.
Note
- The full-text search is available only when it is enabled in the cabinet. For setting procedure, refer to <Administrators Guide>.
- The maximum number of bytes that can be entered for the value of a full-text search condition is 512 bytes. The number of bytes is calculated in UTF-8.
- Maximum number of phrases that can be specified in a full-text search condition is six.
- If the number of search results exceeds 20,000 for the full-text search condition, the search will result in an error. If an error occurs, review the full-text search conditions.
5.
When specified attribute conditions and full-text search conditions, select [Combination of Attribute and Full-Text Search Conditions].
6.
To set up the 2D table, select the checkbox of [Use Distribution] to set the search criteria.
Note
The 2D table view is a feature that allows you to narrow down the results of a target document by specifying specific attributes for columns and rows. You can set a String Type attribute to columns and String Type or Datetime Type attributes to rows. When setting a Datetime Type attribute, you must also specify the display period.
7.
Click [Search].
A search result appears in the document list area.
Note
- To save the search setting, click [Save]. Set items such as [Search Setting Name] on the [Save Search Settings] screen and click [Save], and the search setting is saved and the [Document] screen appears again.
- To set the search results view, click [View Settings].
- To clear the search conditions, click [Restore Default].
- When the display of search results is set to [Detailed View], keywords entered in [Value] for [Operator] are highlighted. Place and hover your mouse cursor over the highlighted part and the search recognition method and explanation will be displayed only for the image searching results.
- A search can be done also for images by means of recognition of text in those images or by recognizing those images themselves. The following types of images can be searched for:
- PNG (.png)
- JPEG (.jpg, .jpeg, .jpe, .jfif, .jfi, .jif)
- TIFF (.tif, .tiff)
- BMP (.bmp) - When you enable the 2D table view, the search results and 2D table areas are shown separately at the top and bottom of the screen. When you select the number in the desired cell in the 2D table, the search result appears on the bottom side of the screen.
- You can create up to 100 items for both columns and rows.
- In the 2D table view, you can adjust the width of the table by using [Width].
8.
To download the search results as a CSV file, click [Export CSV].
The CSV file is downloaded.
Adding to Favorites
You can register frequently used folders or documents as favorites.
1.
Select the checkbox of a folder or document in the document list area, and select [Add to Favorites] from [Batch Operation].
Note
- You can select multiple folders or documents.
- You can confirm the added favorites by clicking. in the navigation area and then selecting
 .
.
Move
You can move folders or documents to another level in the hierarchy.
Note
The access permissions of the moved folder or document depend on the [Inherit Parent Permissions] settings on the [Update Access Permissions] screen.
- If it is set as [Inherit], the access permission of the move destination drawer/folder will be inherited.
- If it is set as [Individual Settings], the access permission of the move destination drawer/folder will not be inherited and the setting before moving is kept.
1.
Select the checkbox of a folder or document in the document list area, and select [Move] from [Batch Operation].
The [Specify Move Destination] screen appears.
Note
- You can select multiple folders or documents.
- You can also move folders or documents by clicking [Move] from
 .
.
2.
Select [Select from Level] and click [Browse].
The [Select Level] screen appears.
3.
Select a level to which the folder/document is moved and click [Select].
Note
You can also select a moving destination from the log.
4.
Click [Move].
The selected folder or document moves to the specified hierarchy level and the [Document] screen appears again.
Delete
You can move folders or documents to the recycle bin.
Delete
1.
Select the checkbox of a folder or document in the document list area, and select [Delete] from [Batch Operation].
The [Confirm Deletion] screen appears.
Note
- You can select multiple folders or documents.
- You can also delete folders or documents by clicking [Delete] from .
2.
Check the message and click [OK].
The selected folder or document moves to the recycle bin and the [Document] screen appears again.
Note
The number of folders or documents in the recycle bin and their use amount are counted as if they are stored in the original folder until the recycle bin is emptied. For details, refer to "Empty Recycle Bin".
Restoring Deleted Documents
1.
Click  in the navigation area.
2.
Select a cabinet from [Target Cabinet] in the document list area.
3.
Select the checkbox of a folder or document, and select [Restore] from [Batch Operation].
The selected folder or document is restored.
Note
You can select multiple folders or documents.
Empty Recycle Bin
1.
Click in the navigation area.
2.
Select a cabinet from [Target Cabinet] in the document list area.
3.
Select the checkbox of a folder or document, and select [Delete] from [Batch Operation].
The [Confirm Deletion] screen appears.
Important
- You can select multiple folders or documents.
- The contents of the recycle bin are not shared with other users.
4.
Check the message and click [OK].
The folders or documents are completely deleted and the recycle bin becomes empty. The [Document] screen appears again.
Important
- The completely deleted folders or documents cannot be restored.
- Click [Empty Recycle Bin], and all the documents and folders in the recycle bin are deleted.
Downloading
You can download documents displayed in the document list area.
1.
Select the checkbox of folder(s) or document(s) in the document list area, and select [Download] from [Batch Operation].
The selected document is downloaded and the [Document] screen appears again.
Note
- You may also download a document by clicking the document name or URL displayed in messages or on the confirmation screen.
- You can also download a document by clicking
 .
. - The file name of the document becomes "Download-{yyyyMMddHHmmss}.zip".
- You cannot download folders.
- Attribute documents that you do not have access permission to or have no content are excluded from the batch download.
Displaying Preview
You can display preview of the document.
Note
To enable this operation, it is necessary to set the previews to be displayed in advance. For how to set the preview, refer to <Administrators Guide>.
1.
From for the desired document in the document list area, click [Content View].
The [{Document Name}] screen appears.
Note
To enable this operation, it is necessary to set the items to be displayed in the document list area in advance. For details, refer to "Operations Displayed in [Document List]".
2.
To display the document storage location, click [Move to Location].
This returns you to the document list area.
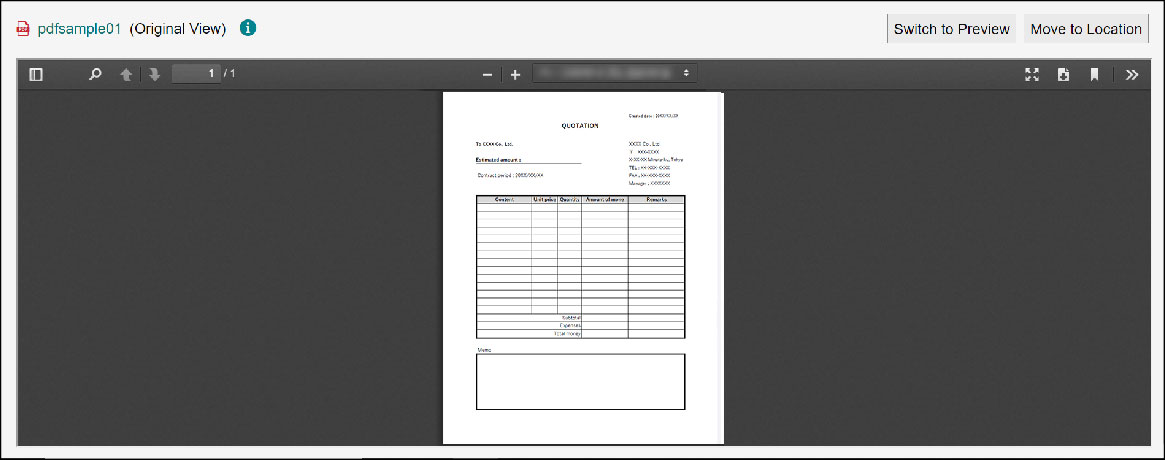
Displaying Document in Original View
Original View is a function that allows PDF documents stored in FUJIFILM IWpro File Management to be viewed as originals without conversion. In the original view, you can select text and search for text in PDF documents.
Note
- The only file format that can be displayed in the original view is PDF.
- When users do not have access permission (for content acquisition), the original view will automatically switch to preview.
- Depending on the PDF format, you may not be able to select text or search for text.
1.
Click on [Content View] from on the PDF document displayed in the document list area.
The [{PDF Document Name} (Original View)] screen appears.
Note
- Document timestamp imprint and signature are not displayed.
- To enable this operation, it is necessary to set the items to be displayed in the document list area in advance. For details, refer to "Operations Displayed in [Document List]".
- Original view cannot be printed.
- The language used in the toolbar can be changed in the browser's language settings.
2.
Click [Switch to Preview] to display in preview.
The [{PDF Document Name} (Preview Unrestricted)] screen appears.
Note
If [Prohibit Saving or Printing of Preview Image by Access Permission] is set to a drawer, the [{PDF Document Name} (Preview Unrestricted)] screen appears when you preview a document for which you do not have access permission (for content acquisition).
3.
To display the document storage location, click [Move to Location].
This returns you to the document list area.
Changing Names
You can change the names of folders or documents.
1.
Click [Update Name] from of a folder or document displayed in the document list area.
The [Update Name] screen appears.
2.
Enter [Name] and click [Update].
The name of the folder or document is changed and the [Document] screen appears again.
Displaying/Changing Attributes and Tags
You can display or change the attributes or tags of folders or documents.
Display
1.
Click [View Attributes] from of a folder or document displayed in the document list area.
The [View Attributes] screen appears.
2.
Click the [Attribute] or [Tag] tab.
You can confirm the settings.
3.
Click [Close].
The [Document] screen appears again.
Change
1.
Click [Update Attributes] from of a folder or document displayed in the document list area.
The [Update Attributes] screen appears.
Note
You can also change attributes or tags by displaying or selecting a document or folder whose attribute or tag is to be changed, and clicking the icon in the property area or clicking .
2.
Click the [Attribute] or [Tag] tab.
3.
Change the settings as necessary.
4.
Click [Update].
The attributes or tags of the folder or document are changed and the [Document] screen appears again.
Changing Status
You can change the statuses (such as [Fix] and [Editable]) of folders or documents. The statuses can also be changed collectively.
Note
- To enable this operation, it is necessary to set the items to be displayed in the document list area in advance. For details, refer to "Operations Displayed in [Document List]".
- For how to set the status definition, refer to <Administrators Guide>.
1.
Click [Update Status] from of a folder or document displayed in the document list area.
The [Update Status] screen appears.
Note
You can also change the status by selecting a folder or file in the document list area and clicking [Update Status].
2.
Check [Current Status], select [Post-Update Status], and then click [Update].
The status of the folder or document is changed and the [Document] screen appears again.
Displaying/Changing Access Permission
You can display or change the access permission of drawers, folders, or documents.
Refer
For the summary of access permission and how to set it, refer to <Administrators Guide>.
Display
1.
Click [View Access Permissions] from of a drawer, folder, or document displayed in the document list area.
The [View Access Permissions] screen appears.
2.
Check the access permission and click [Close].
The [Document] screen appears again.
Change
1.
Click [Update Access Permissions] from of a drawer, folder, or document displayed in the document list area.
The [Update Access Permissions] screen appears.
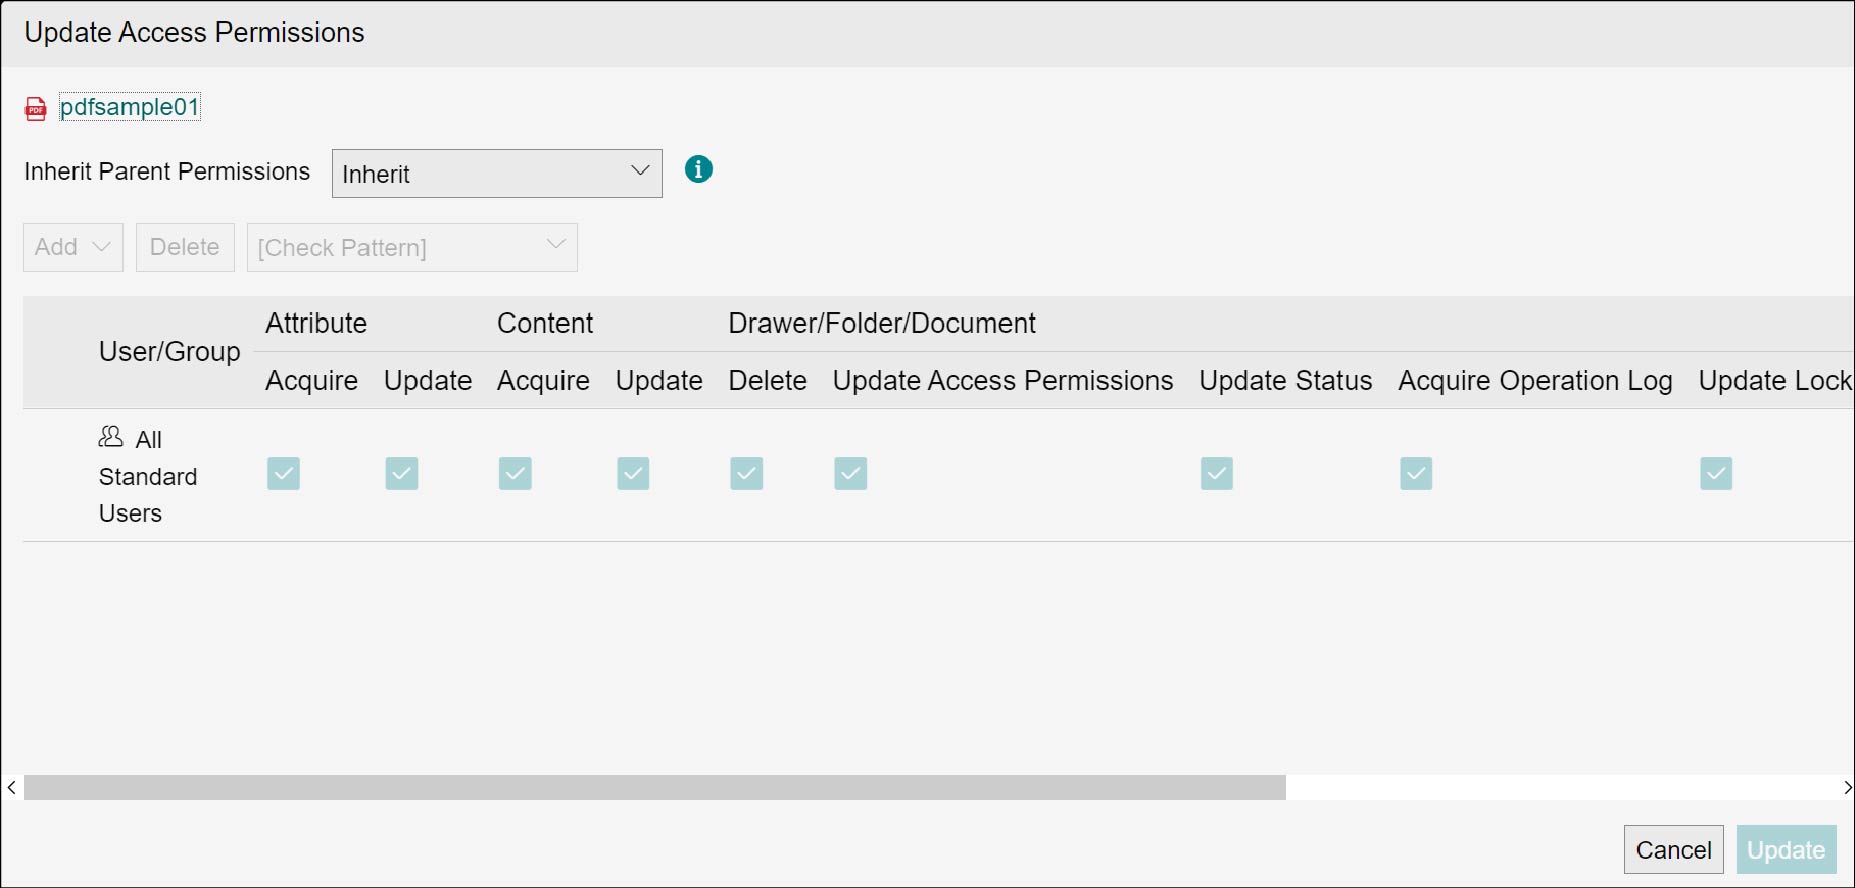
2.
Select [Inherit] or [Individual Setting] from [Inherit Parent Permissions].
Note
- When [Inherit] is enabled, the same access permissions as the move destination drawer/ folder will be set automatically.
If it is set as [Inherit], the access permissions of the lower drawers and folders can be updated at once by updating the access permissions of the upper cabinets, drawers, and folders. - When [Individual Settings] is enabled, access permissions of the move destination drawer/ folder are not inherited and the settings stay same as before moving.
3.
When selecting [Individual Setting], select the checkboxes of desired permissions arbitrarily.
Note
- When selecting [Add from Address Book] from [Add], you can add users or groups.
- When selecting [Add [All Standard Users]] from [Add], you can add built-in groups.
- Select the checkbox of a user or group and click [Delete], and the user or the group can be deleted.
- Select [Allow All], [Allow All Except Delete], [Allow Acquire, and Create], [Allow Acquire], or [Reject All] from [Check Pattern], and presence/absence of each permission for an arbitrary user or group can be changed collectively.
- Change by clicking [Add] or [Delete] or selecting from [Select Check Pattern] is executed by clicking [Update] on the [Update Access Permissions] screen.
4.
Click [Update].
The access permission of the folder or document is changed and the [Document] screen appears again.
Checking Operation Log
You can check the operation log of a folder or document.
1.
Click [Operation Log] from of a folder or document displayed in the document list area.
The [Operation Log] screen appears.
2.
Set items such as [Maximum Number of Items Acquired] and [Operation Date/Time], and click [Search].
The corresponding operation log is listed.
Note
- Click the user name, and the profile can be checked.
- To download the list in the CSV format, click [Export CSV]. For how to display the [Export CSV] button, refer to "Operations Displayed in [Document List]".
- Click [Reset Filter Conditions], and the search conditions are cleared.
Displaying Basic Information
You can check the basic information of cabinets, drawers, folders, or documents displayed in the document list area.
1.
Click [View Basic Information] from of a cabinet, drawer, folder, or document.
The [Basic Information] screen appears.
Saving as CSV File
You can save the attributes of folders or documents displayed in the document list area as a CSV file.
Note
To enable this operation, it is necessary to set the items to be displayed in the document list area in advance. For details, refer to "Operations Displayed in [Document List]".
1.
Select the hierarchy level to check the attributes and display them in the document list area.
2.
Click [Export CSV].
A CSV file is downloaded.