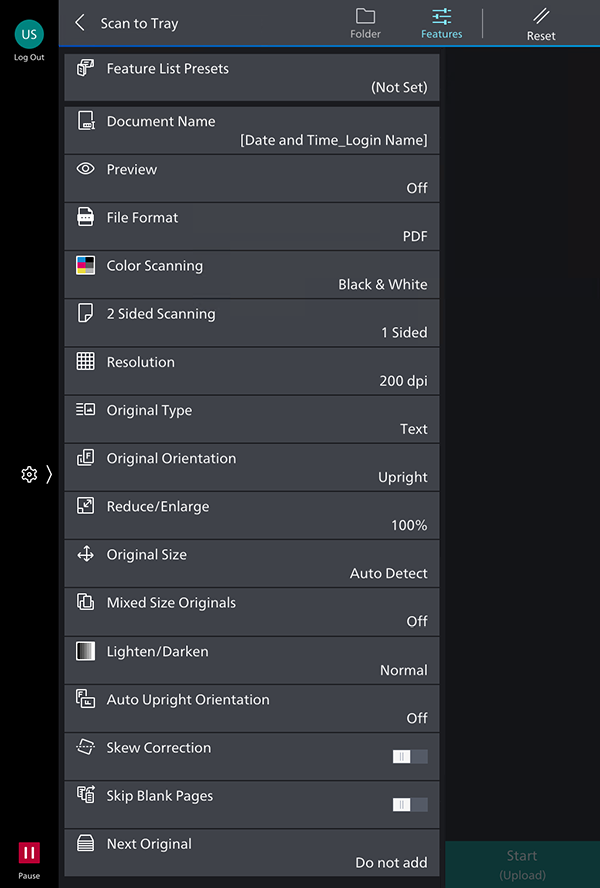
Scan Settings Screen
This screen is displayed by tapping either of the following.
- A rule on the rule selection screen
- [Scan to Personal Postbox] > [Features] on the rule selection screen
- [Personal Postbox] > [Features] on the [Scan to Save Location] screen
- [Tray] > [Features] on the [Scan to Save Location] screen
- [Workspace] > [Features] on the [Scan to Save Location] screen
- [Box] > [Features] on the [Scan to Save Location] screen
- [Dropbox] > [Features] on the [Scan to Save Location] screen
- [Google Drive] > [Features] on the [Scan to Save Location] screen
- [kintone] > [Select App] > record selection > [Scan File Destination] > [Features] on the [Scan to Save Location] screen
- [Microsoft Teams] > [Select Team] > [Select Channel] > [Features] on the [Scan to Save Location] screen
- [OneDrive for Business] > [Features] on the [Scan to Save Location] screen
- [SharePoint Online] > [Select Site] > [Select Document Library] > [Features] on the [Scan to Save Location] screen
It enables you to configure the settings for scanning and importing documents.
- Some items are not displayed for some models.
- The default values of the rule scan settings can be configured on the [Rule List] screen. For details, see "Rule Settings".
- For non-rule scan settings, the default values or presets set as default values are reflected.
- If the various items are changed by the user, the changed settings are retained until the app is closed.
- The following changes may be required if the user performing the operation is prevented from changing the color mode in the user settings of the device.
- If you cannot make the changes, the specified rule cannot be used. In that case, use a different rule.
- If you can make the changes, the setting values specified in the rule cannot be used. In that case, change the setting values.
[Reset]
Restores the default values.
[Feature List Presets]
Displays the [Feature List Presets] screen. It enables you to register new presets or check a list of the created presets.
[Preview]
Set this to [On] to display a preview before scanning.
[File Format]
Selects the file format of the files generated when scanning.
- [PDF (OCR Conversion)] and [DocuWorks (OCR Conversion)] can be configured when Box / Dropbox / Google Drive / OneDrive for Business / SharePoint Online is selected as the save location.
- The Advanced Scan Kit or Searchable PDF Kit may be required to use [PDF (OCR Conversion)] and [DocuWorks (OCR Conversion)], depending on the license.
- The results of optical character recognition (OCR) may differ, depending on the license.
- The expected strings may not be included in the transferred document for some multifunction printers, due to different priorities for optical character recognition (OCR).
[Color Scanning]
Selects the color settings for scanning.
[2 Sided Scanning]
Set this when scanning two-sided originals.
[Resolution]
Selects the resolution of the document to scan.
[Original Type]
Selects whether to prioritize the scanning of text or photos.
[Original Orientation]
Sets the orientation of the document to scan.
[Reduce/Enlarge]
Sets the magnification of the document to scan. To scan with other settings, select [Other Settings].
[Original Size]
Selects the size of the document to scan.
[Mixed Size Originals]
Set this when scanning multiple documents of a different size at the same time.
[Lighten/Darken]
Selects the density of the document to scan.
[Auto Upright Orientation]
Set this to correct the image orientation by automatically rotating the document according to the orientation of the text or QR code.
- [Auto Upright Orientation] does not support Thai or Vietnamese.
[Skew Correction]
Set this to automatically correct skew in the scanned text or figures so that they will be level with the page.
[Skip Blank Pages]
Enable this to skip any blank pages included in the document to scan.
- [Skip Blank Pages] can only be configured when saving scanned documents using something other than a rule.
[File Name]/[Document Name]
Attaches a file name. By default, the date and time and login user name are used as the file name.
Example:
yyyymmddhhmmss_login user name.(extension)
[Next Original]
Select [Add] to scan another document.
[Add Favorite]/[Remove Favorite]
Enables you to register the set rule to the favorites list or remove it from the favorites list. Rules registered as favorites are displayed at the top of the list on the rule selection screen. You can register up to 20 favorites.
- This is displayed when you tap a rule on the rule selection screen.
- You can change the display order of the list on the [Favorites Settings] screen.
[Start]
Executes scanning.