Step 3: Configuring Scan Delivery/Fax Delivery
This explains procedures for installing FUJIFILM IWpro Scan Delivery and FUJIFILM IWpro Fax Delivery on the multifunction device.
| 3-1 | Downloading FUJIFILM IWpro Device Setup |
| 3-2 | Installing the Application |
| 3-3 | Configuring FUJIFILM IWpro Scan Delivery |
| 3-4 | Configuring FUJIFILM IWpro Fax Delivery |
3-1 Downloading FUJIFILM IWpro Device Setup
With FUJIFILM IWpro, download FUJIFILM IWpro Device Setup.
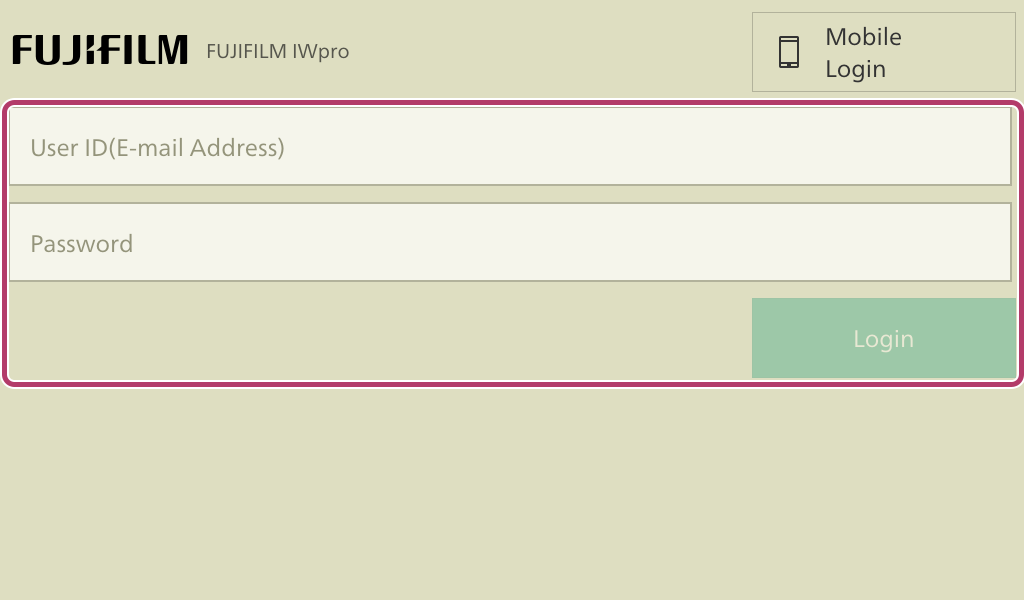
- Log into the FUJIFILM IWpro as the Service Administrator.https://fbiwpro.fujifilm.com/
- Log in to Device with the user ID and password of the FUJIFILM IWpro license holder.
- Click [
 ], and click [Device Management] in [Admin Menu].
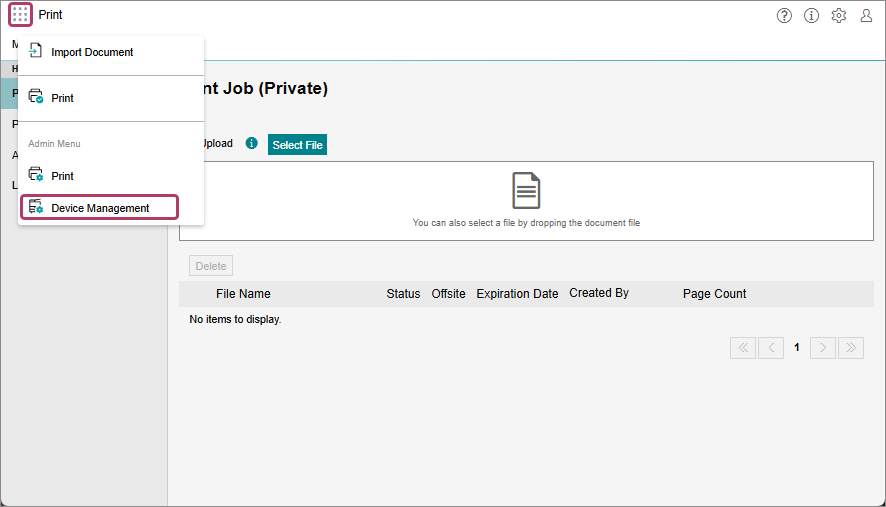
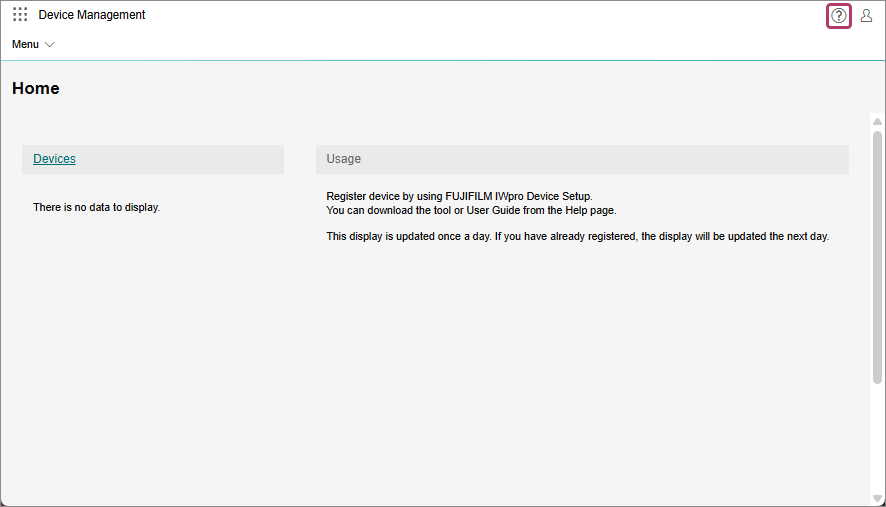
- Click [
 ].
].
- Click [FUJIFILM IWpro Setup].
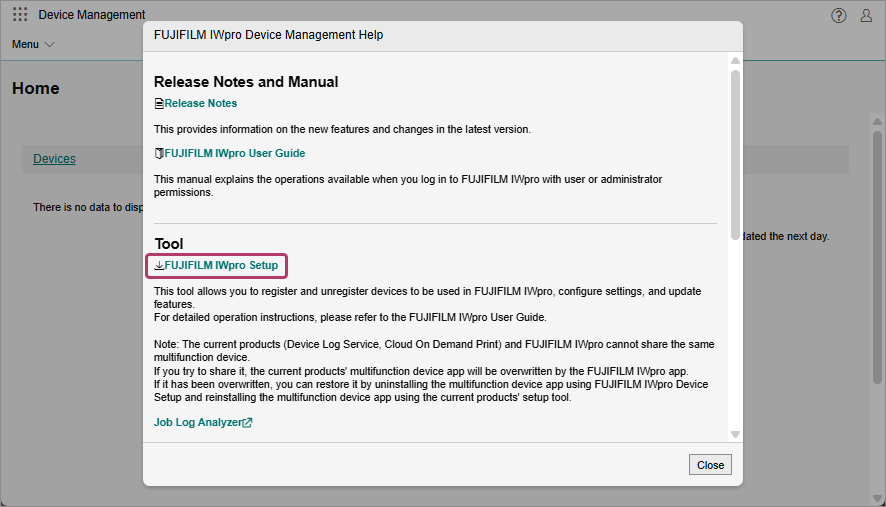
- Specify the save location, and click [Save].
- Click [Close].
- Click [
 ], then click [Logout].
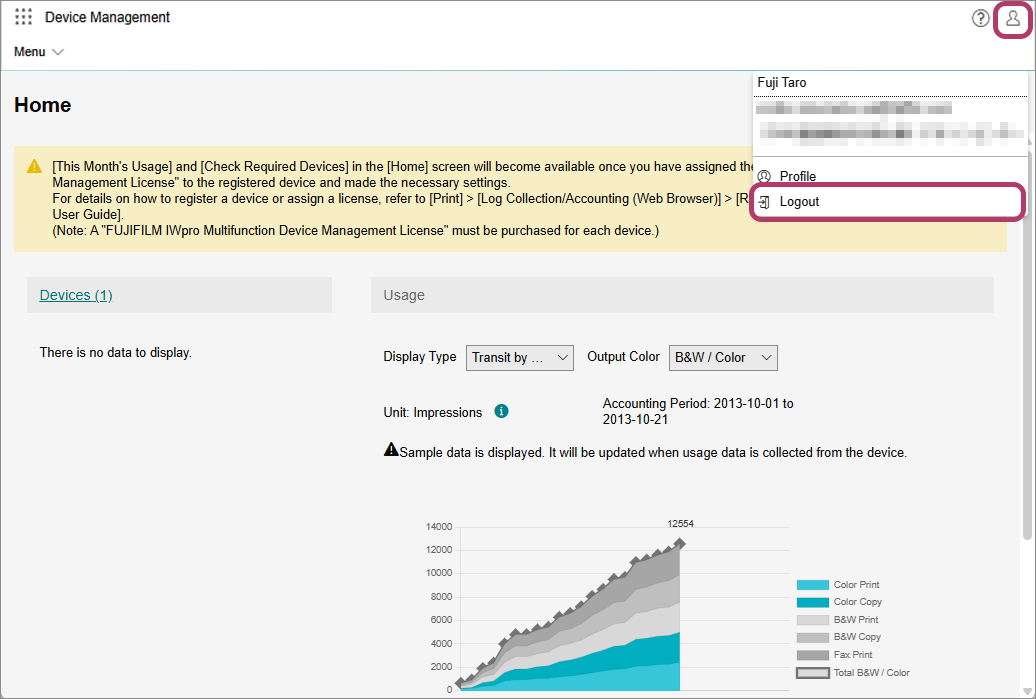
- Extract the saved ZIP file to a folder.
This completes the procedure for downloading FUJIFILM IWpro Device Setup.
| 3-1 | Downloading FUJIFILM IWpro Device Setup |
| 3-2 | Installing the Application |
| 3-3 | Configuring FUJIFILM IWpro Scan Delivery |
| 3-4 | Configuring FUJIFILM IWpro Fax Delivery |
3-2 Installing the Application
- Do not perform other operations on the device until the procedure on this page is complete. Also note the following.
- Do not touch the control panel or power supply of the device.
- Do not access Internet Services. If you are logged in, log off and wait about 40 seconds before starting the procedure.
- Do not perform operations such as printing.
- Do not receive faxes.
- If you are using "Smart WelcomEyes", do not approach the device. Also make sure to temporarily disable "Smart WelcomEyes".
- In the folder opened in step 8 of "3-1 Downloading FUJIFILM IWpro Device Setup", double click "FUJIFILMIWproDeviceSetup.exe".
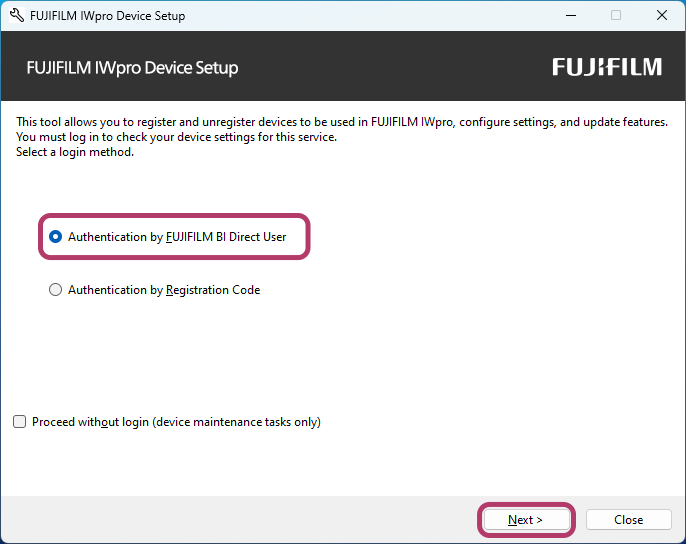
- Select [Authentication by FUJIFILM BI Direct User], and click [Next].
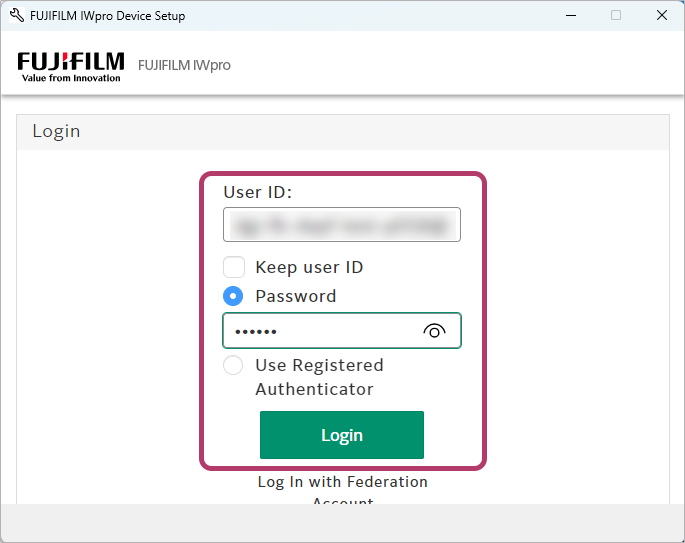
- Enter the Service Administrator user ID and password, and click [Login].
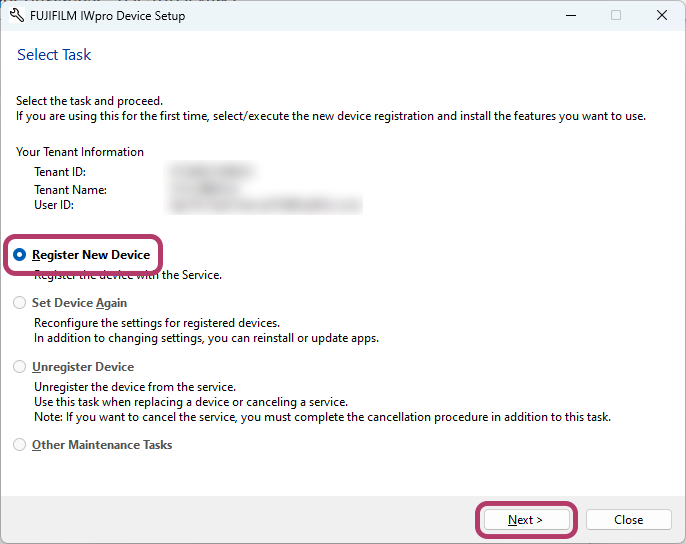
- Select [Register New Device], and click [Next].
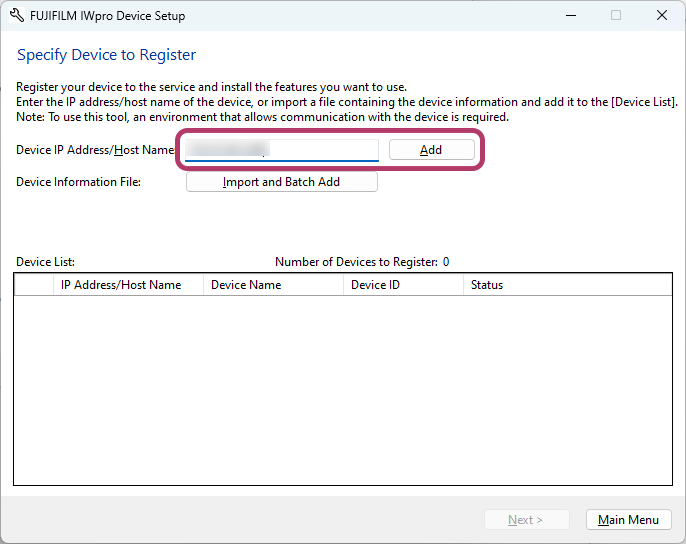
- In [Device IP Address/Host Name], enter the IP address of the multifunction device to register, and click [Add].
- If the multifunction device panel is operated or an Internet service is opened in order to check the IP address of the multifunction device, first log off.
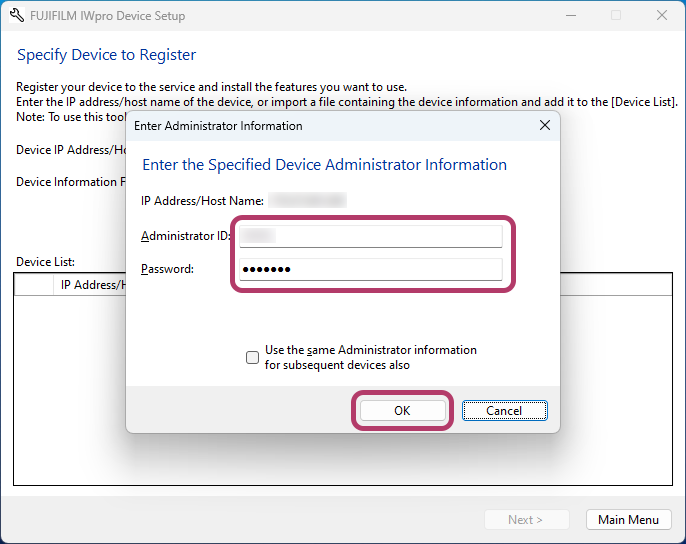
- In [Enter Administrator Information], enter the System Administrator ID and password of the multifunction device to register, and click [OK].
- During registration, this may communicate with the device or remote servers. connection cannot be confirmed will be displayed. Check, and if there is no problem, click [OK].
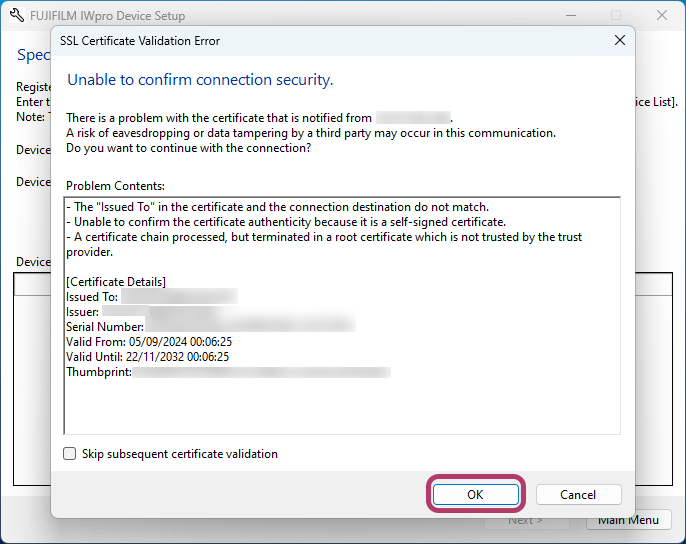
- During registration, this may communicate with the device or remote servers. connection cannot be confirmed will be displayed. Check, and if there is no problem, click [OK].
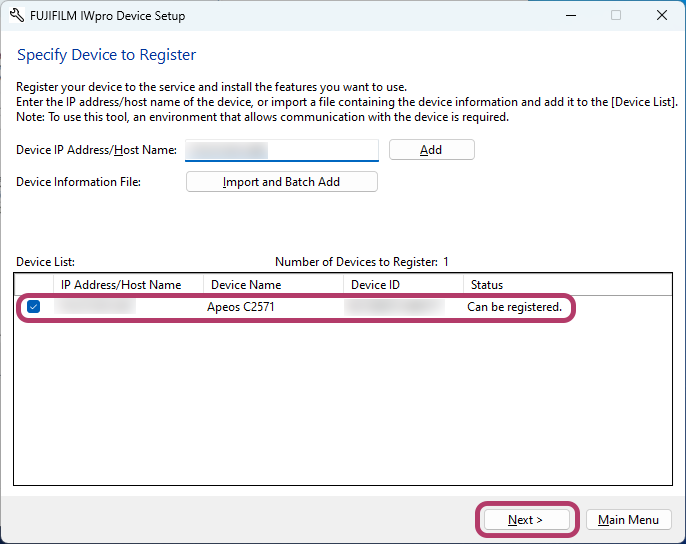
- In the [Device List], check that the multifunction device to register is displayed, and click [Next].
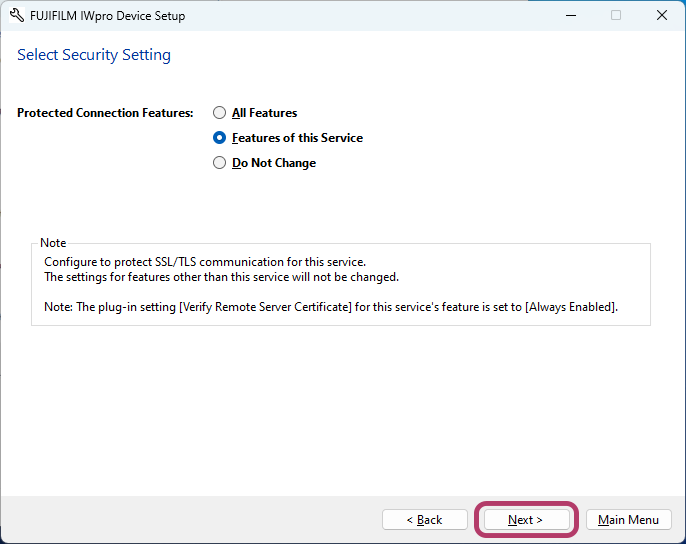
- Set the features to install on the multifunction device to [Install], and click [Next].
- Selection items will differ depending on the purchased license.
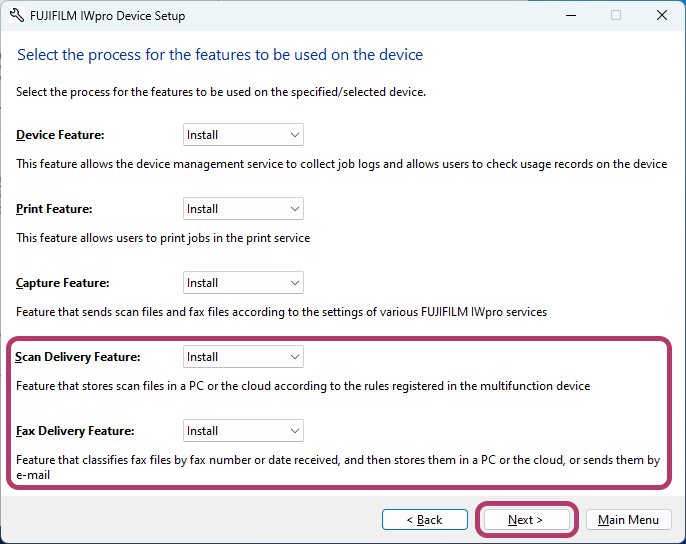
- Click [Next].
- If selecting [All Features], other applications installed on the multifunction device will also be set.
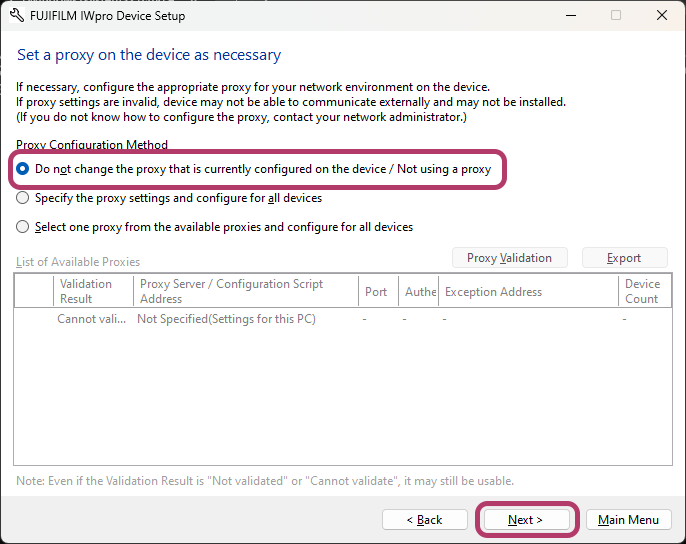
- Select [Do not change the proxy that is currently configured on the device / Not using a proxy], and click [Next].
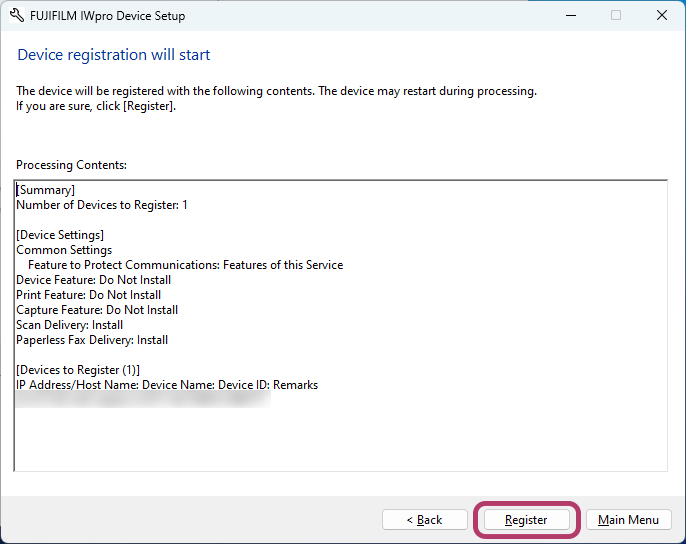
- Click [Register].
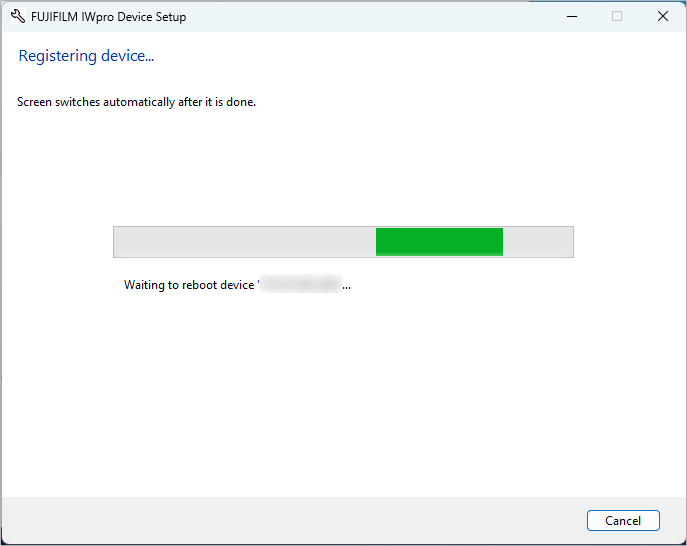
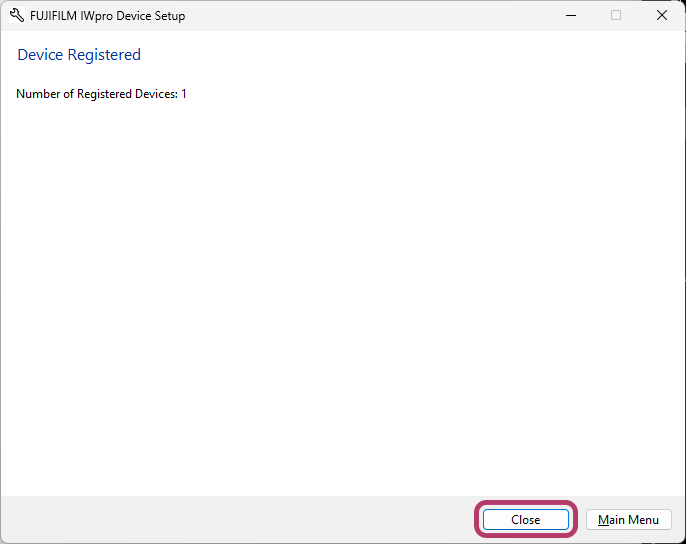
- Wait until the "Device Registered" message is displayed.
- Do not touch the multifunction device control panel.
- Click [Close].
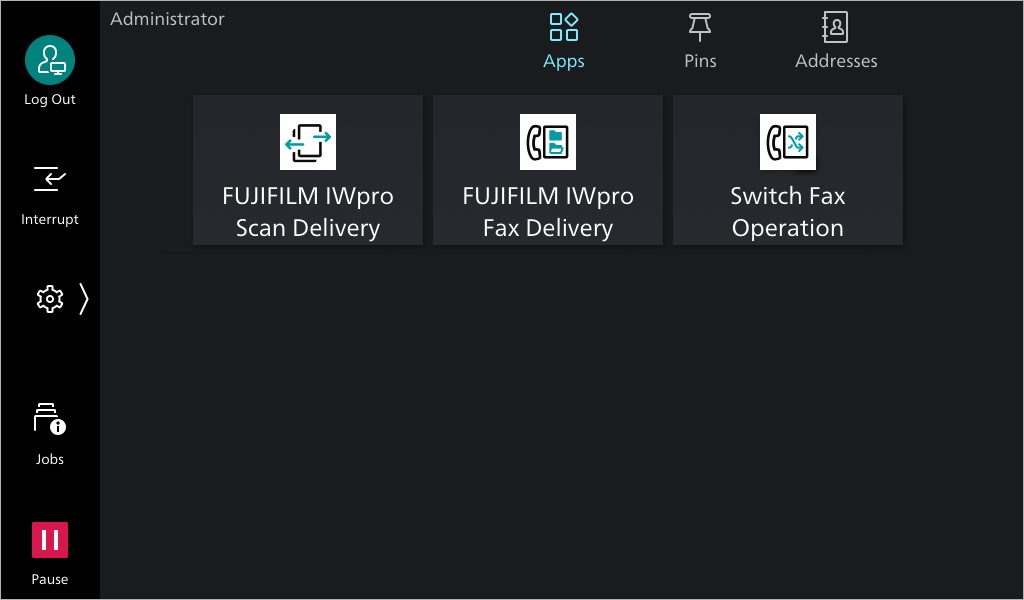
If the FUJIFILM IWpro Scan Delivery feature was selected in step 8 , if the FUJIFILM IWpro Scan Delivery icon or FUJIFILM IWpro Fax Delivery feature are selected, FUJIFILM IWpro Fax Delivery and the Switch Fax Operation icon will be added to the multifunction device home screen.
This completes the procedure for installing the application.
| 3-1 | Downloading FUJIFILM IWpro Device Setup |
| 3-2 | Installing the Application |
| 3-3 | Configuring FUJIFILM IWpro Scan Delivery |
| 3-4 | Configuring FUJIFILM IWpro Fax Delivery |
3-3 Configuring FUJIFILM IWpro Scan Delivery
This explains settings for using FUJIFILM IWpro Scan Delivery for the first time.
This explains using an example of settings using the Configuring FUJIFILM IWpro Scan Delivery Wizard in the Internet service to transfer a scanned document to OneDrive for Business. For more detailed procedures, refer to the "FUJIFILM IWpro Scan Delivery User Guide".
- On a PC, open a web browser.
- Enter the IP address of the multifunction device in the address bar of the web browser and press the <Enter> key.
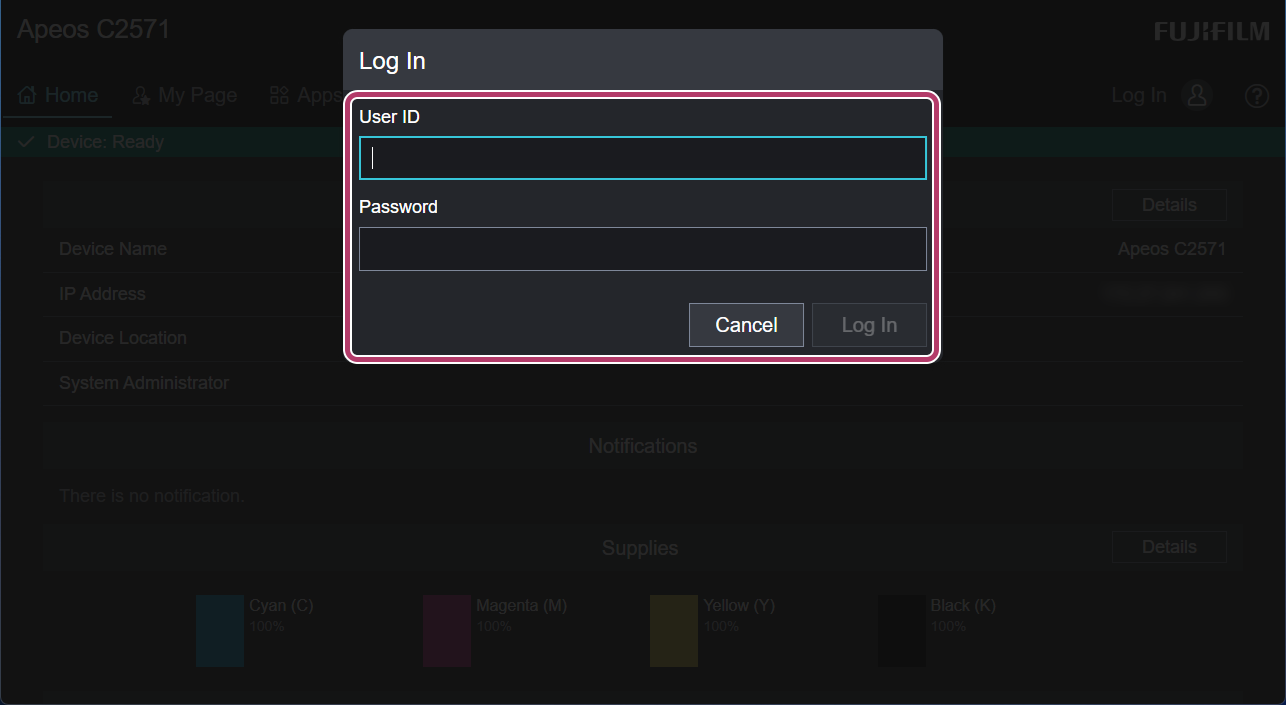
- Click [Log In].
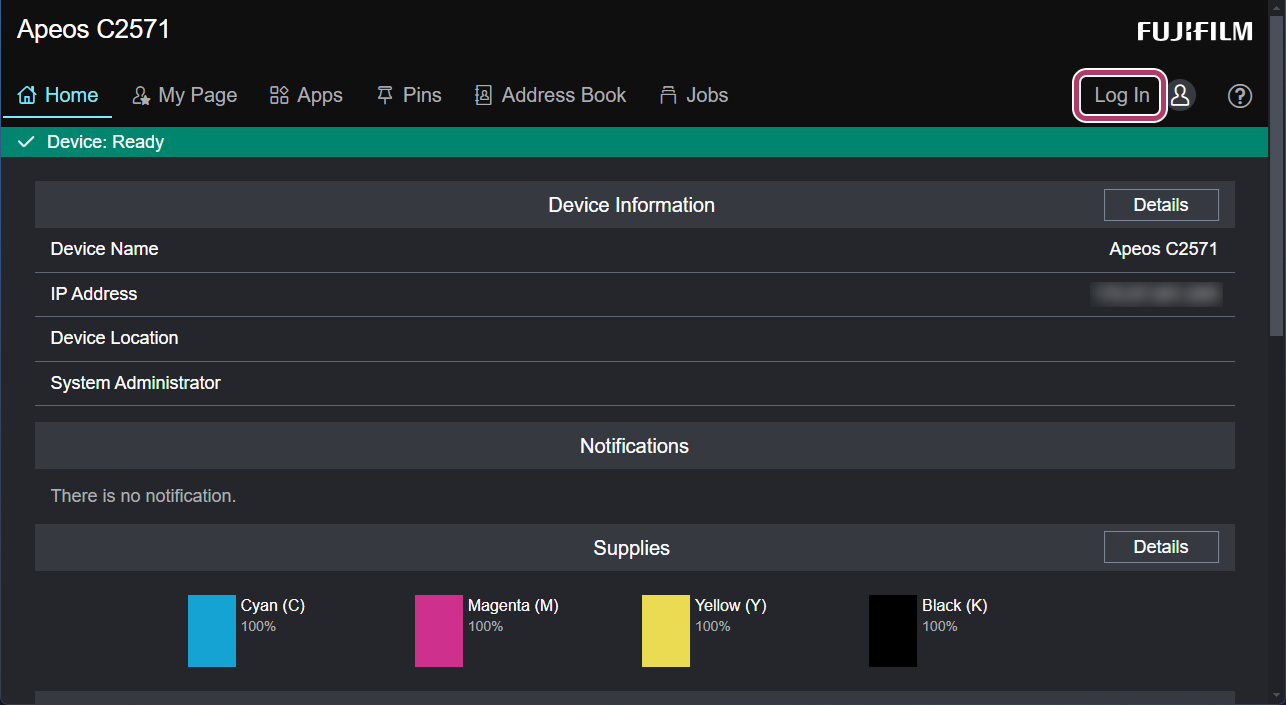
- Enter the System Administrator user ID and password, and click [Log In].
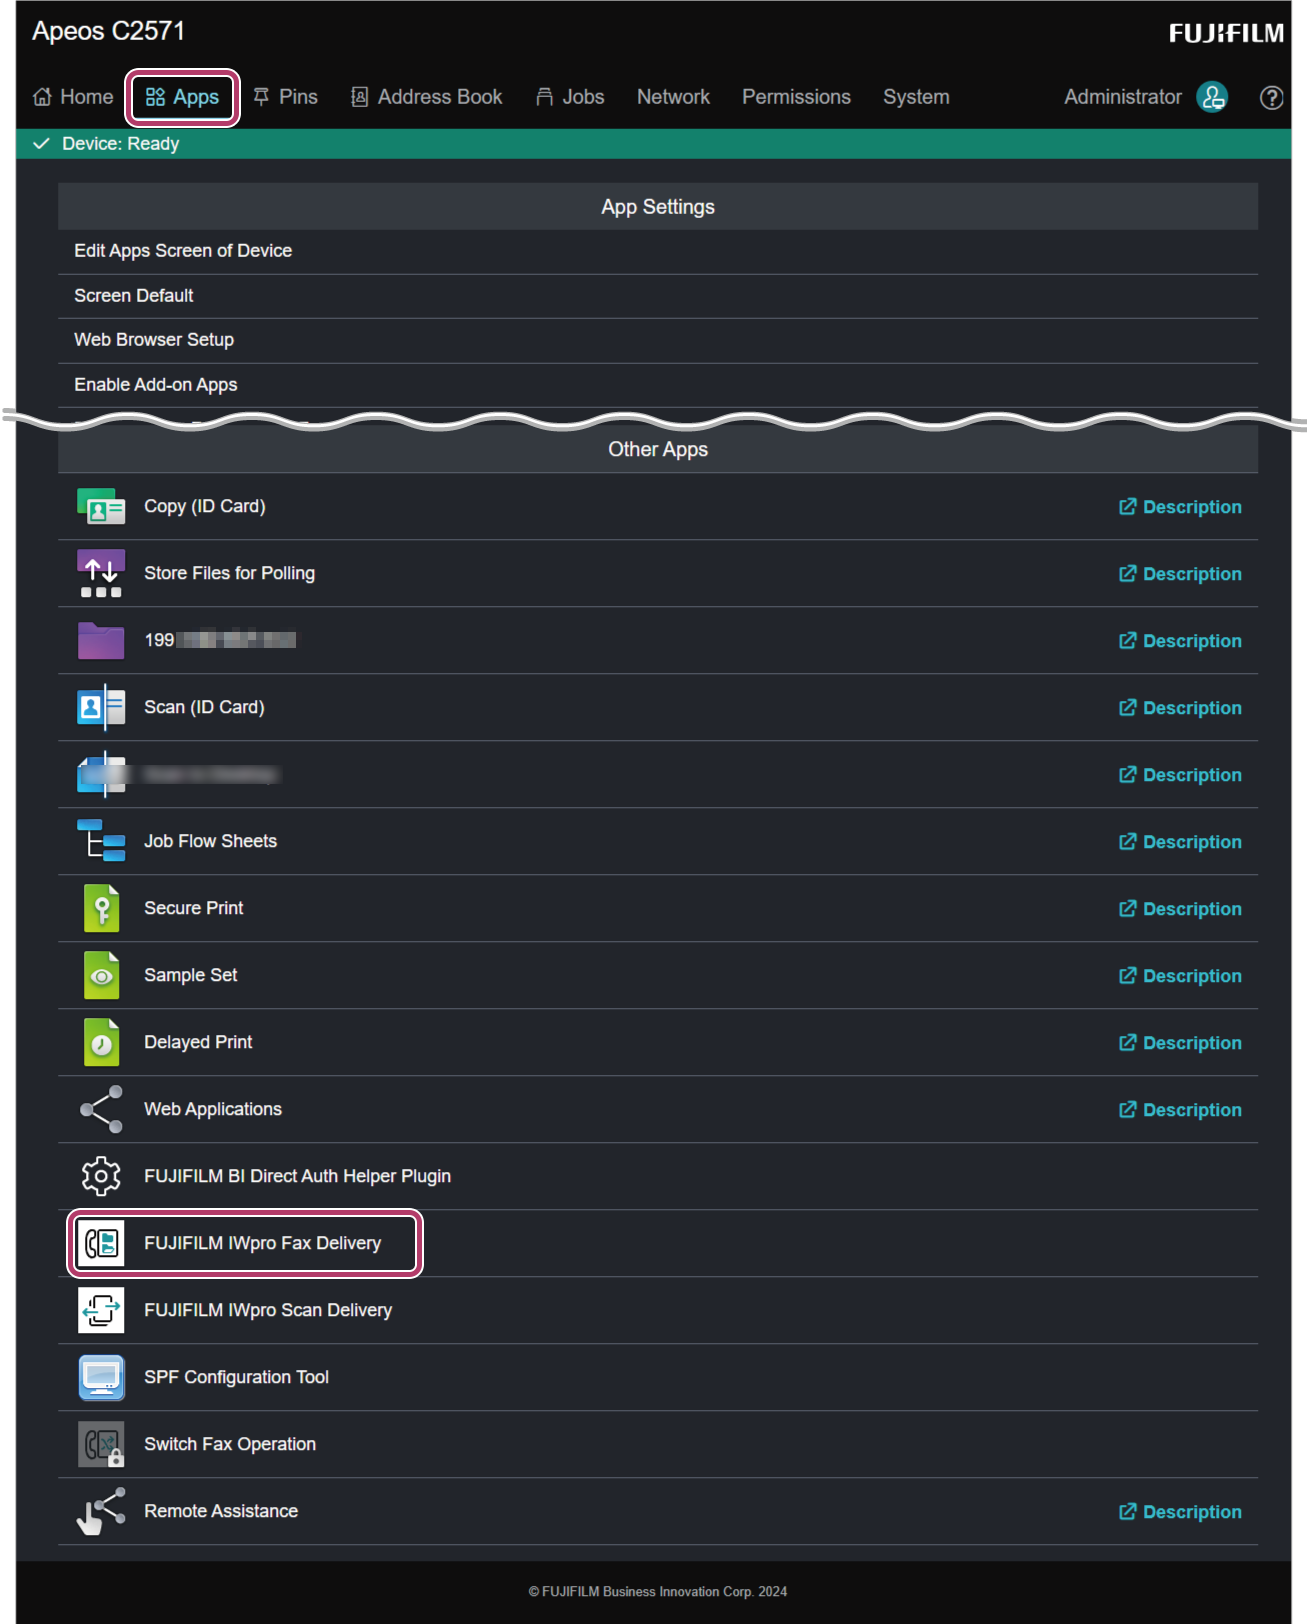
- Click [Apps], and in the Apps list, click [FUJIFILM IWpro Scan Delivery].
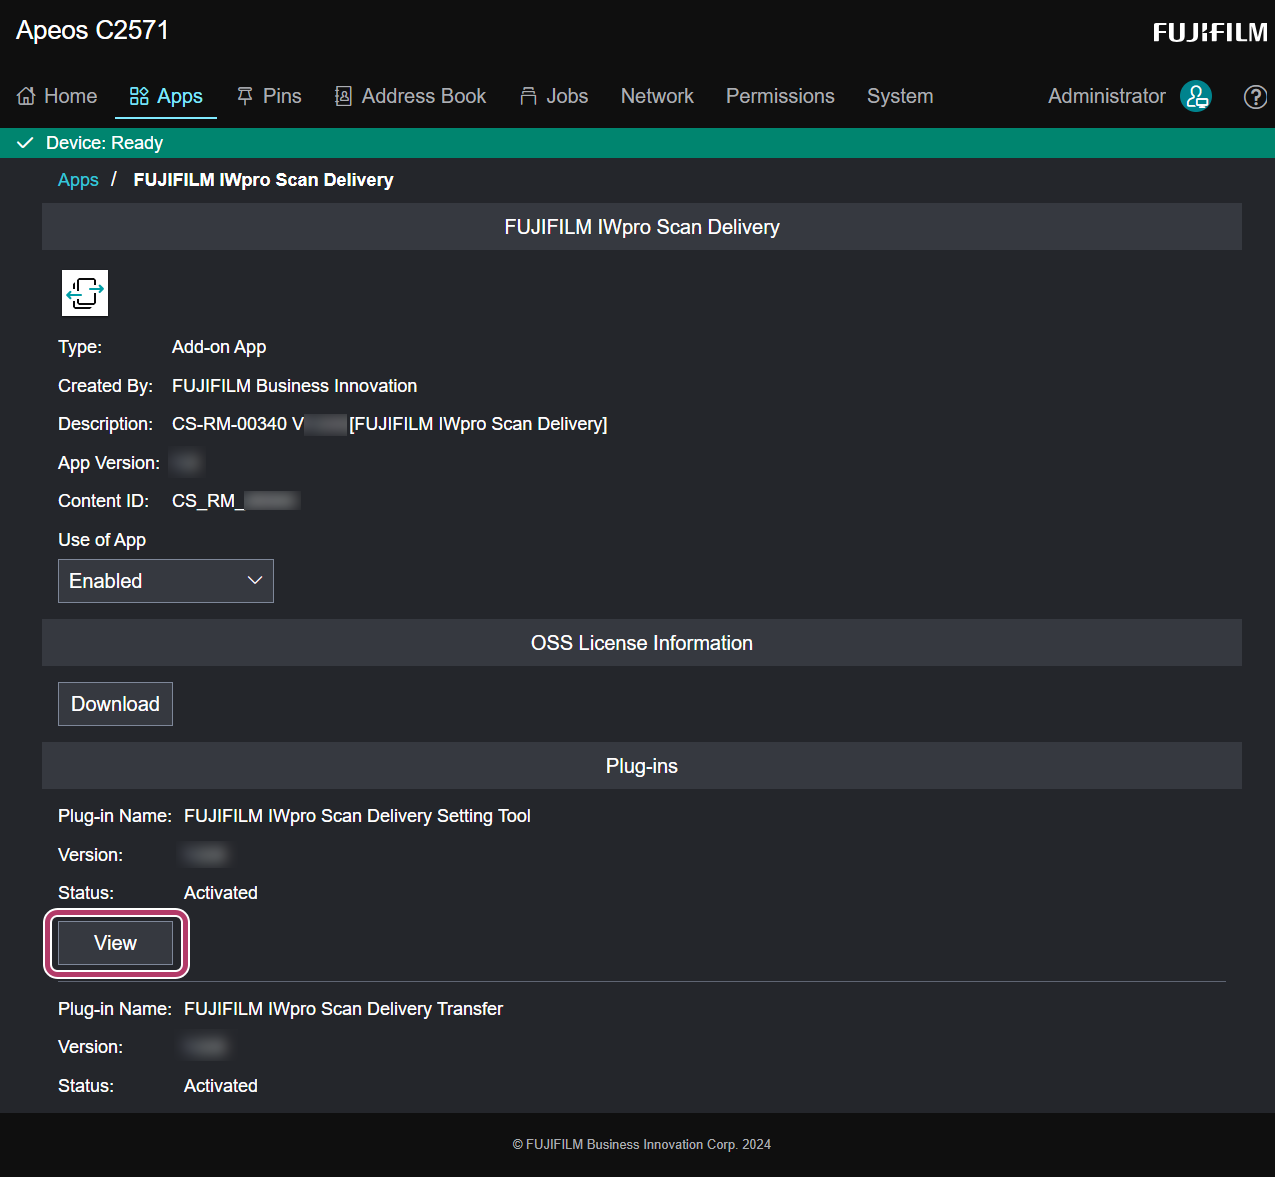
- In [Plug-ins], click [View].
- If a pop-up blocker is displayed, allow it.
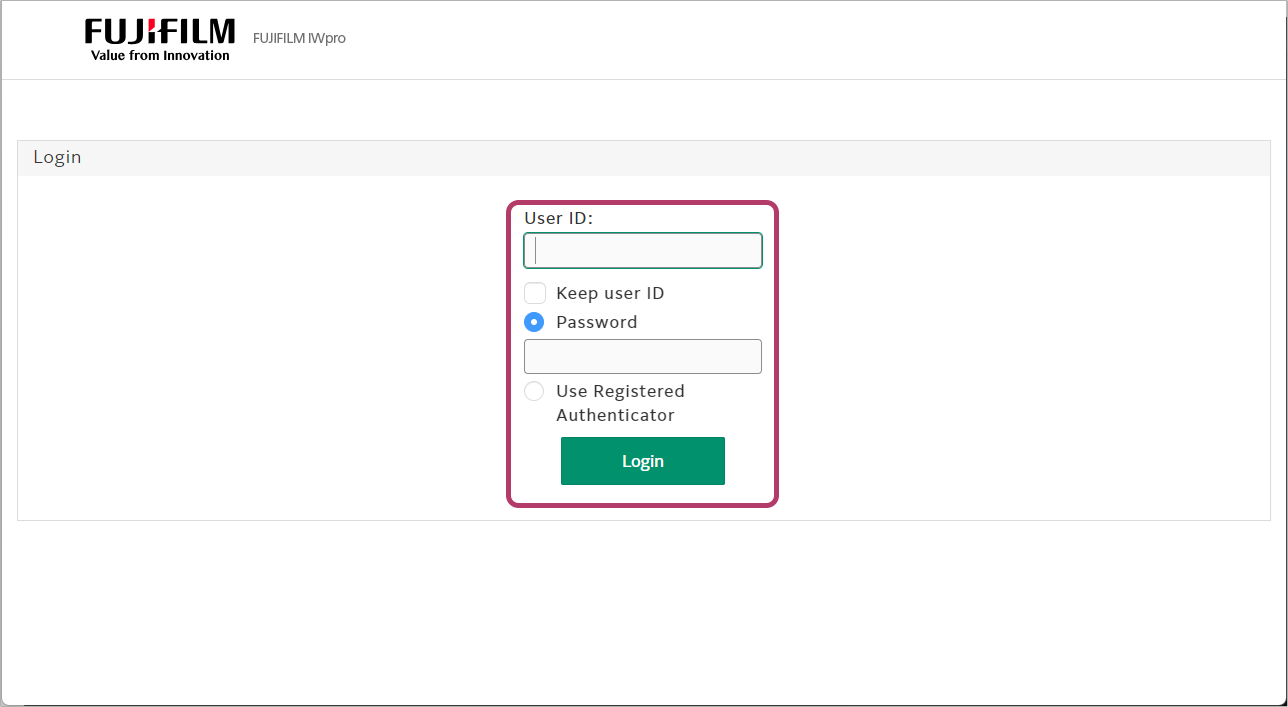
- Enter the Service Administrator user ID and password, and click [Login].
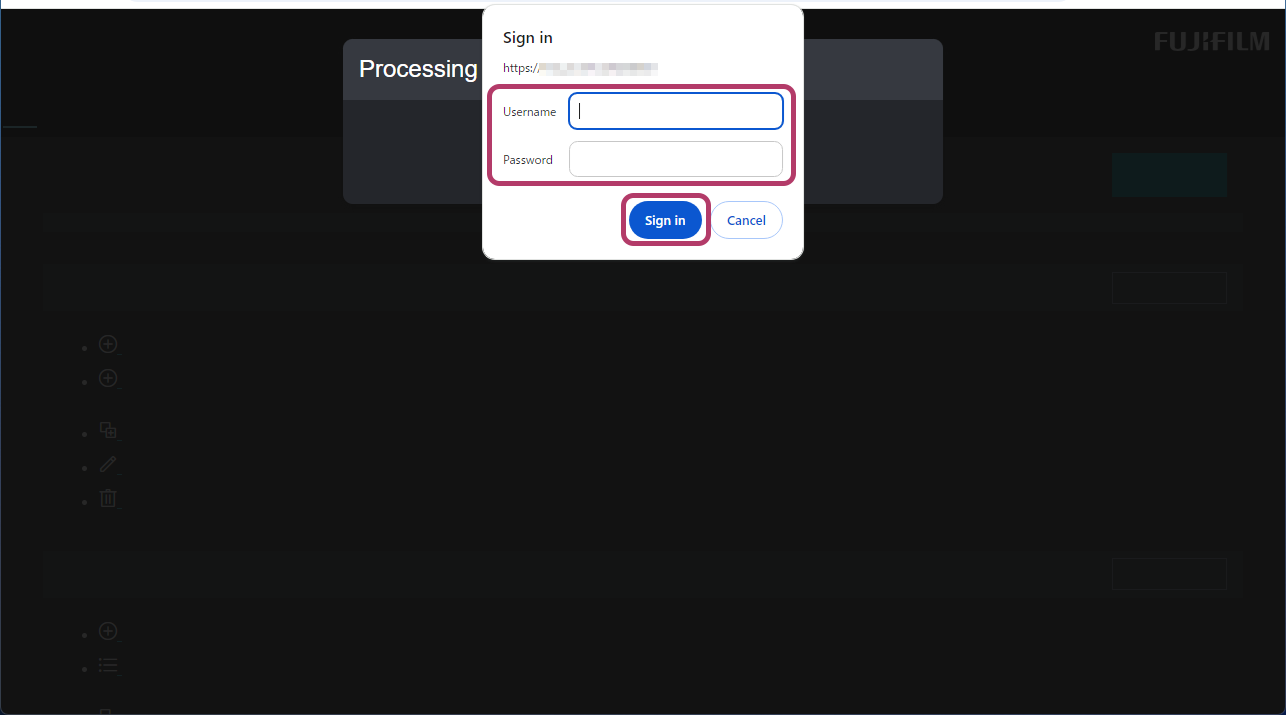
- Enter the System Administrator user name and password, and click [Sign in].
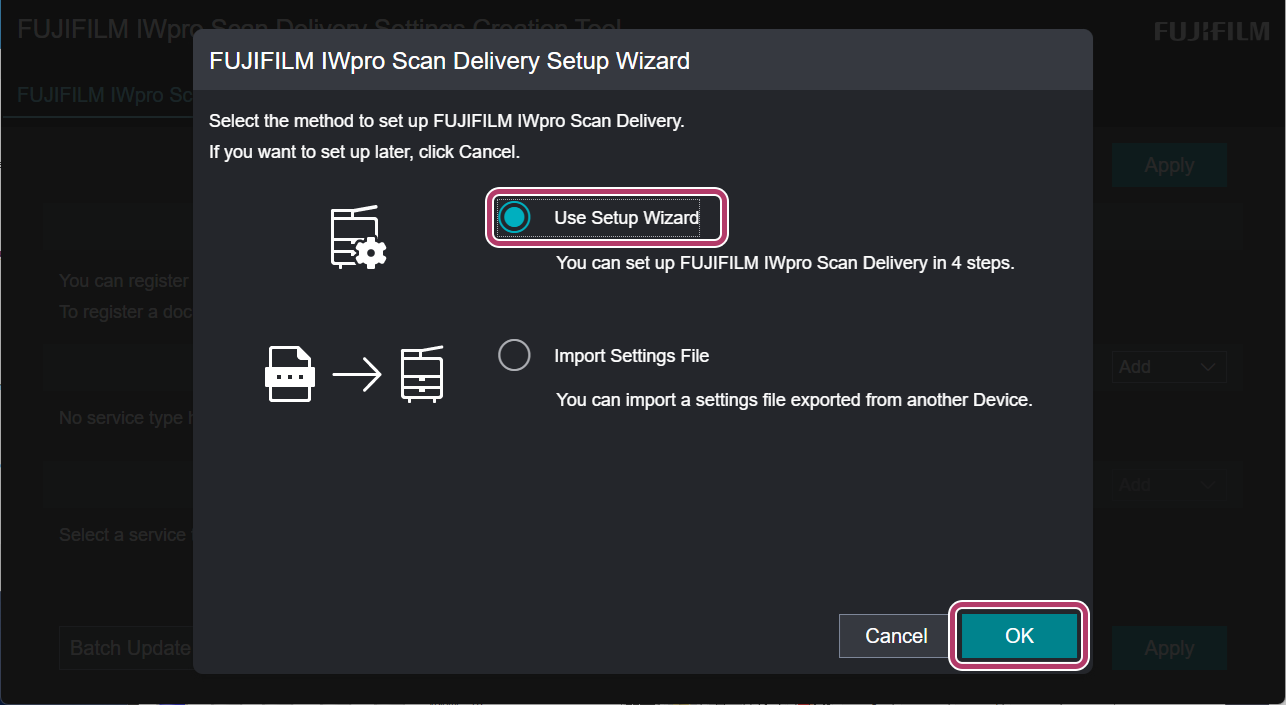
- Select [Use Setup Wizard], and click [OK].
- Select one that is similar to the type of document you will be handling from the recommended service types, and click [Next].When the settings are complete, the selected service type and document type will be displayed on the home screen of the multifunction device.

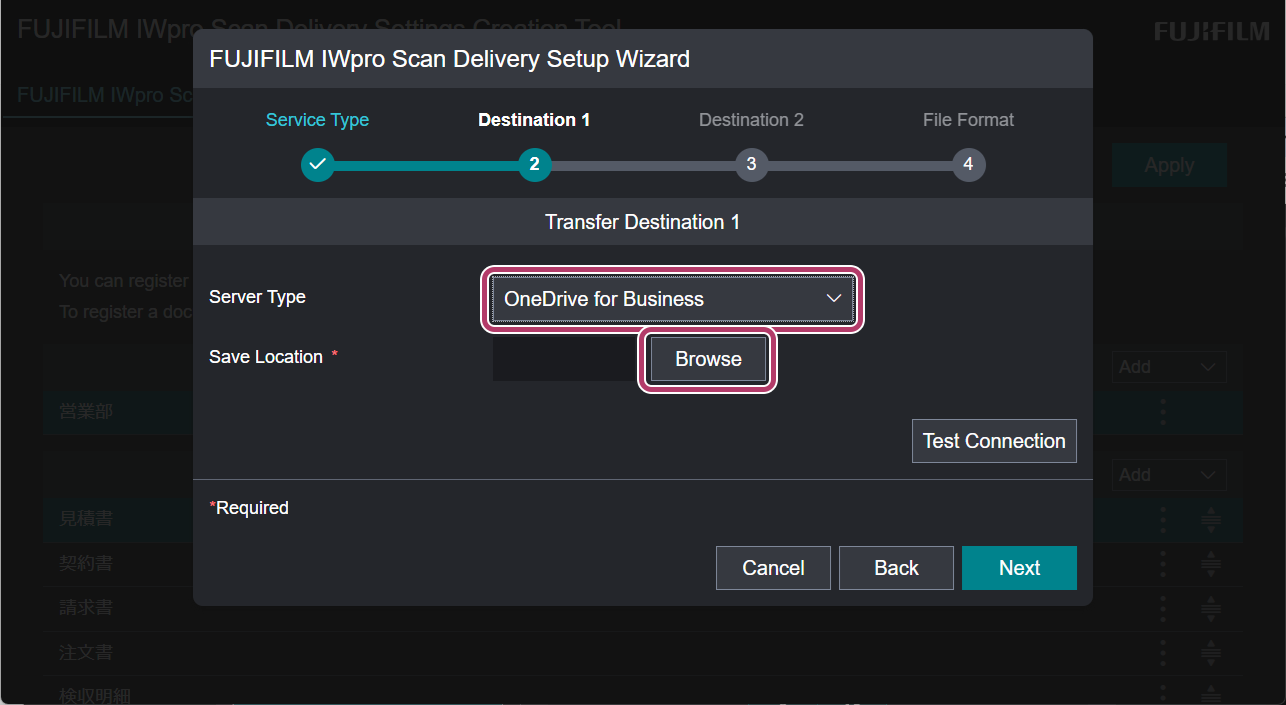
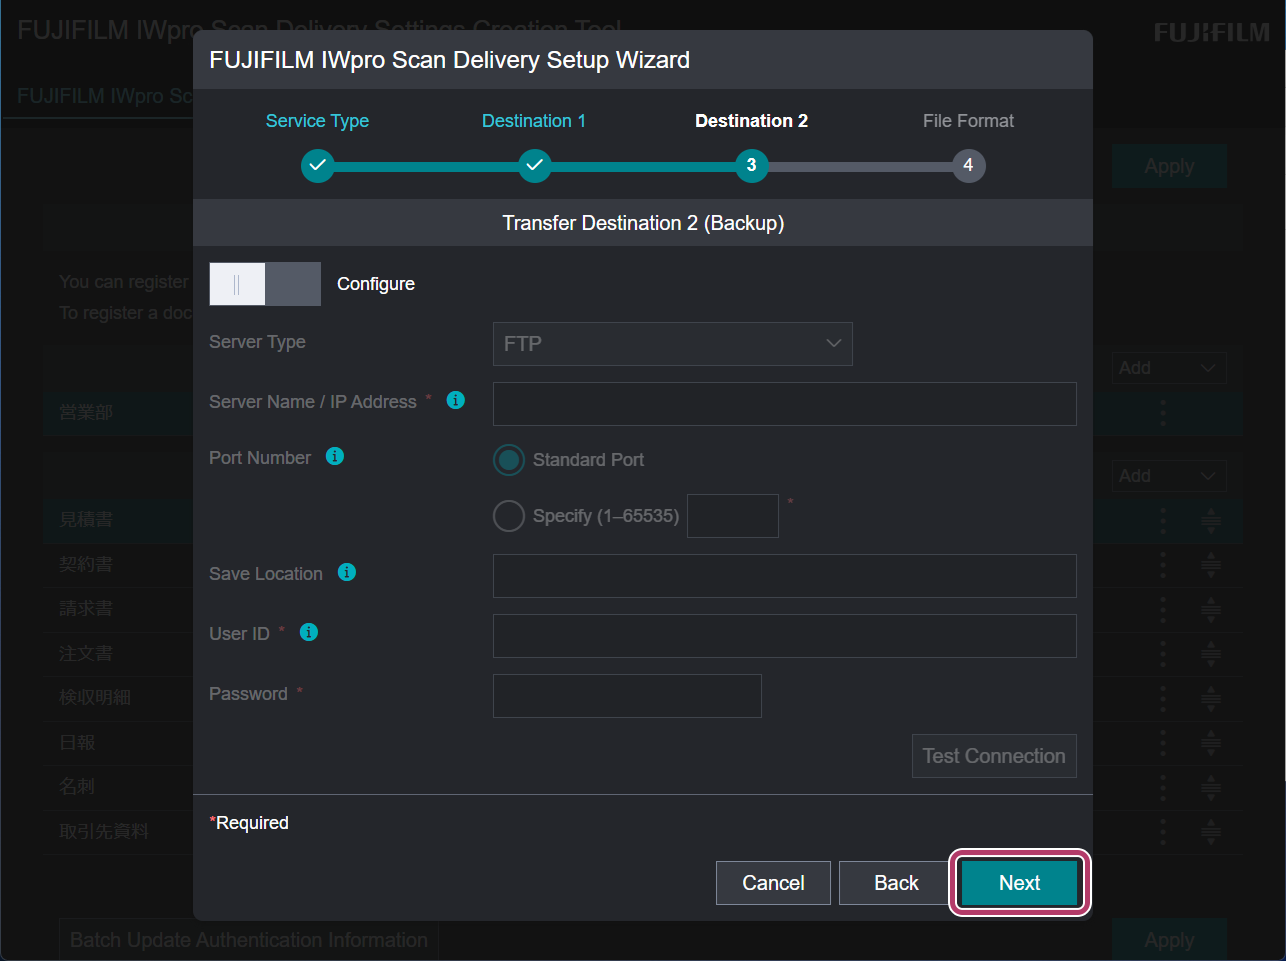
- Select the cloud service to use in [Server Type], then click [Browse] in [Save Location].
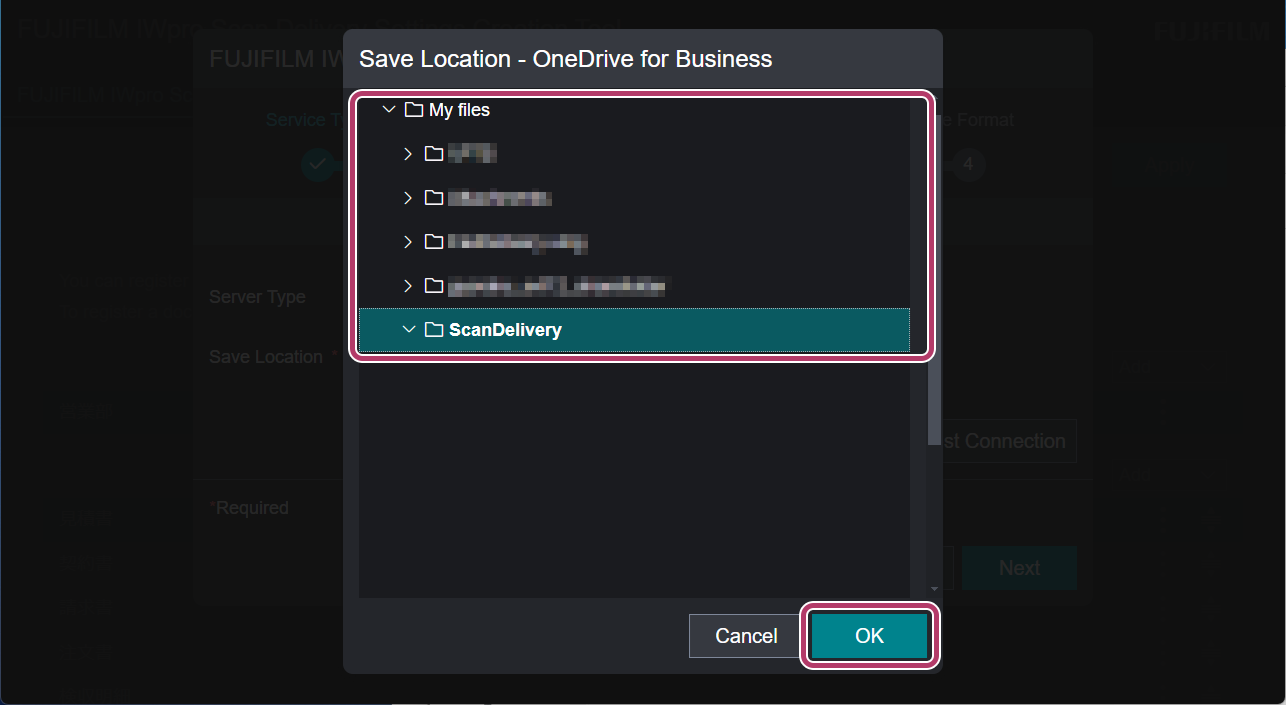
- Select the folder to save scanned documents, and click [OK].
- Select the folder created in "Creating a Shared Folder" in "Step 1: Configuring Cloud Service Link Settings".
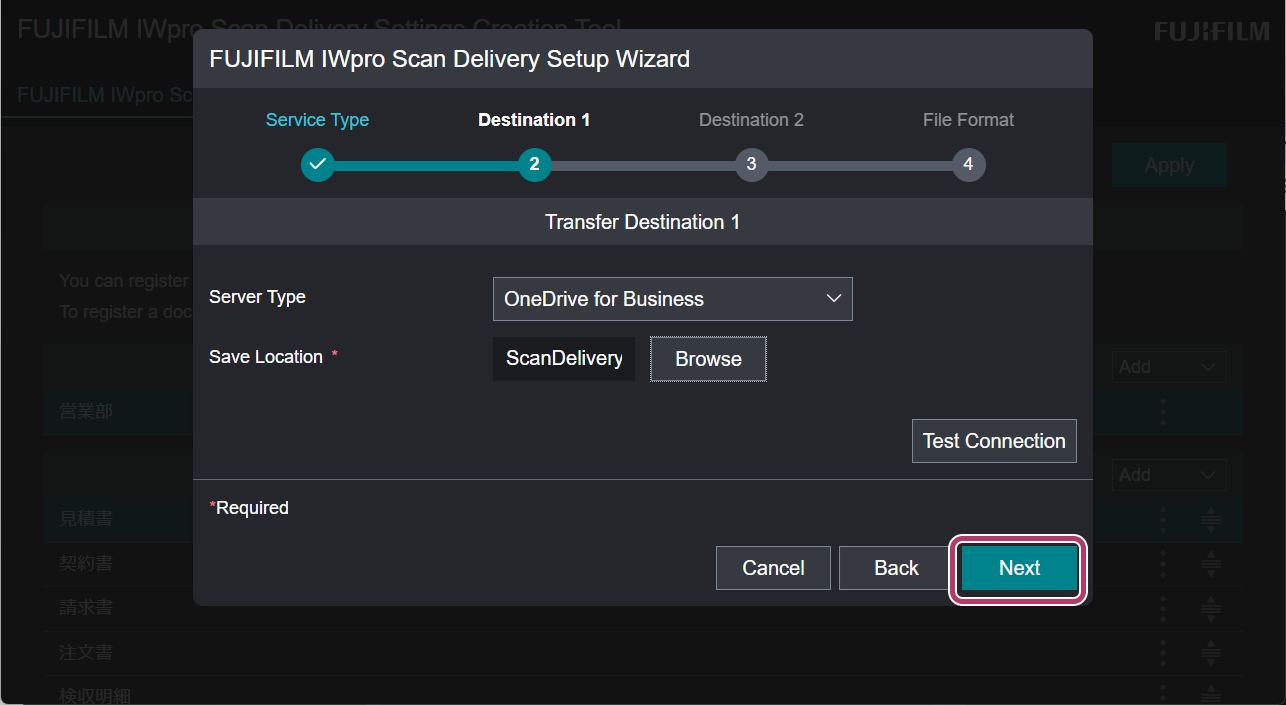
- Click [Next].
- If necessary, enable [Configure] and click [Next].
- For more information, refer to the "FUJIFILM IWpro Scan Delivery User Guide".
- Select the file format to save, and click [Done].
- The following items are commonly set for documents linked to services.
- Folder Name: Document Type Name
- File Name: Date and Time (YYYY-MMDD-hhmmss)
- Skew Correction: ON
- Skip Blank Pages: ON
- Auto Upright Orientation: ON
- Split Multiple Documents: ON
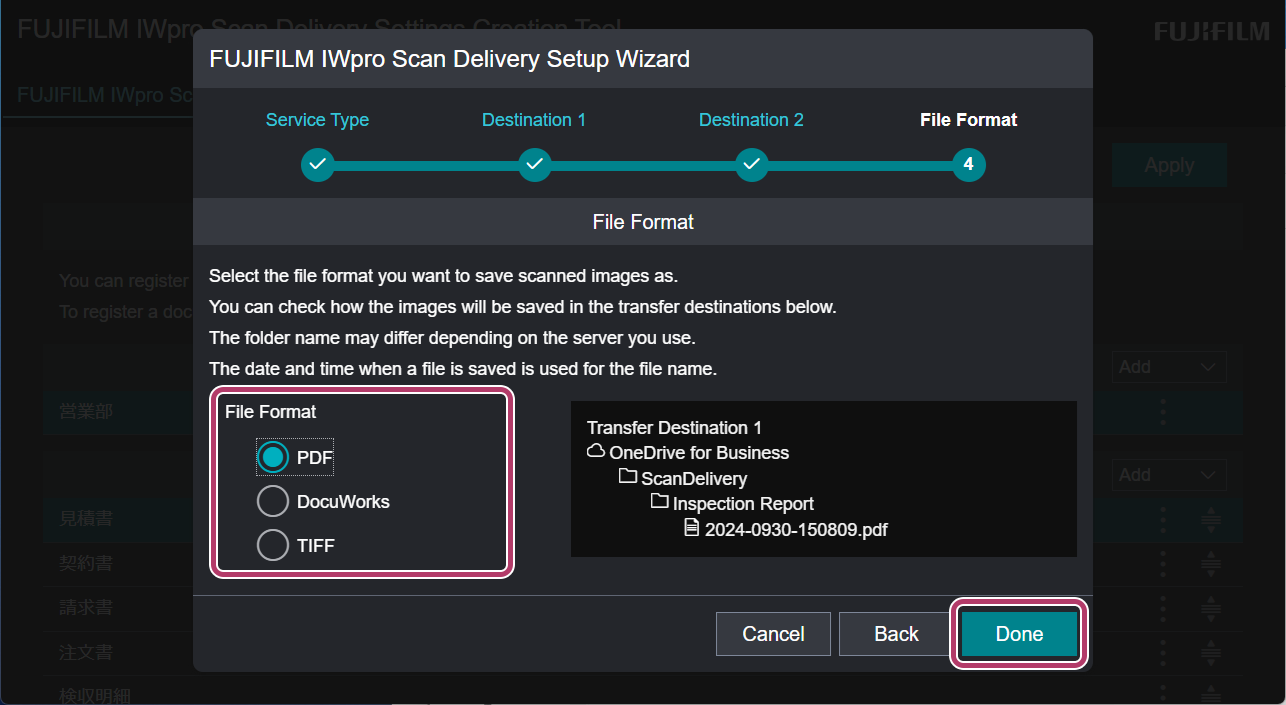
- The following items are commonly set for documents linked to services.
- Click [OK].
This completes the procedure for configuring FUJIFILM IWpro Scan Delivery.
| 3-1 | Downloading FUJIFILM IWpro Device Setup |
| 3-2 | Installing the Application |
| 3-3 | Configuring FUJIFILM IWpro Scan Delivery |
| 3-4 | Configuring FUJIFILM IWpro Fax Delivery |
3-4 Configuring FUJIFILM IWpro Fax Delivery
This explains settings for using FUJIFILM IWpro Fax Delivery for the first time.
This explains using an example of settings for how to save documents received by fax to OneDrive for Business. For detailed procedures, refer to the "FUJIFILM IWpro Fax Delivery User Guide".
- When Paperless Fax Delivery is installed on the multifunction device, first backup paperless fax settings data.
- For the backup procedure, refer to "Export the Setting Information" in the "FUJIFILM IWpro Fax Delivery User Guide".
- If a confirmation screen is displayed, tap [OK]. Paperless Fax Delivery settings data will be deleted, and the settings data transferred to FUJIFILM IWpro Fax Delivery.
- If [(Not Set)] is displayed for [Line 1], [Line 2], [Line 3], and [Exception Operation Mode] in [Line Status] when you open Paperless Fax Delivery in Internet Services, the setting data was successfully migrated to FUJIFILM IWpro Fax Delivery.
If information is displayed in [Line Settings], but [(Not Set)] is displayed for [Transfer 1], [Transfer 2], and [Notification Destination], there is no problem.
- If [(Not Set)] is displayed for [Line 1], [Line 2], [Line 3], and [Exception Operation Mode] in [Line Status] when you open Paperless Fax Delivery in Internet Services, the setting data was successfully migrated to FUJIFILM IWpro Fax Delivery.
- Log in as System Administrator to the multifunction device.
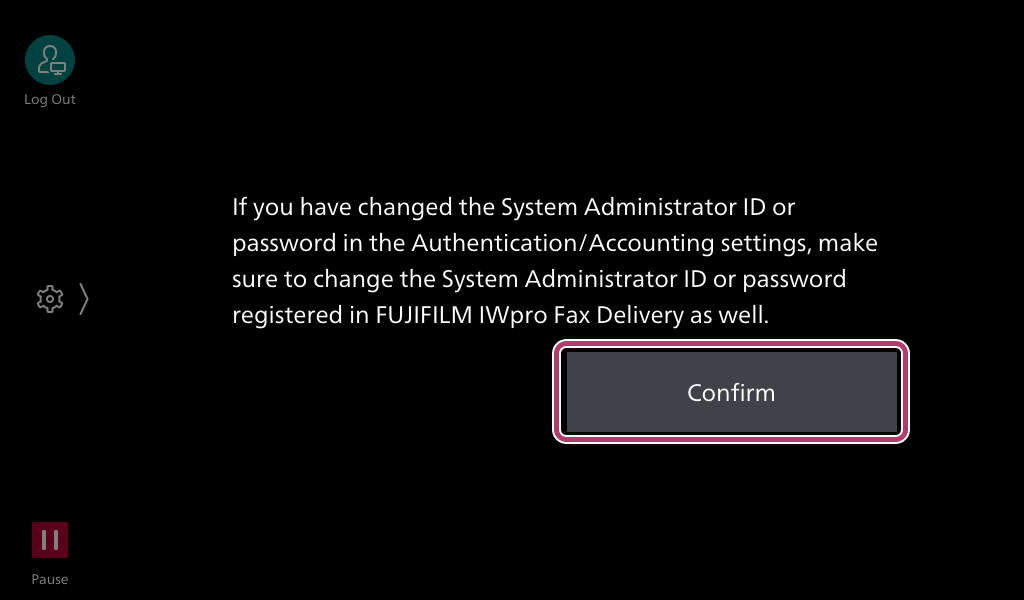
- Tap [FUJIFILM IWpro Fax Delivery].
- Tap [Confirm].
- This will not be shown from subsequent logins. If the System Administrator ID and password are changed, this will be displayed.
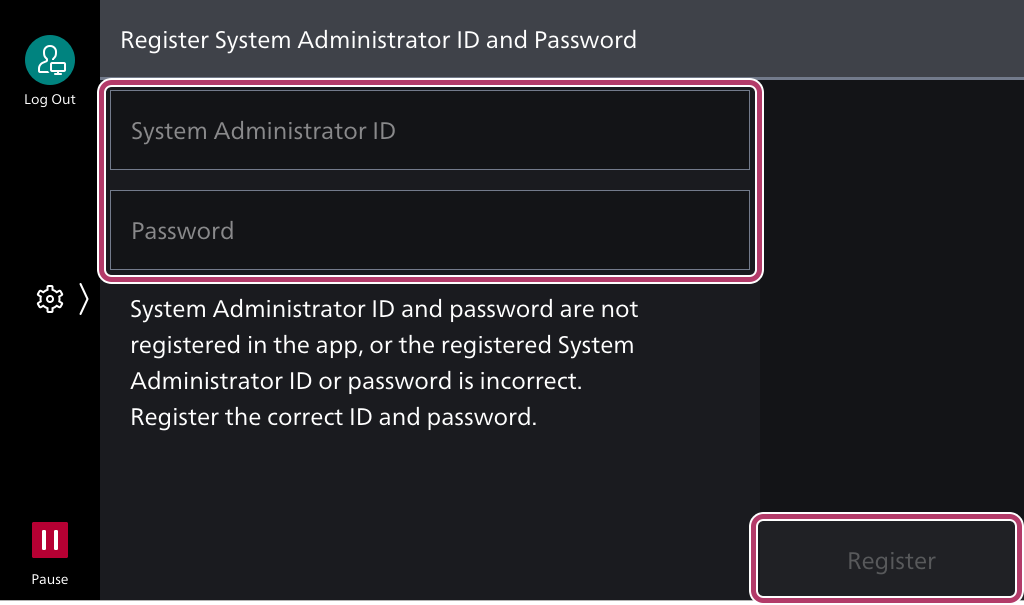
- Enter the System Administrator ID and password, and tap [Register].
- This will not be shown from subsequent logins. If the System Administrator ID and password are changed, this will be displayed.
- Enter the Service Administrator user ID and password, and tap [Login].
- The e-mail address used to log in is set as the destination to send the results of forwarding to FUJIFILM IWpro.
- If the screen to select the line is displayed, select the line to set, and tap [Next].
- Select the cloud service to as the forwarding destination.
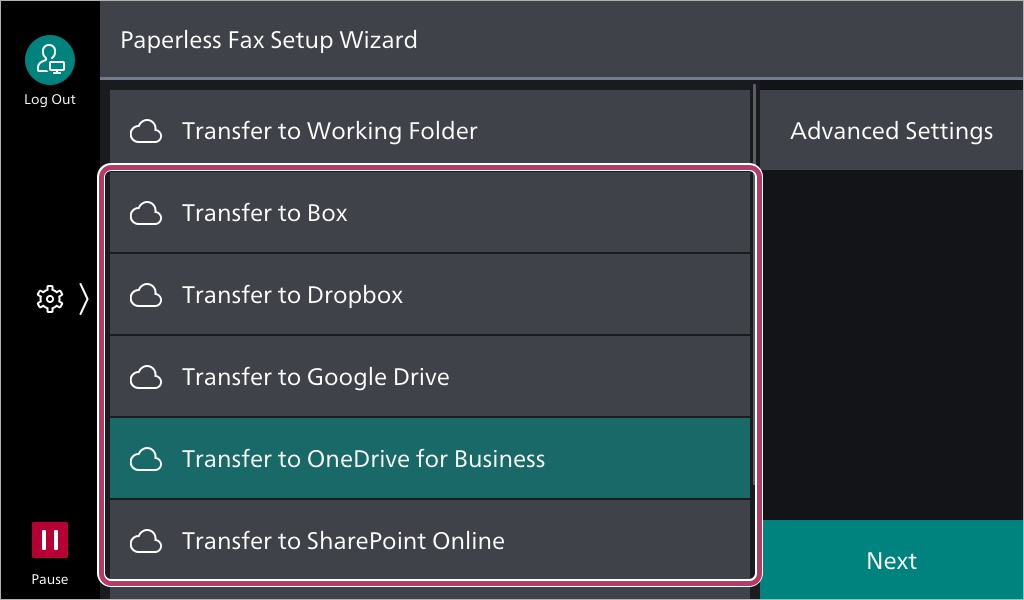
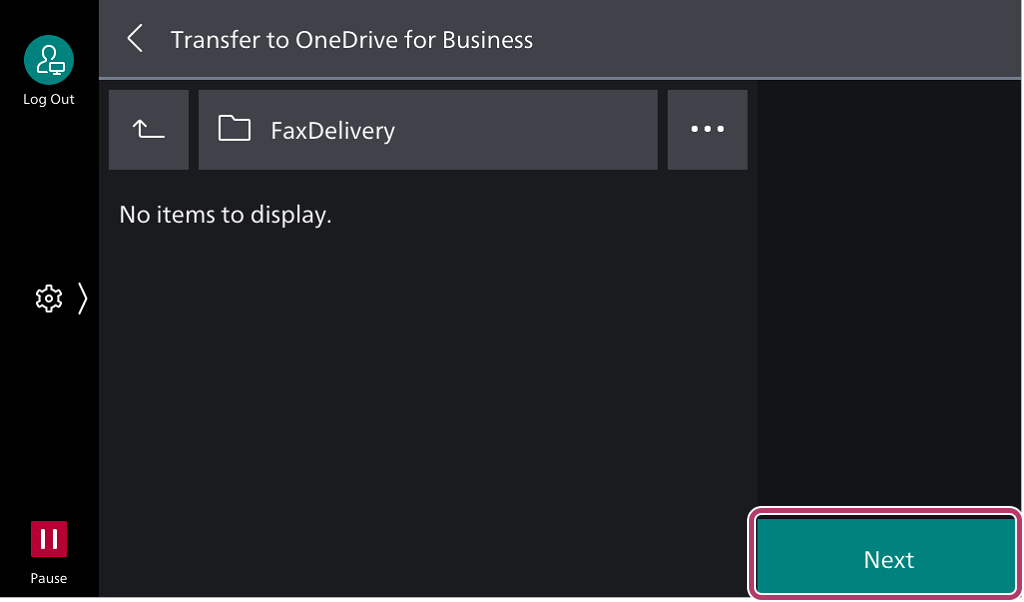
- Tap the folder to save the document received by fax.
- Select the folder created in "Creating a Shared Folder" in "Step 1: Configuring Cloud Service Link Settings".
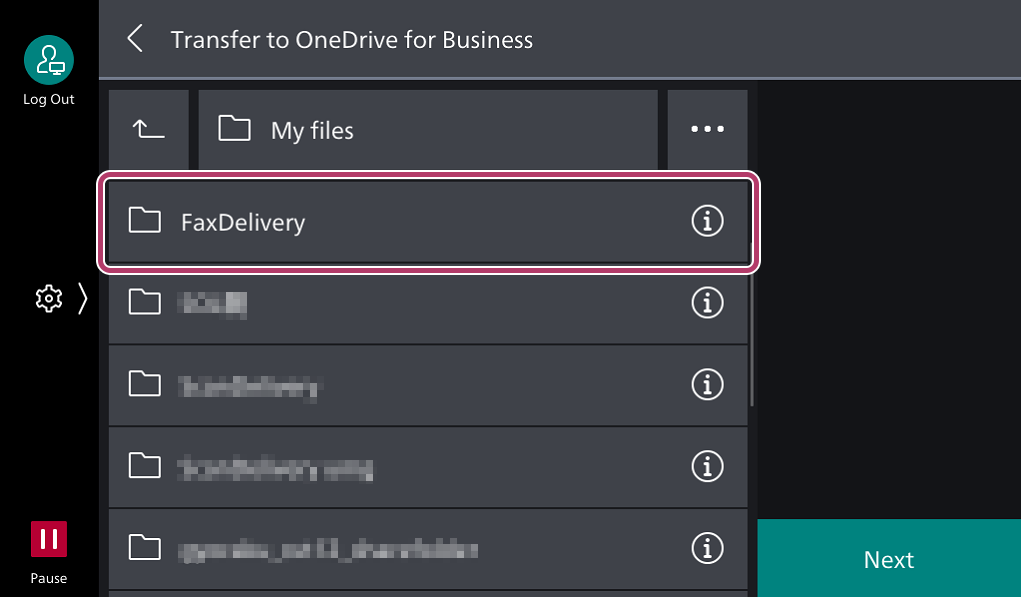
- Tap [Next].
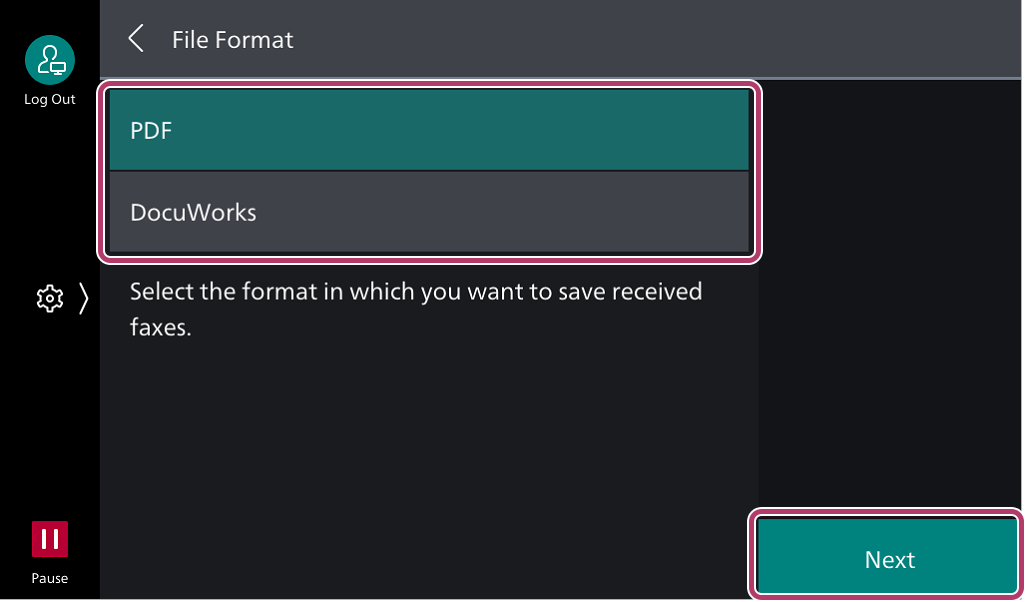
- Select the save format for the document received by fax, and tap [Next].
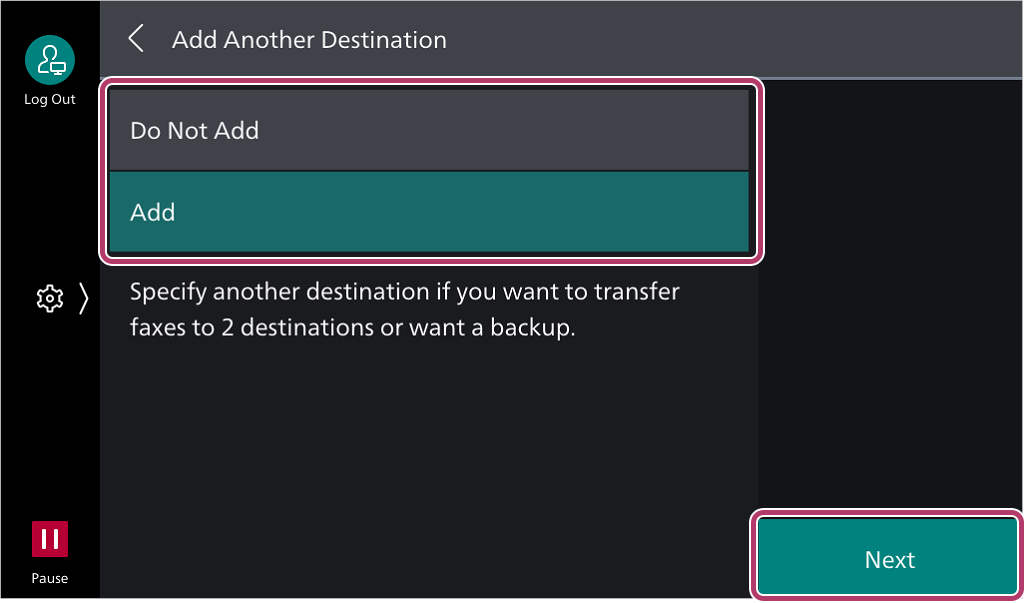
- Select whether to add a transfer destination, and tap [Next].If you select [Do Not Add], move to the next step.
If you select [Add], repeat steps 6 to 9 to add a transfer destination.
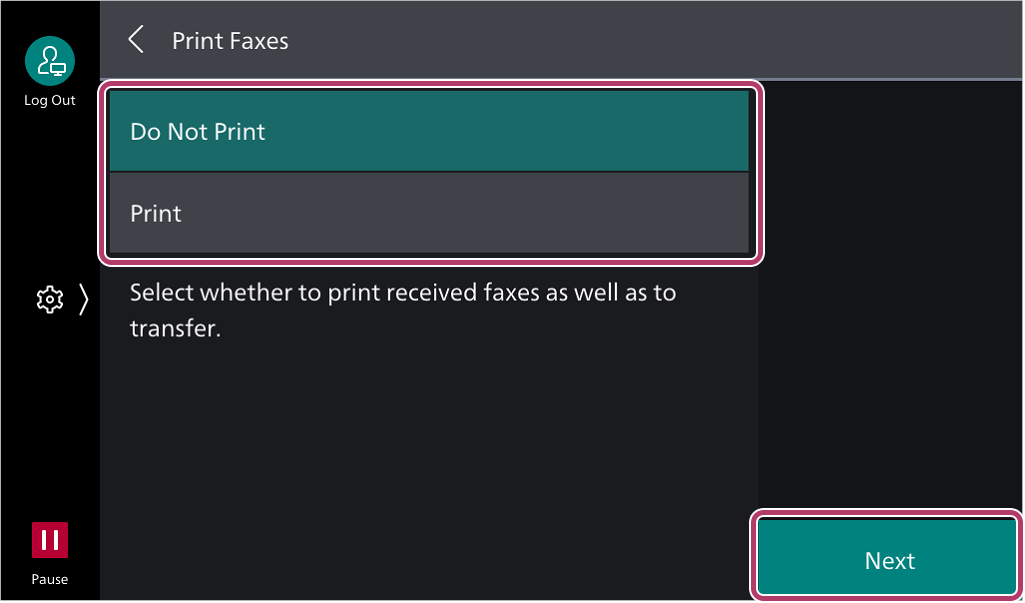
- Select whether to output to paper documents received by fax, and tap [Next].
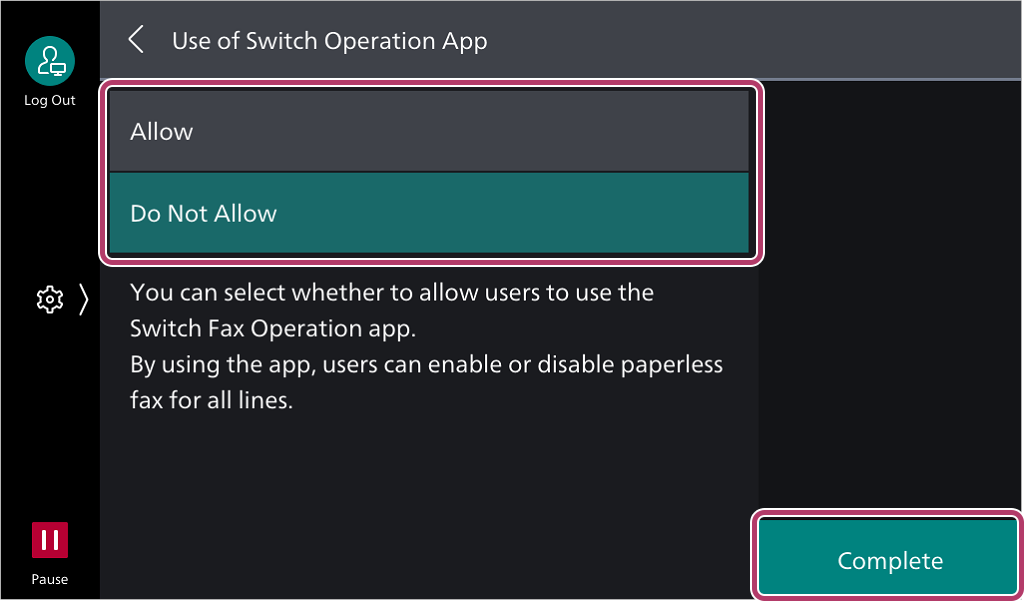
- Select whether or not to switch between normal mode and exception mode, and tap [Complete].
- "Exception mode" is an operation that is different from normal. If you select [Allow], printing (paper output) will be automatically set as an exception mode. For how to manually switch between normal mode and exception mode, and for detailed settings methods, refer to the "FUJIFILM IWpro Fax Delivery User Guide".
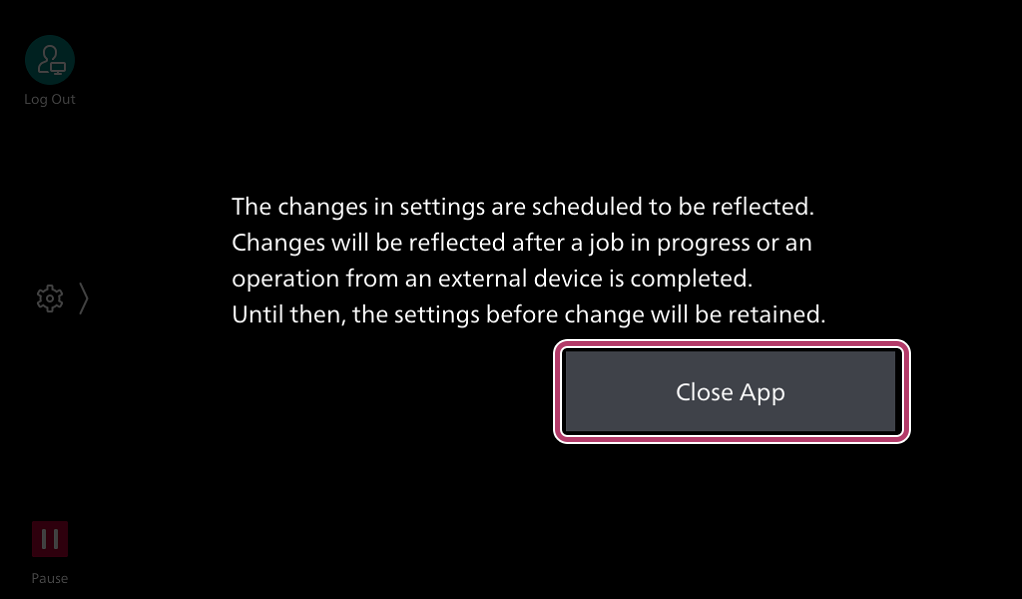
- Tap [Close App].
This completes the procedure for configuring FUJIFILM IWpro Fax Delivery.
This completes step 3. Click [Next] to proceed to step 4.