Step 1: Configuring Cloud Service Link Settings
Configure the following settings.
- Configuring the Cloud Service
- Linking FUJIFILM BI Direct with the Cloud Service
- Connecting FUJIFILM BI Direct with the Cloud Service
- Creating a Shared Folder
Click the cloud service to use to display the procedure.
Procedures and screens are subject to change without notice.
When Using SharePoint Online/OneDrive/Box
When using SharePoint Online/OneDrive/Box, configure the following settings.
- Linking FUJIFILM BI Direct with the Cloud Service to Use
- Connecting FUJIFILM BI Direct with the Cloud Service to Use
- Creating a Shared Folder
Linking FUJIFILM BI Direct with the Cloud Service to Use
Configure the settings for linking FUJIFILM BI Direct with the cloud service to use.
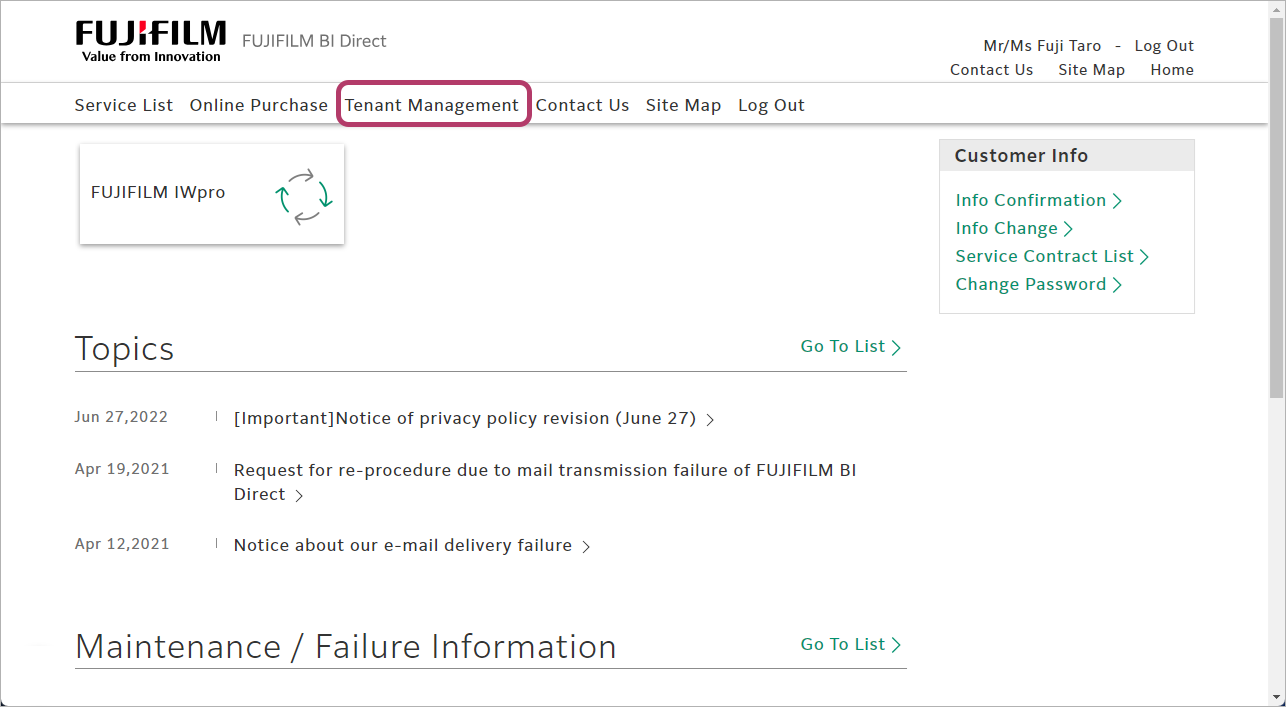
- Log in to FUJIFILM BI Direct.
https://direct-fb.fujifilm.com/ap2/top
- If a screen prompting you to agree to the terms of use or privacy policy for FUJIFILM IWpro is displayed, check the displayed information and click [Accept and Proceed].
- When first using FUJIFILM BI Direct, FUJIFILM BI Direct registration is necessary. Register as shown on the screen.
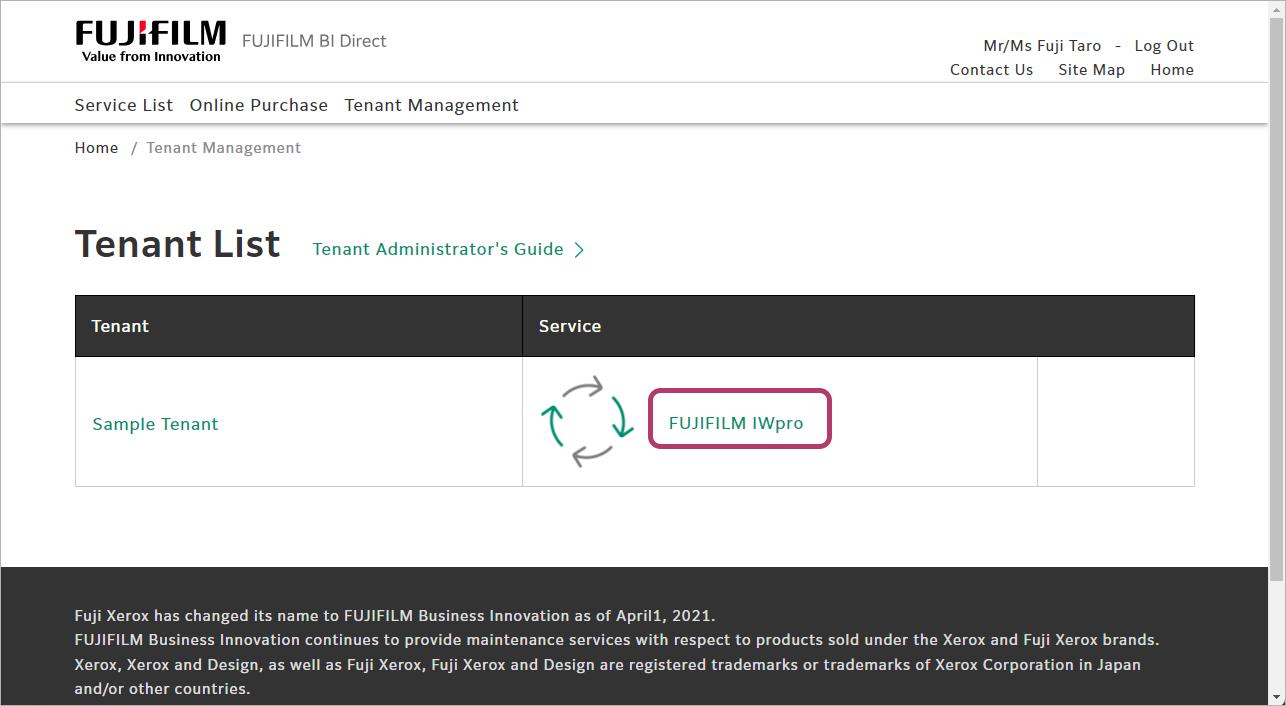
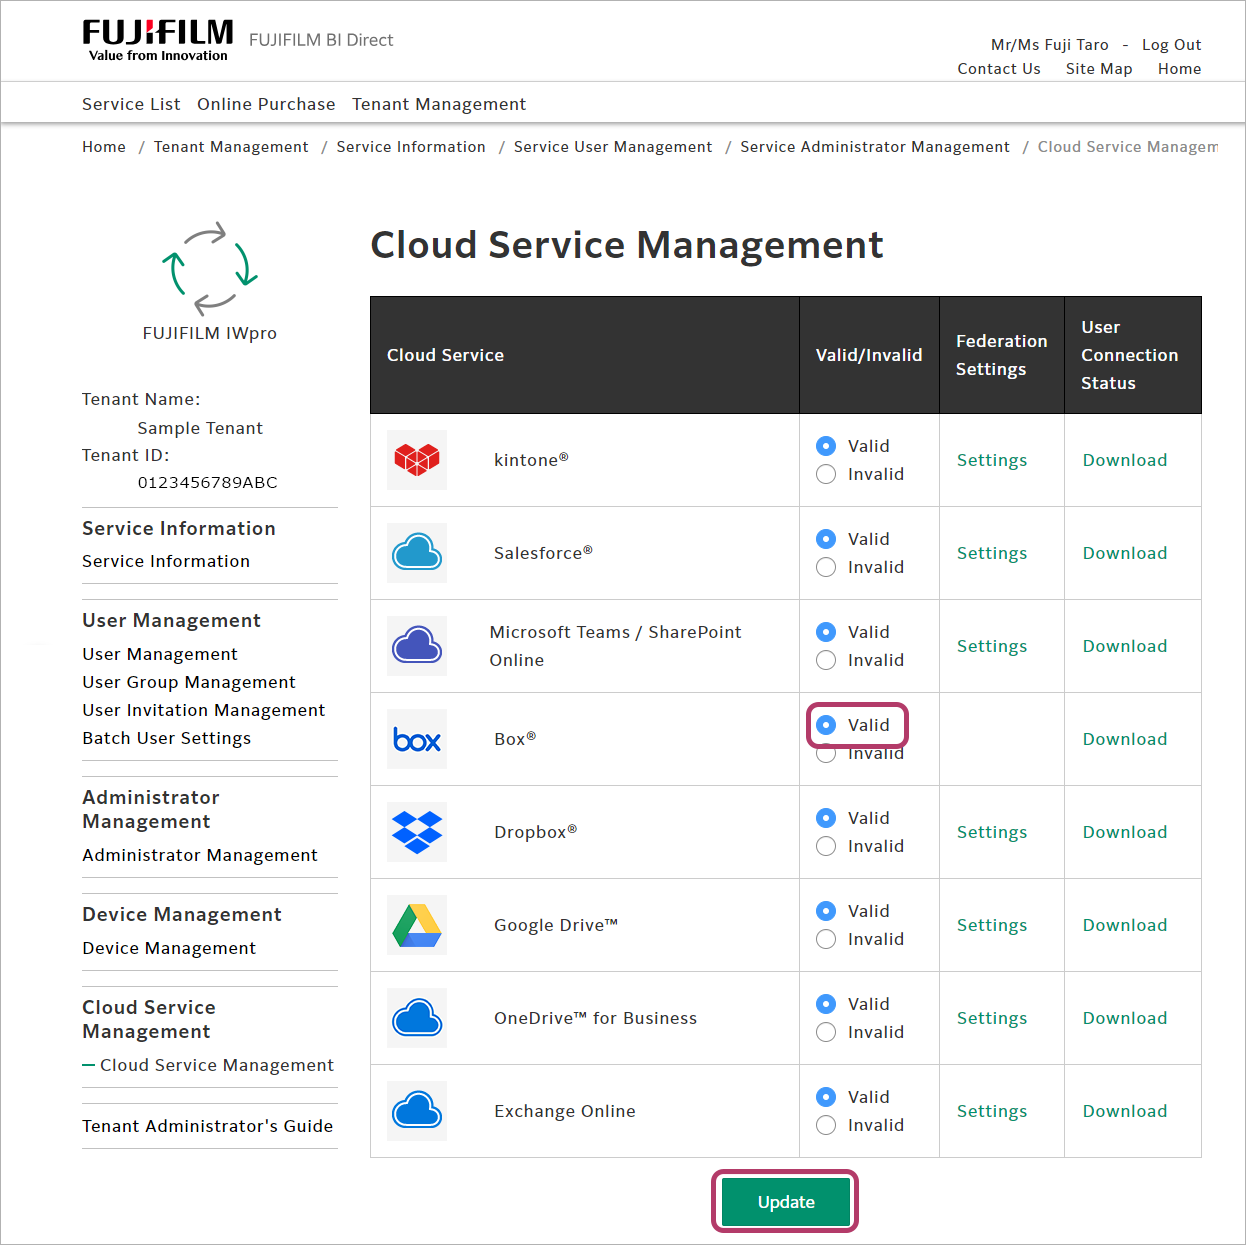
- Click [Tenant Management].
- Click [FUJIFILM IWpro] in the [Service] field.
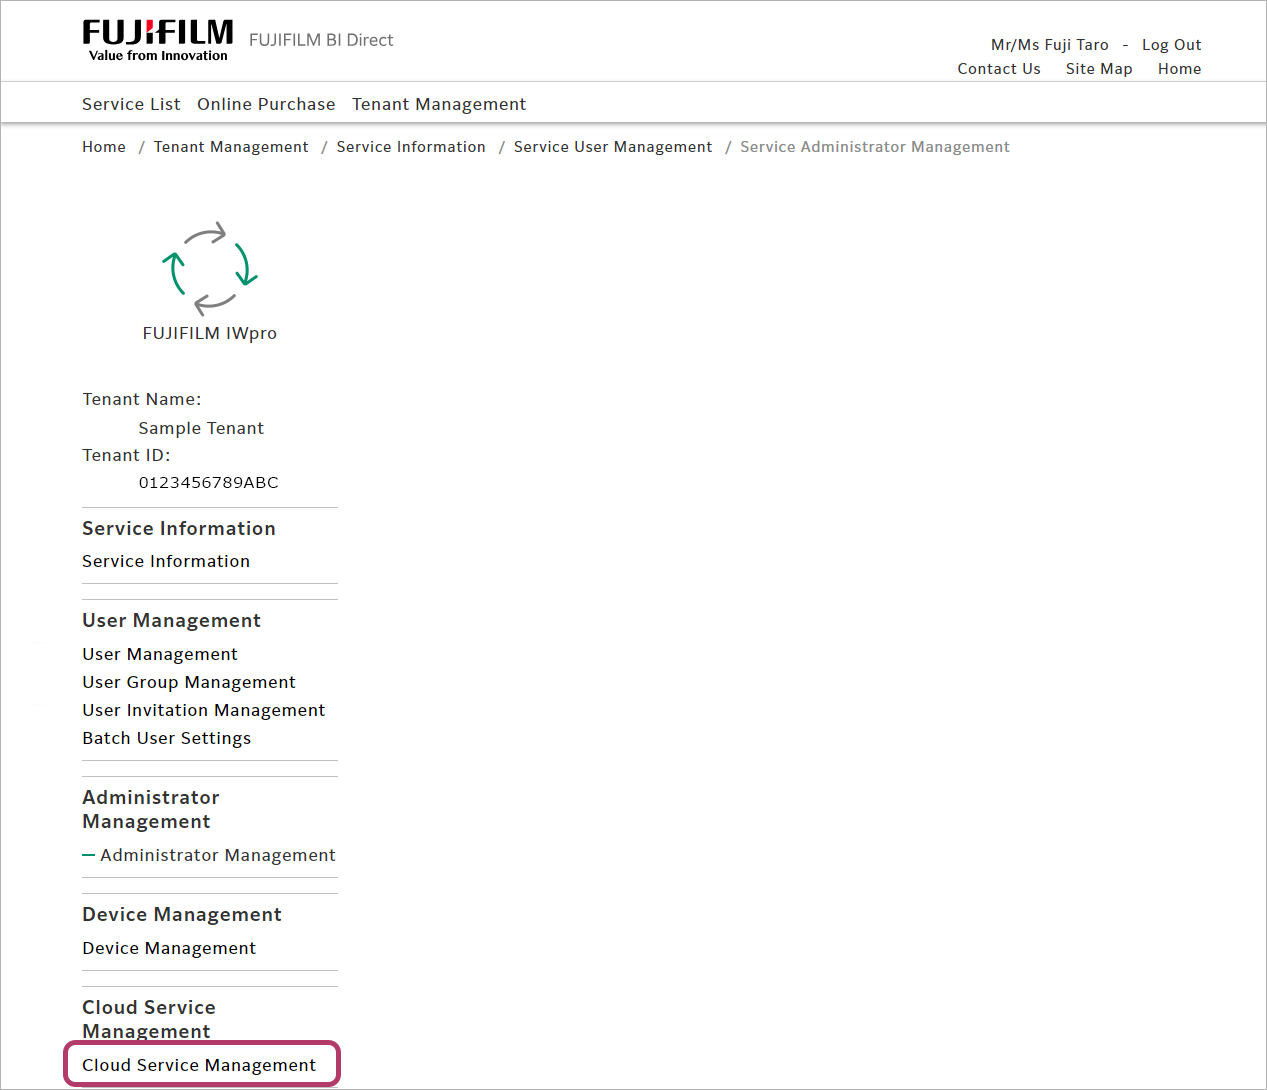
- Click [Cloud Service Management] in [Cloud Service Management].
- Select [Valid] for the cloud service to use, then click [Update].
- For Box, enable the user of FUJIFILM IWpro on the admin console screen of Box.
- If user access permissions (consent) to applications are restricted due to Microsoft Entra ID settings, connection may fail. In such cases, please request your organization's Microsoft Entra ID administrator to grant access permissions (consent) to the following applications.
- When configuring linkage with Microsoft Teams / SharePoint Online
Application Name: FUJIFILM IWpro
Application ID: 16f3deb8-19d1-417c-aa5b-03a7a57dbcbe - When configuring linkage with OneDrive for Business
Application Name: FUJIFILM IWpro
Application ID: b42237fe-384e-4c6f-a929-de4bd4a989a4 - When configuring linkage with Exchange Online
Application Name: FUJIFILM IWpro
Application ID: c245238d-538a-4979-bfc0-7db9fcb3282a
- When configuring linkage with Microsoft Teams / SharePoint Online
Connecting FUJIFILM BI Direct with the Cloud Service to Use
Configure the connection settings for using the cloud service in FUJIFILM BI Direct.
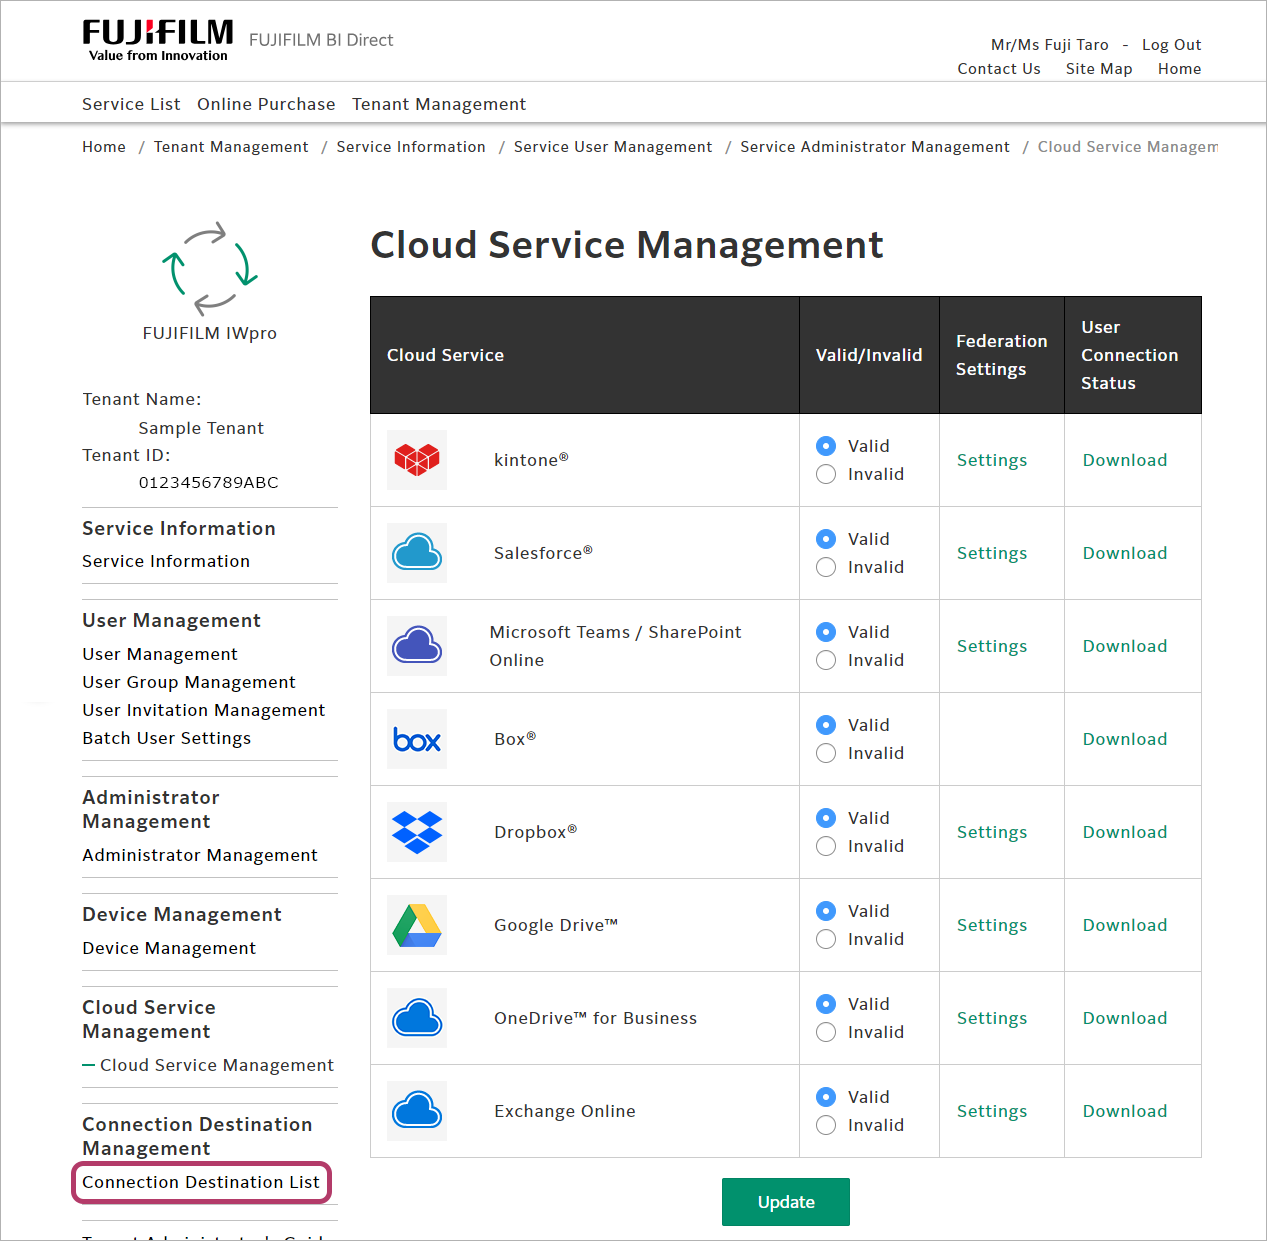
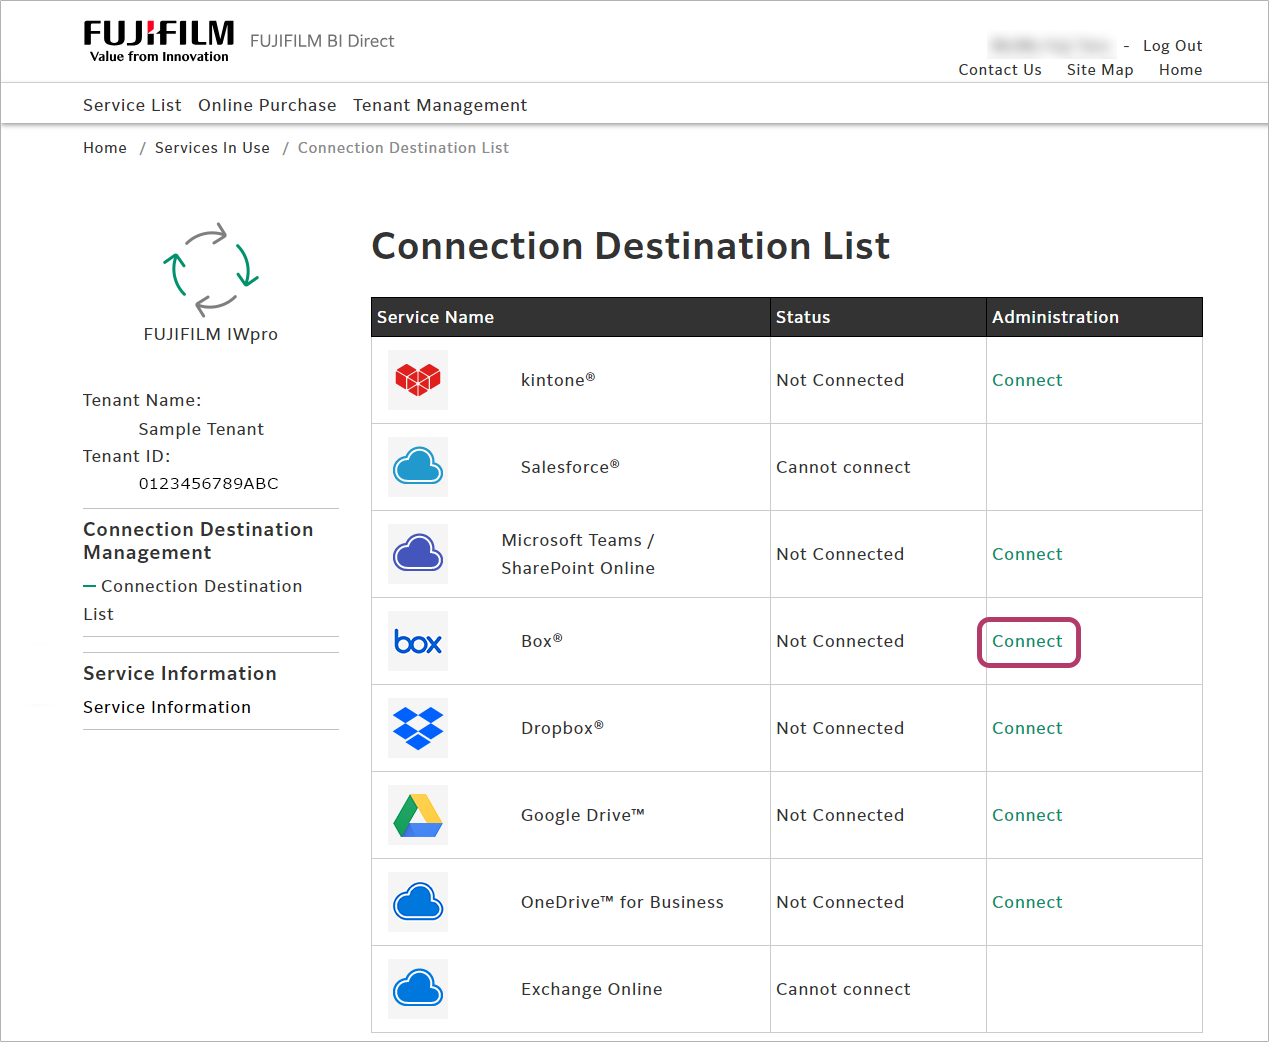
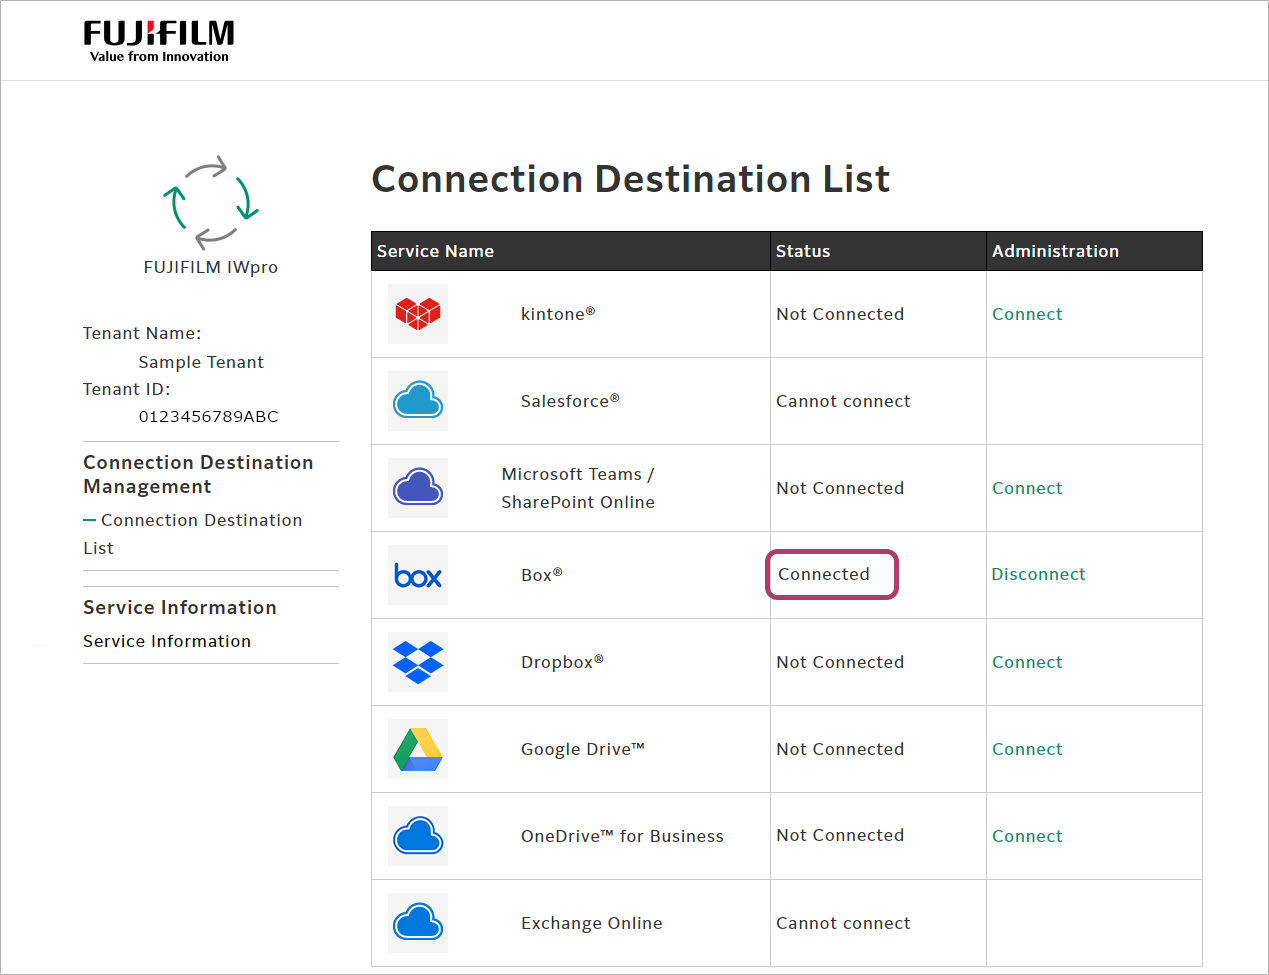
- In [Connection Destination Management], click [Connection Destination List].
- Click [Connect] for the cloud service to use.
 For OneDrive for Business
- Enter the OneDrive for Business account, and click [Next].
- Enter the password, and click [Sign in].
- A screen asking whether to remain signed in will be displayed. Click [No] or [Yes] as required.
For SharePoint Online- Enter the SharePoint Online account, and click [Next].
- Enter the password, and click [Sign in].
- A screen asking whether to remain signed in will be displayed. Click [No] or [Yes] as required.
For Box- Enter the e-mail address and password for logging in to Box, then click [Authorize].
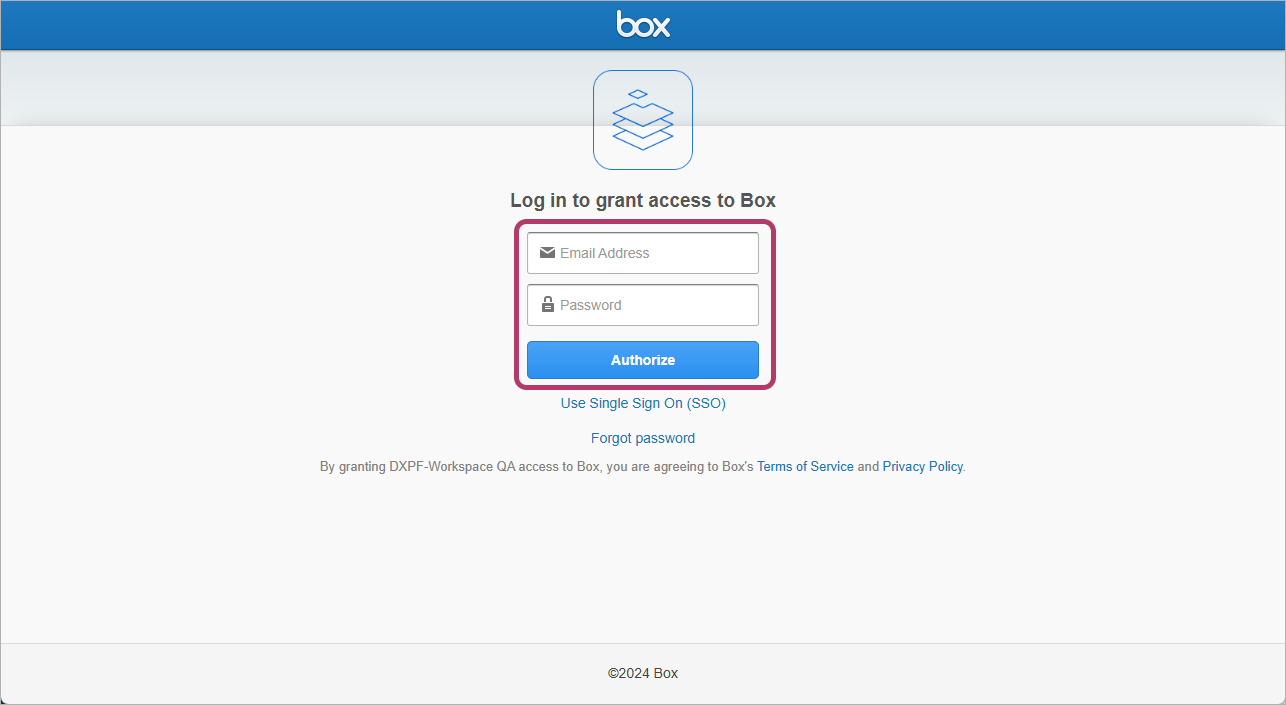
- Click [Grant access to Box].
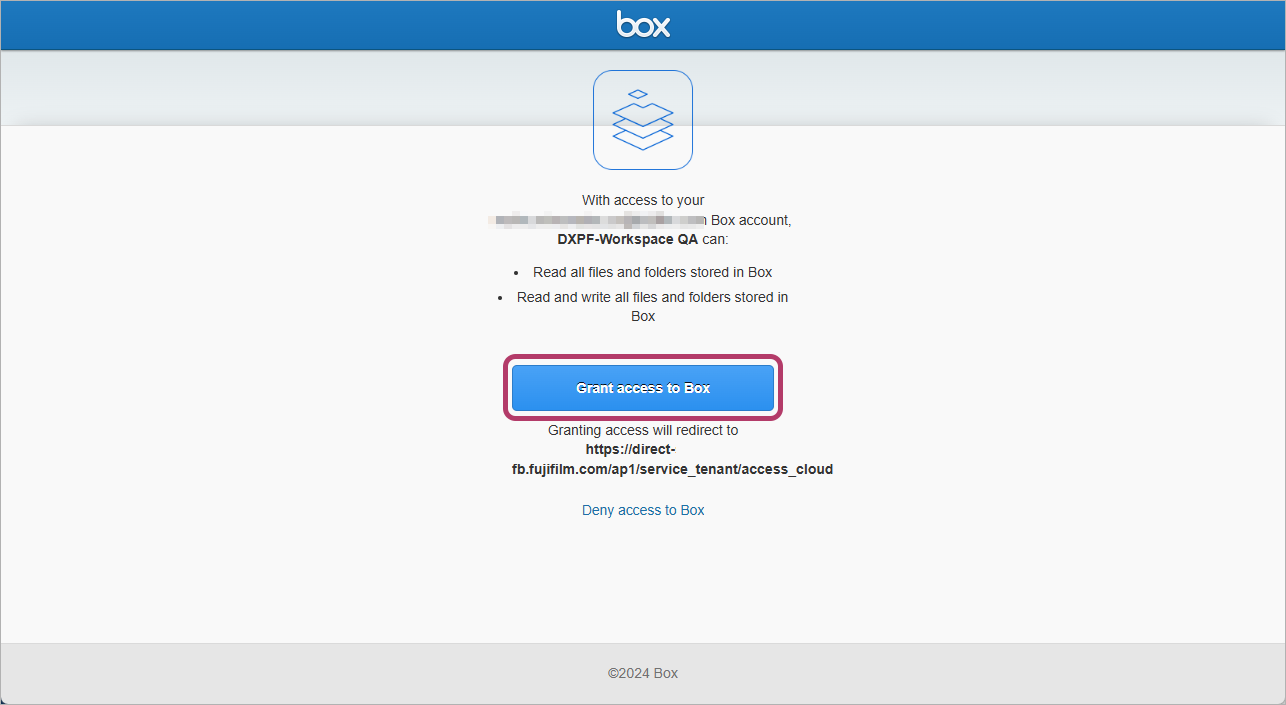
- A screen asking whether to remain signed in will be displayed. Click [No] or [Yes] as required.
- If user access permissions (consent) to applications are restricted due to Microsoft Entra ID settings, connection may fail. In such cases, please request your organization's Microsoft Entra ID administrator to grant access permissions (consent) to the following applications.
- When configuring linkage with Microsoft Teams / SharePoint Online
Application Name: FUJIFILM IWpro
Application ID: 16f3deb8-19d1-417c-aa5b-03a7a57dbcbe - When configuring linkage with OneDrive for Business
Application Name: FUJIFILM IWpro
Application ID: b42237fe-384e-4c6f-a929-de4bd4a989a4 - When configuring linkage with Exchange Online
Application Name: FUJIFILM IWpro
Application ID: c245238d-538a-4979-bfc0-7db9fcb3282a
- When configuring linkage with Microsoft Teams / SharePoint Online
When the connection is completed, [Connected] will be displayed in the [Status] column.
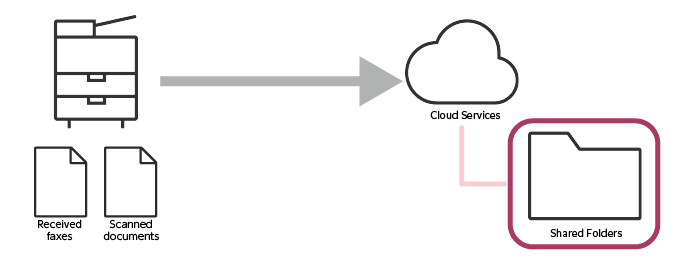
Creating a Shared Folder
To share the FUJIFILM IWpro Scan Delivery or FUJIFILM IWpro Fax Delivery save location with multiple users, create a folder to share, and grant access rights to the users.
This completes the procedure for configuring SharePoint Online/OneDrive/Box.
When Using Dropbox
Configure the following settings to use Dropbox.
- Configuring Dropbox
- Linking FUJIFILM BI Direct with Dropbox
- Connecting FUJIFILM BI Direct to Dropbox
- Creating a Shared Folder
Configuring Dropbox
- This procedure should be performed by the Dropbox administrator.
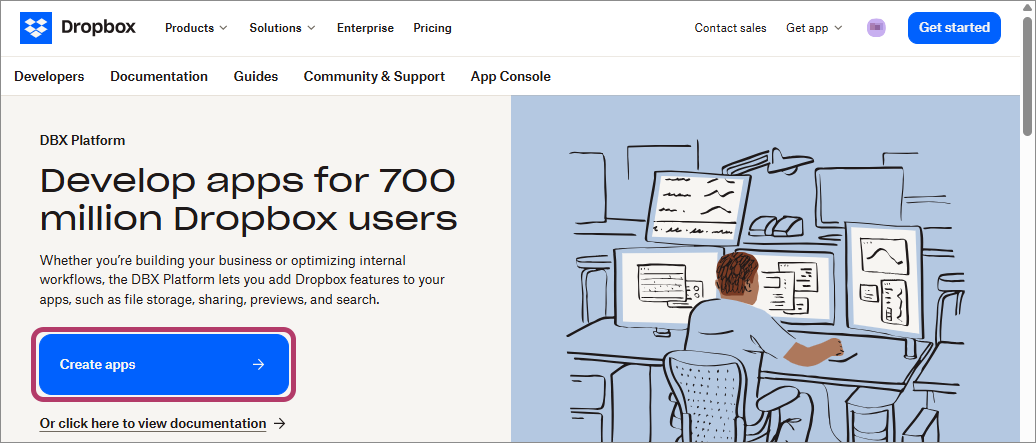
- Access DBX Platform.
- Click [Create apps], then follow the instructions on the displayed screen to log in.
- Configure the settings as follows.
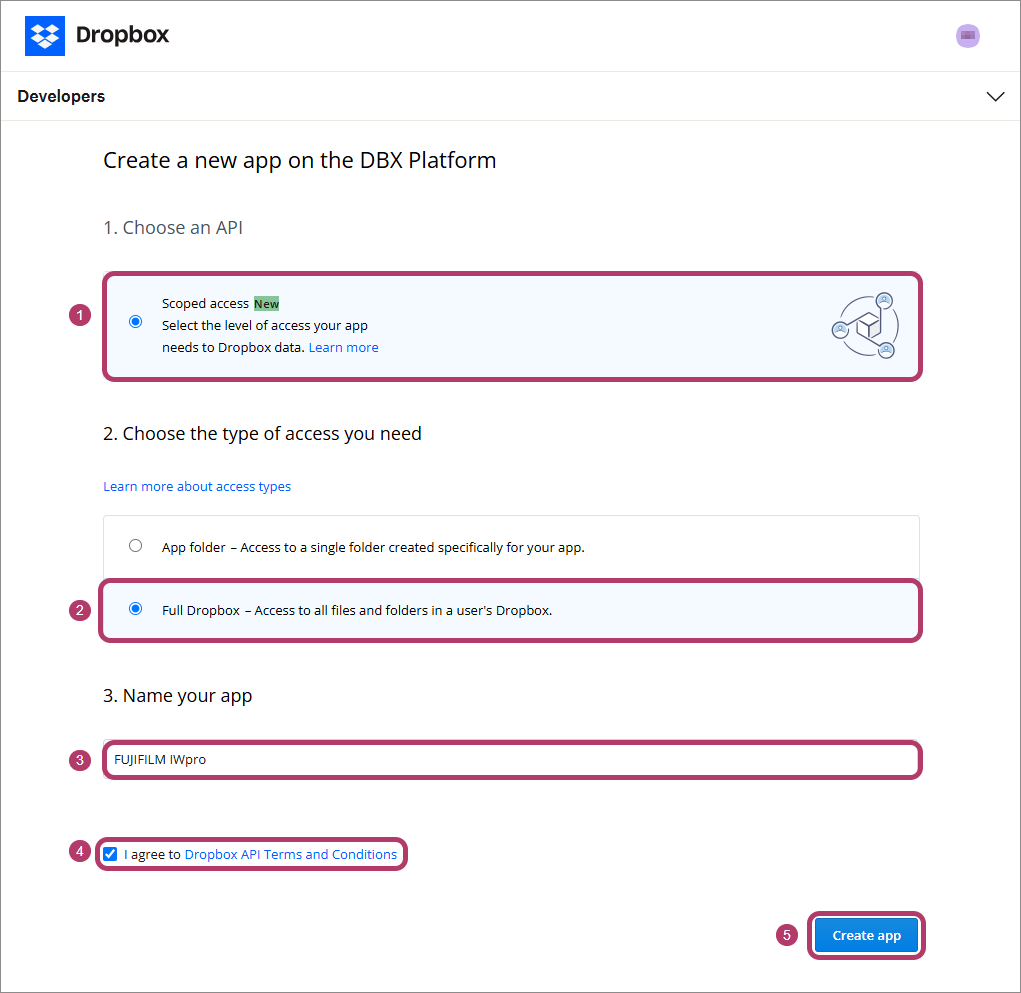
- Select [Scoped access New] in [1. Choose an API].
- Select [Full Dropbox - Access to all files and folders in a user's Dropbox.] in [2. Choose the type of access you need].
- Enter a name of your choice in [3. Name your app].
- The name you enter must be unique across Dropbox.
- Select the [I agree to Dropbox API Terms and Conditions] check box.
- Click [Create app].
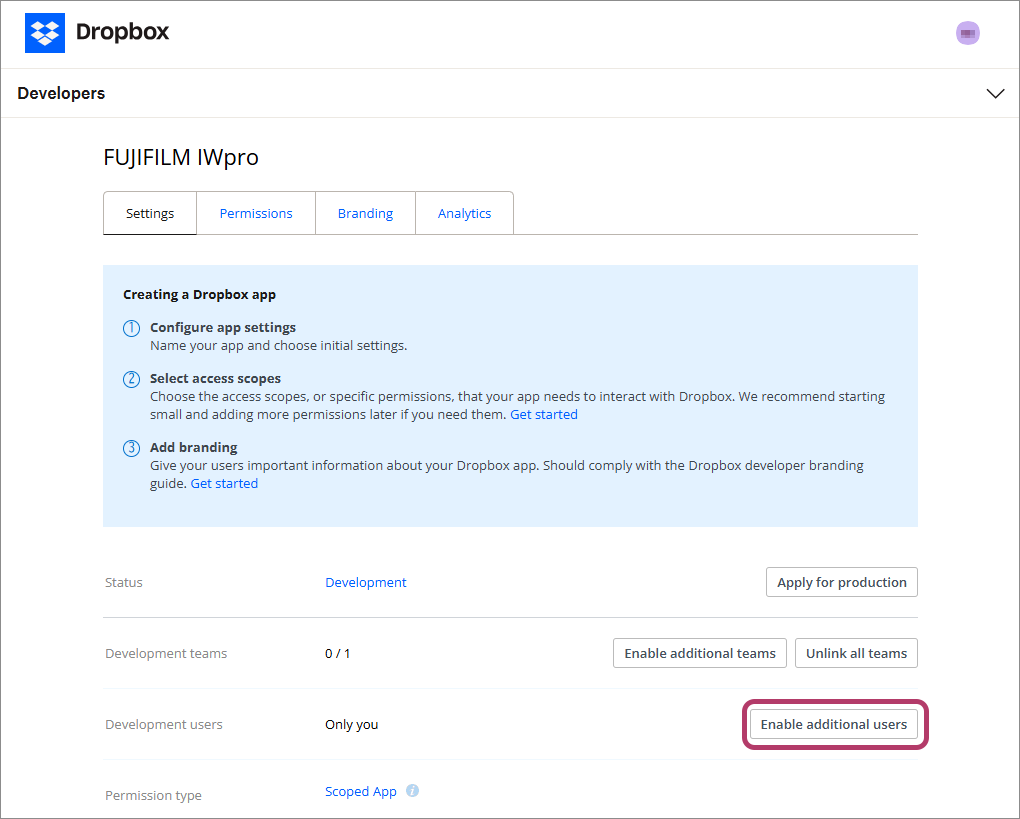
An app named "FUJIFILM IWpro" is created and the app configuration screen is displayed.
- Configure the settings as follows on the [settings] tab.
- Click [Enable additional users] in [Development users], then click [Okay] on the displayed screen.
- Make a note of the values in [App key] and [App secret].
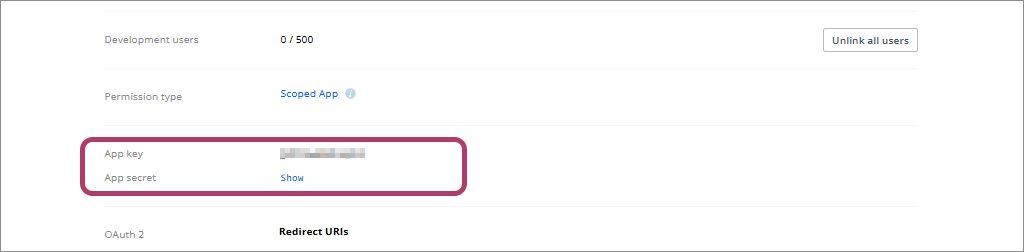
- The value in [App secret] is displayed by clicking [show].
- Enter "https://direct-fb.fujifilm.com/ap2/service_tenant/access_cloud" in [Redirect URIs] in [OAuth2], then click [Add].
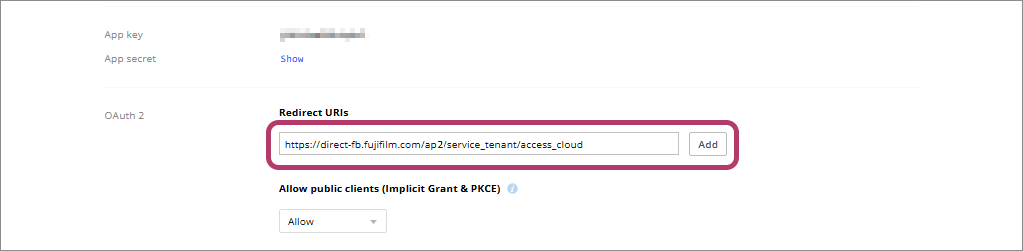
- Click [Enable additional users] in [Development users], then click [Okay] on the displayed screen.
- Select the following check boxes on the [Permissions] tab, then click [Submit].
- account_info.read
- files.metadata.write
- files.metadata.read
- files.content.write
- files.content.read
- sharing.write
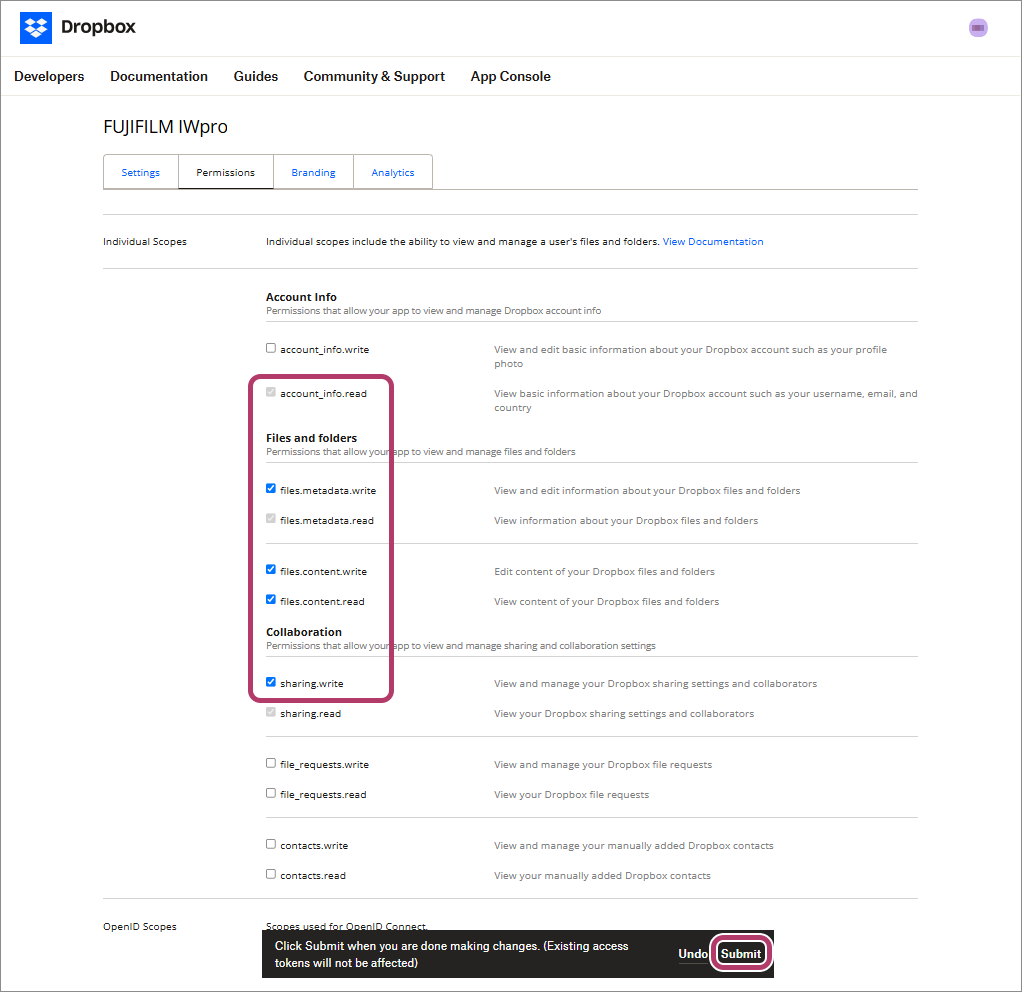
This completes the procedure for configuring Dropbox.
Close the screen of DBX Platform.
Linking FUJIFILM BI Direct with Dropbox
- Log in to FUJIFILM BI Direct.
https://direct-fb.fujifilm.com/ap2/top
- If a screen prompting you to agree to the terms of use or privacy policy for FUJIFILM IWpro is displayed, check the displayed information and click [Accept and Proceed].
- When first using FUJIFILM BI Direct, FUJIFILM BI Direct registration is necessary. Register as shown on the screen.
- Click [Tenant Management].
- Click [FUJIFILM IWpro] in the list of tenants.
- Select [Cloud Service Management] from the menu.
- Click [Settings] for [Dropbox
®].

- Enter the values that you made a note of in "Configuring the Dropbox Administrator Settings", then click [Update].
Item Description Application (Client) ID Make a note of the value in [App key]. Client Secret Enter the value in [App secret]. 
- Click [OK].
Connecting FUJIFILM BI Direct to Dropbox
To use Scan Delivery and Fax Delivery in Dropbox, configure the connection settings in FUJIFILM BI Direct.
- In [Connection Destination Management], click [Connection Destination List].
- Click [Connect] for [Dropbox
®].
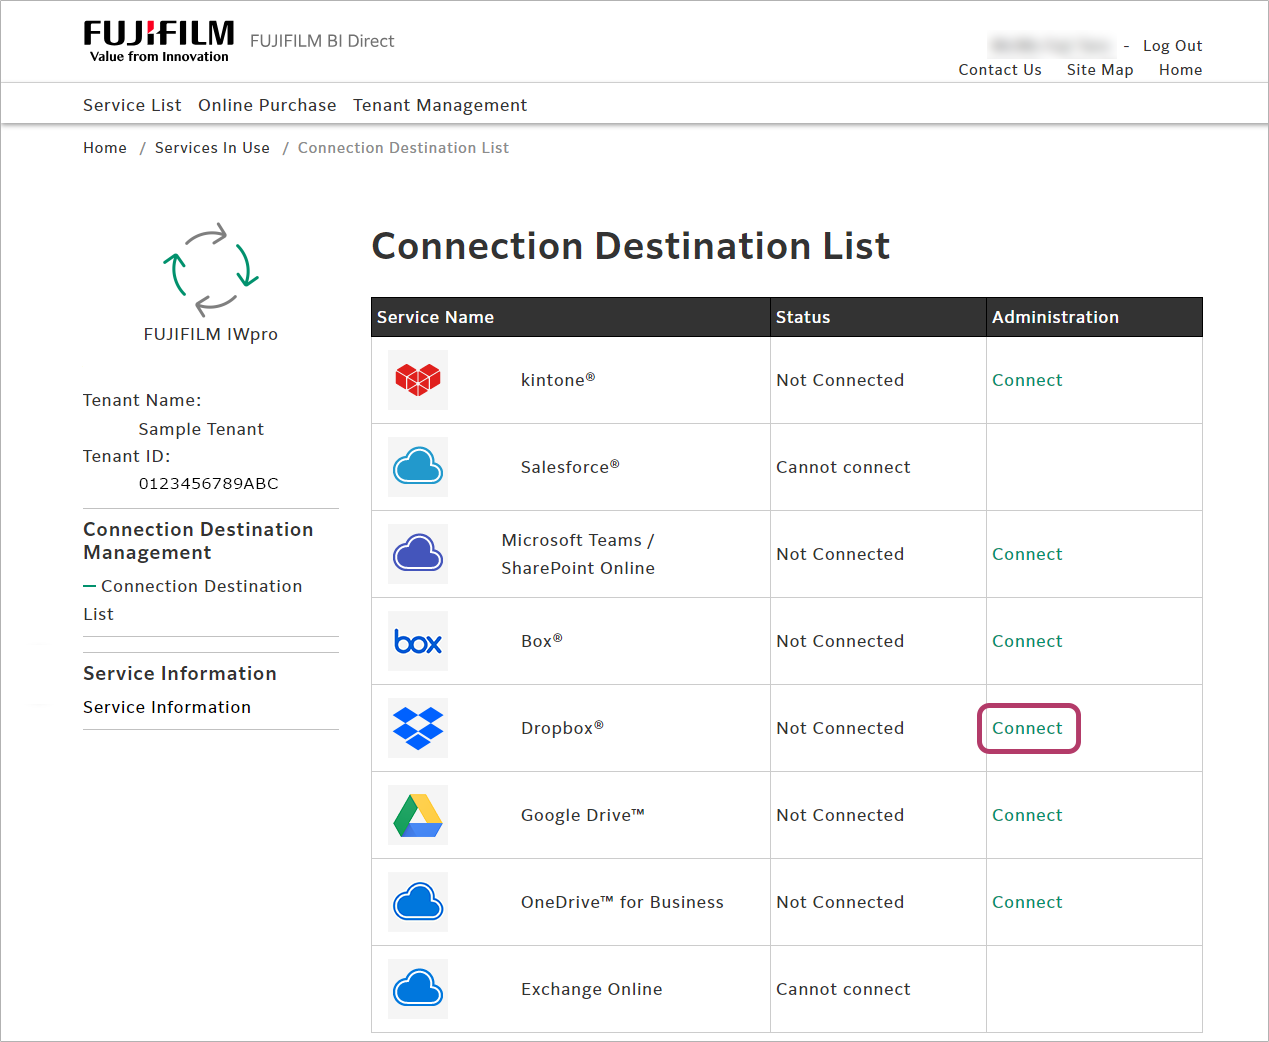
- Enter the Dropbox account, and click [Next].
- Enter the password, and click [Sign in].
- A screen asking whether to remain signed in will be displayed. Click [No] or [Yes] as required.
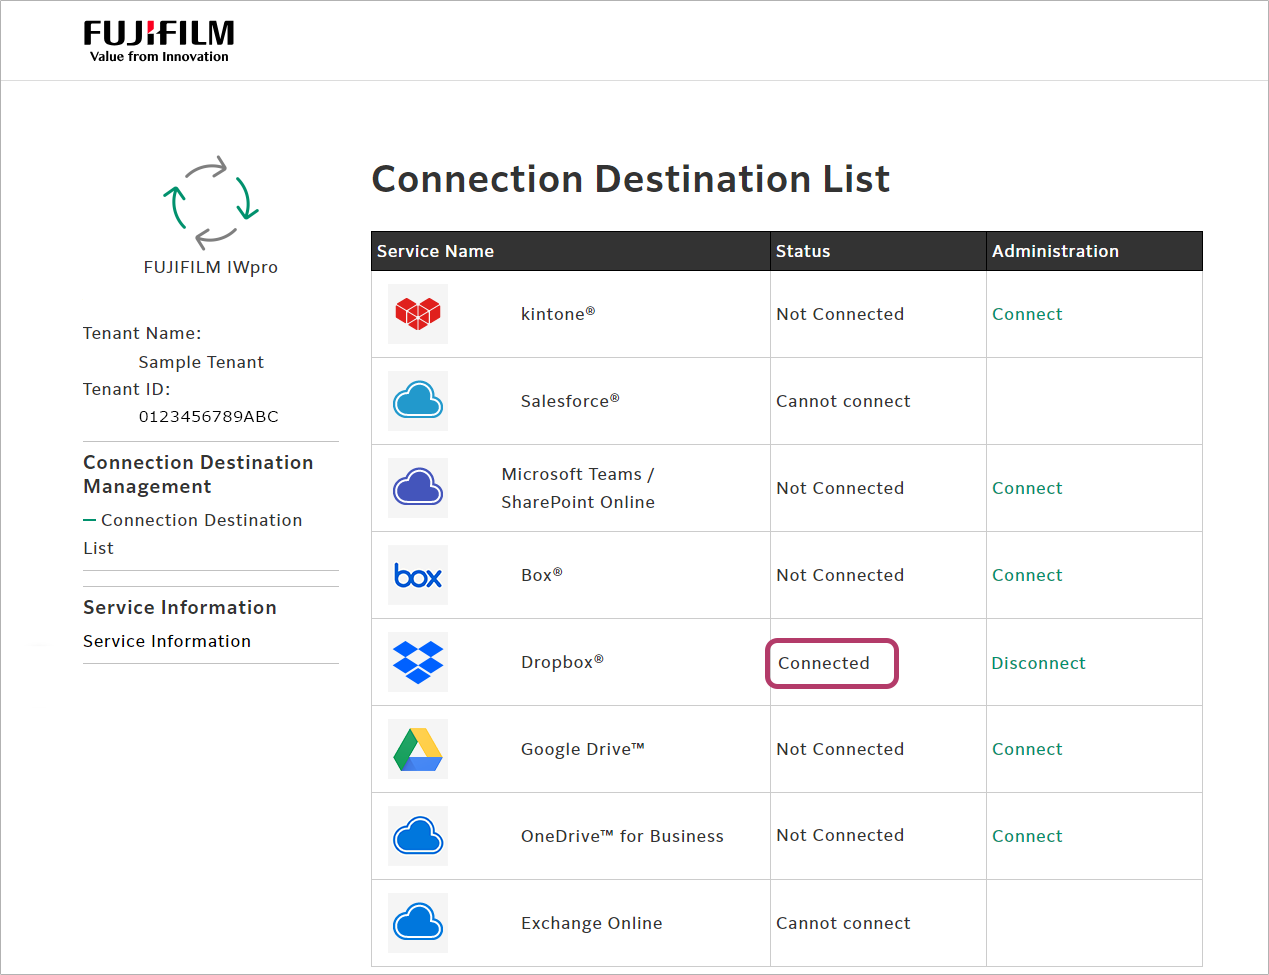
When the connection is completed, [Connected] will be displayed in the [Status] column.
Creating a Shared Folder
To share the FUJIFILM IWpro Scan Delivery or FUJIFILM IWpro Fax Delivery save location with multiple users, create a folder to share, and grant access rights to the users.
This completes the procedure for configuring Dropbox.
When Using Google Drive
Configure the following settings to use Google Drive.
- Configuring Google Drive
- Linking FUJIFILM BI Direct with Google Drive
- Connecting FUJIFILM BI Direct to Google Drive
- Creating a Shared Folder
Configuring Google Drive
- This procedure should be performed by the Google Workspace administrator.
Creating a Project
- Log in to Google Cloud Platform Console.
- Click the displayed project name.

- If a project does not exist, displayed as [Select a project] instead of the project name.
- Click [NEW PROJECT].
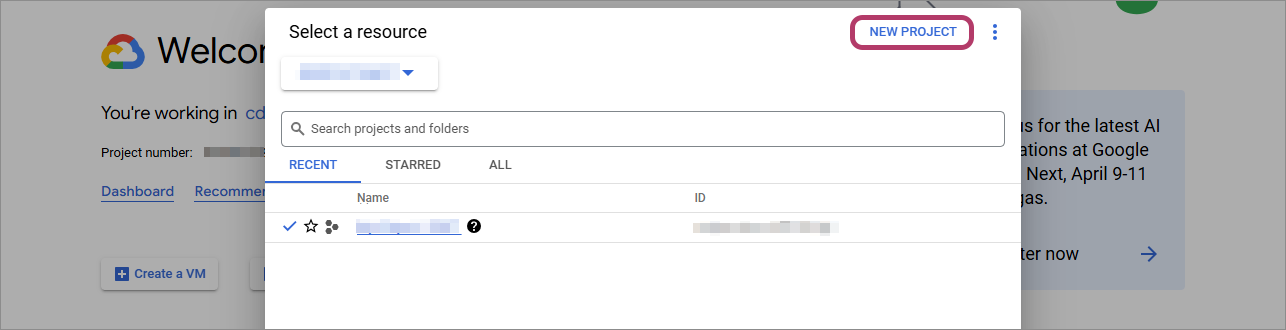
- Enter "FUJIFILM IWpro" in [Project name], then click [Create].
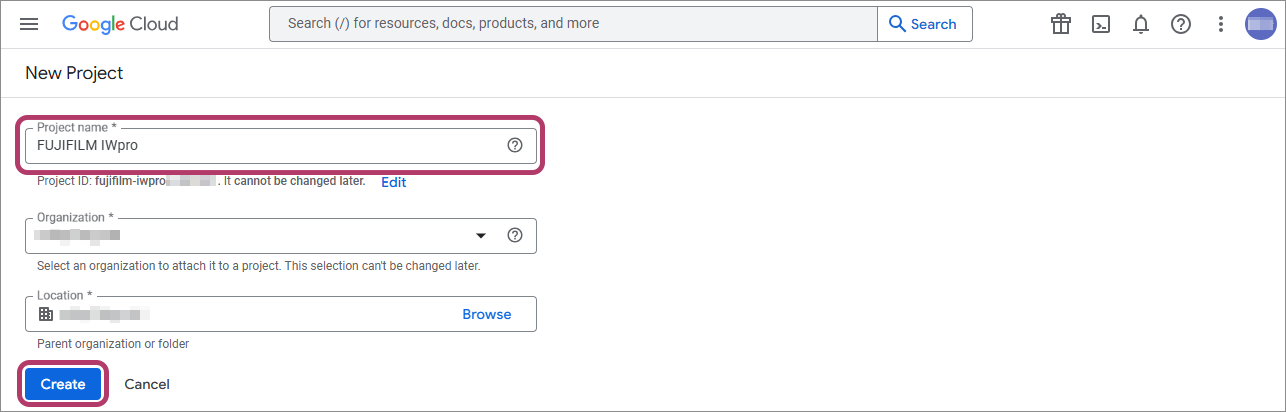
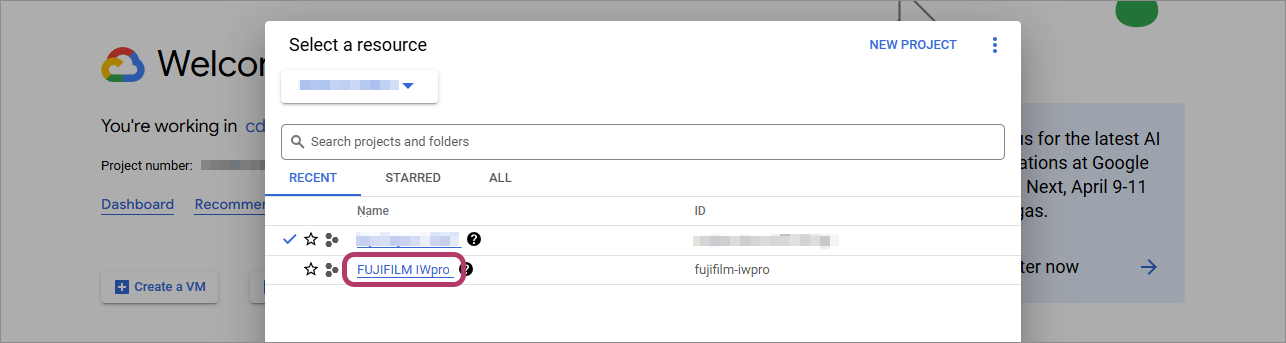
- Click the displayed project name.
- Click [FUJIFILM IWpro].
Enabling the Google Drive API
- Click [
 ] (the navigation menu).

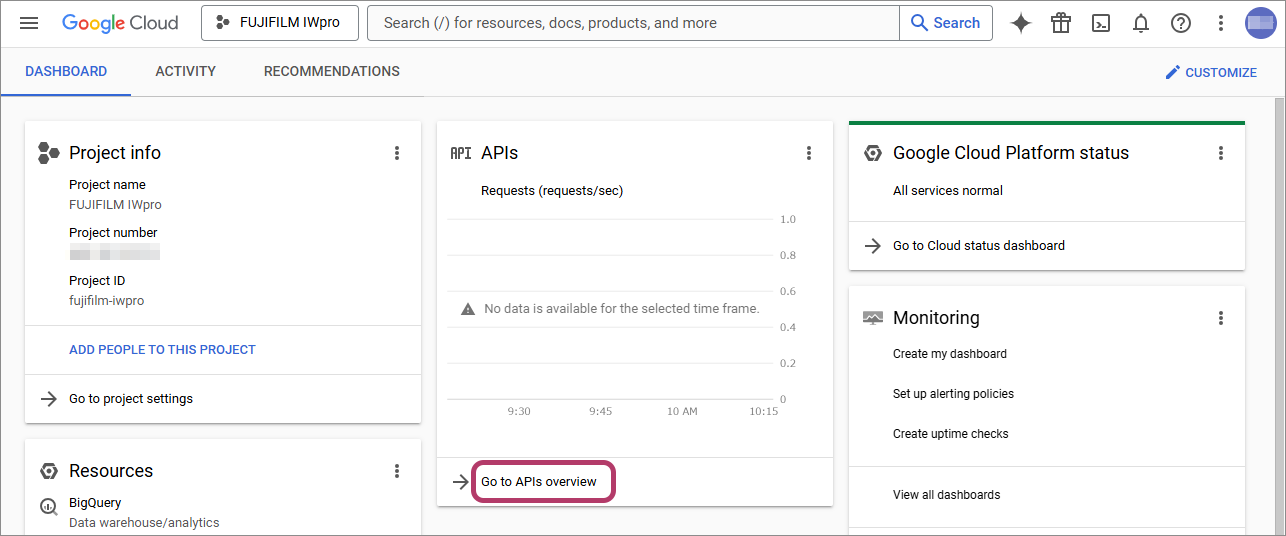
- Click [Dashboard] in [Cloud overview].

- Click [Go to APIs overview].
 The [API & Services] screen is displayed.
 - Click [+Enable APIs and services].
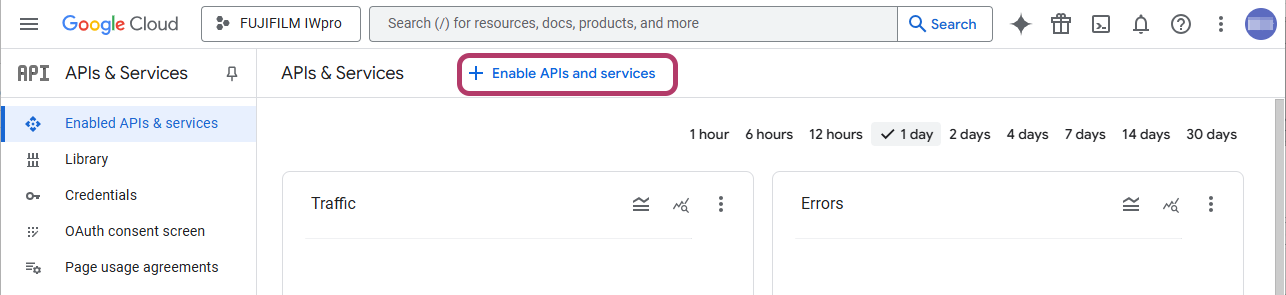 The [API Library] screen is displayed.
 - Enter "Google Drive API" in the search box, then press the
<Enter>key.

- Select [Google Drive API] from the search results.
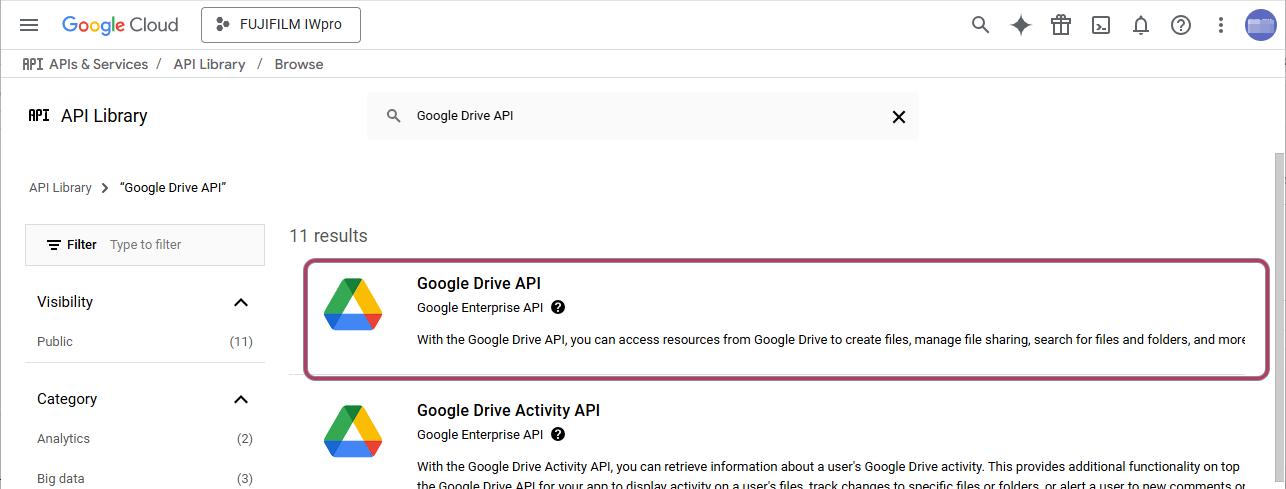
- Click [ENABLE].
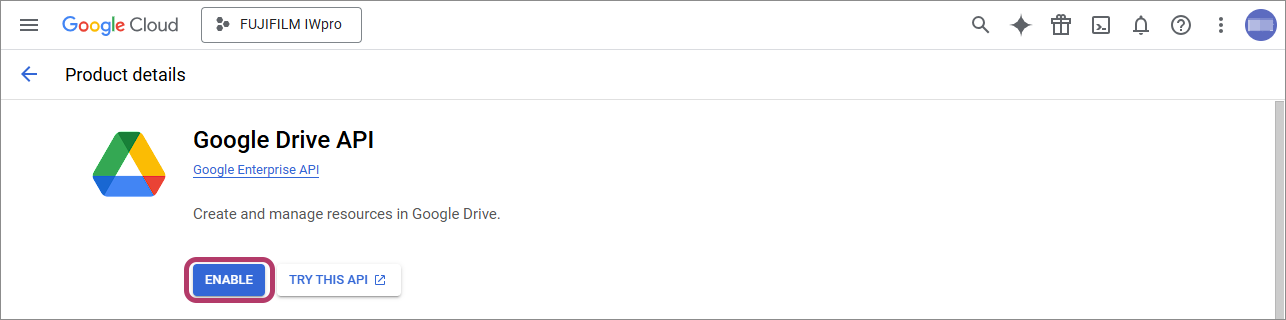 Return to the [API & Services] screen.
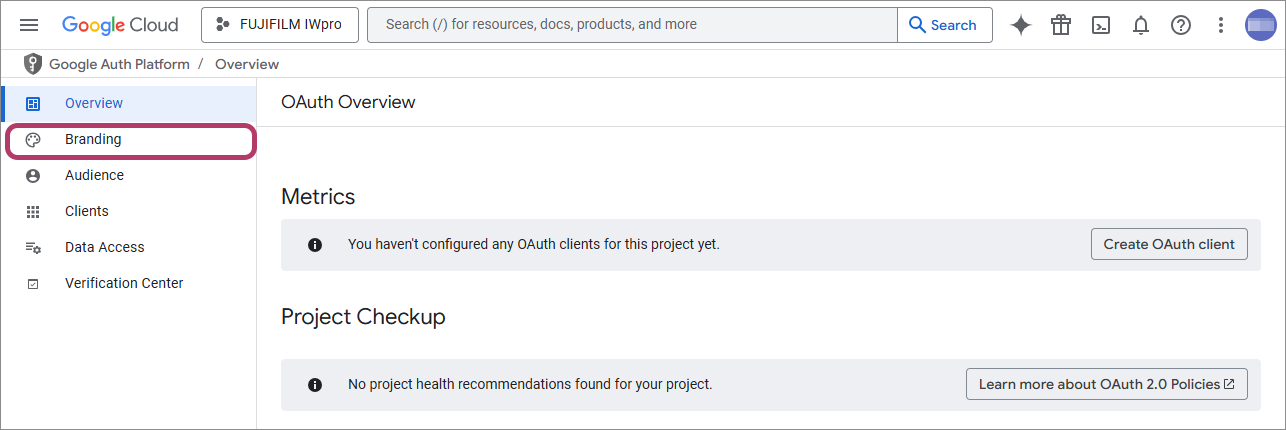
Oauth Consent Screen Settings
- Click [OAuth consent screen] on the [APIs & Services] screen.
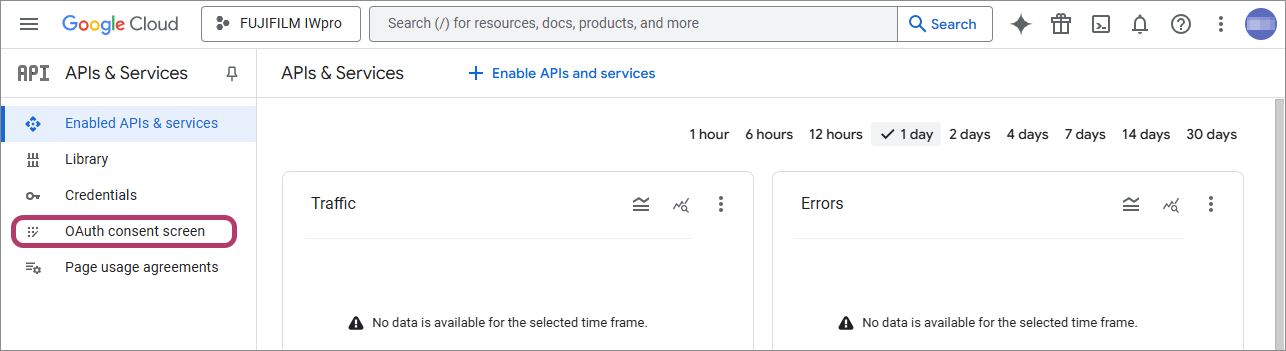
- Click [Get started].
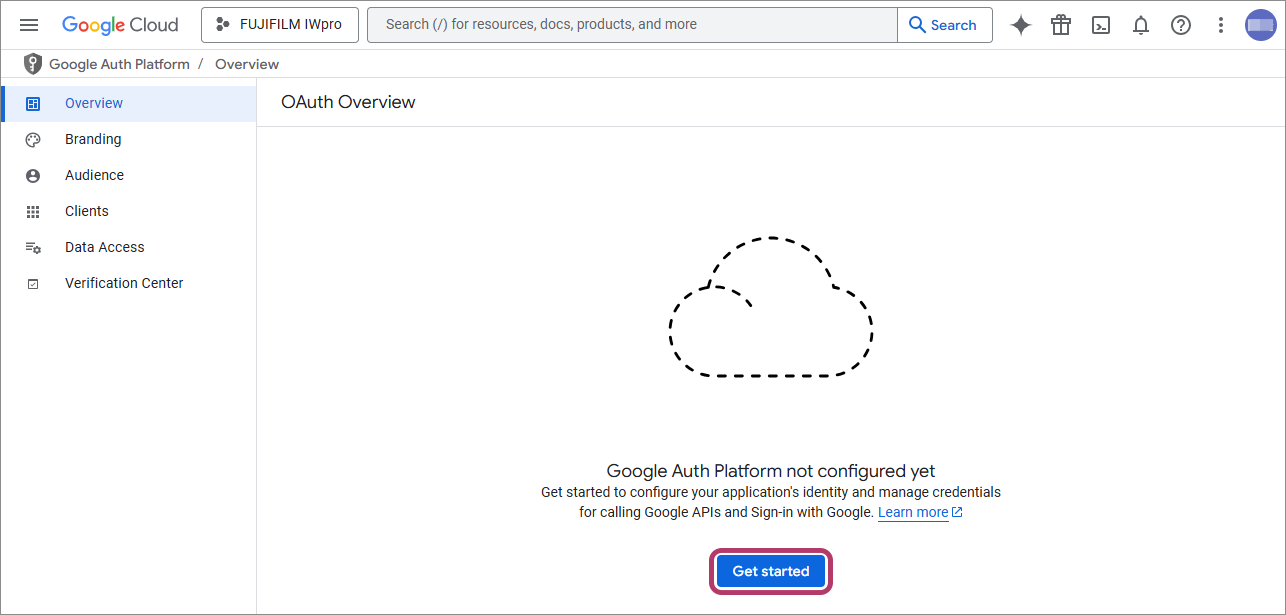
- Enter the app name in [App name] and the e-mail address for user support in [User support email], then click [Next].
Item Input value App name Enter "FUJIFILM IWpro". User support email Click this and select a displayed e-mail address. - The e-mail address set here is displayed on the OAuth consent screen and used as the e-mail address for user support.
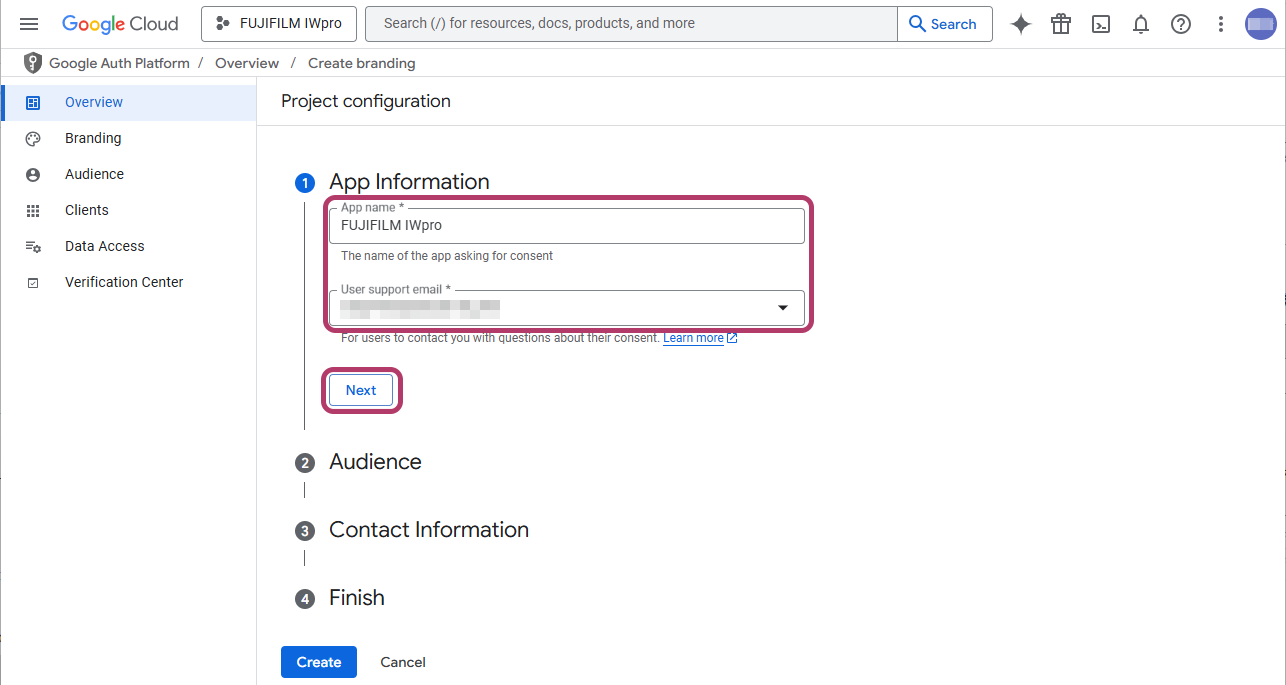
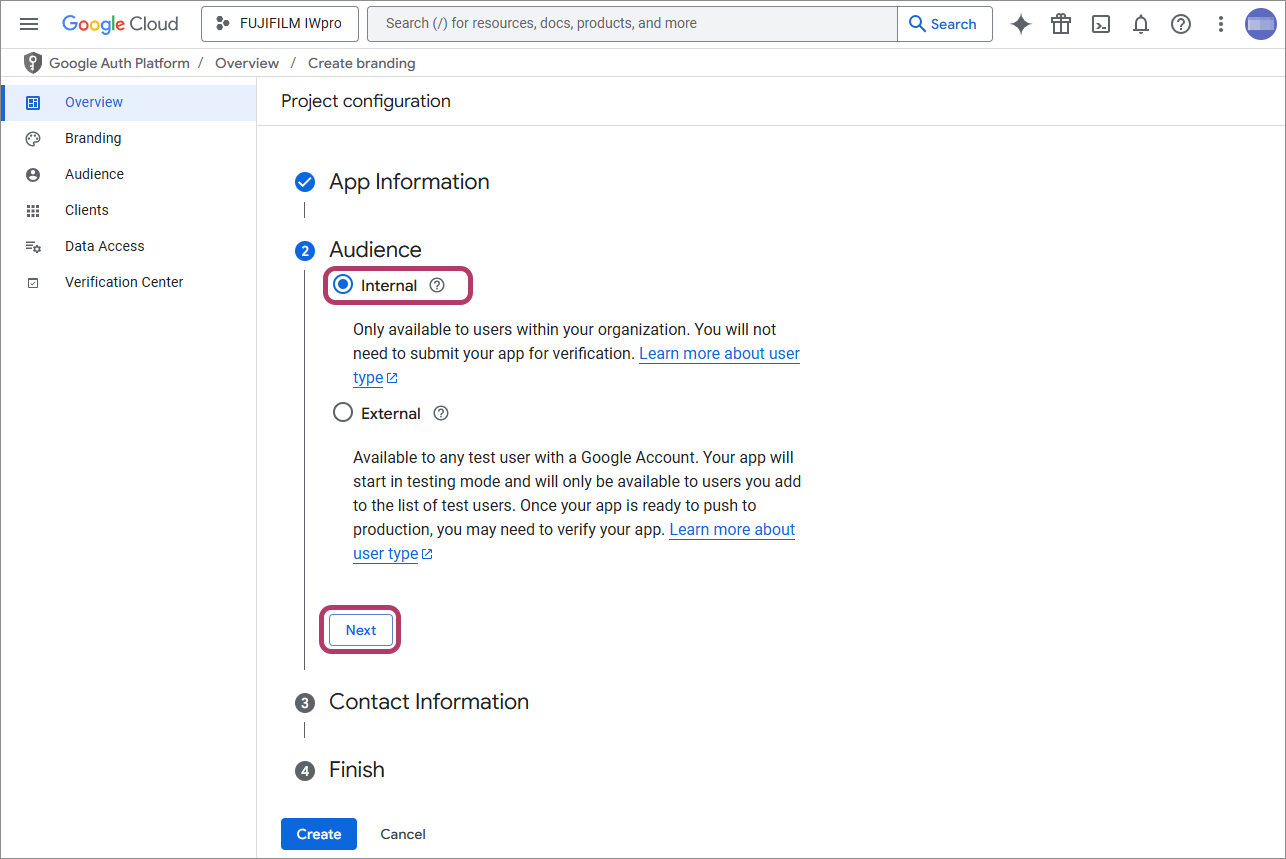
- Select [Internal], then click [Next].
- Enter the e-mail address, then click [Next].
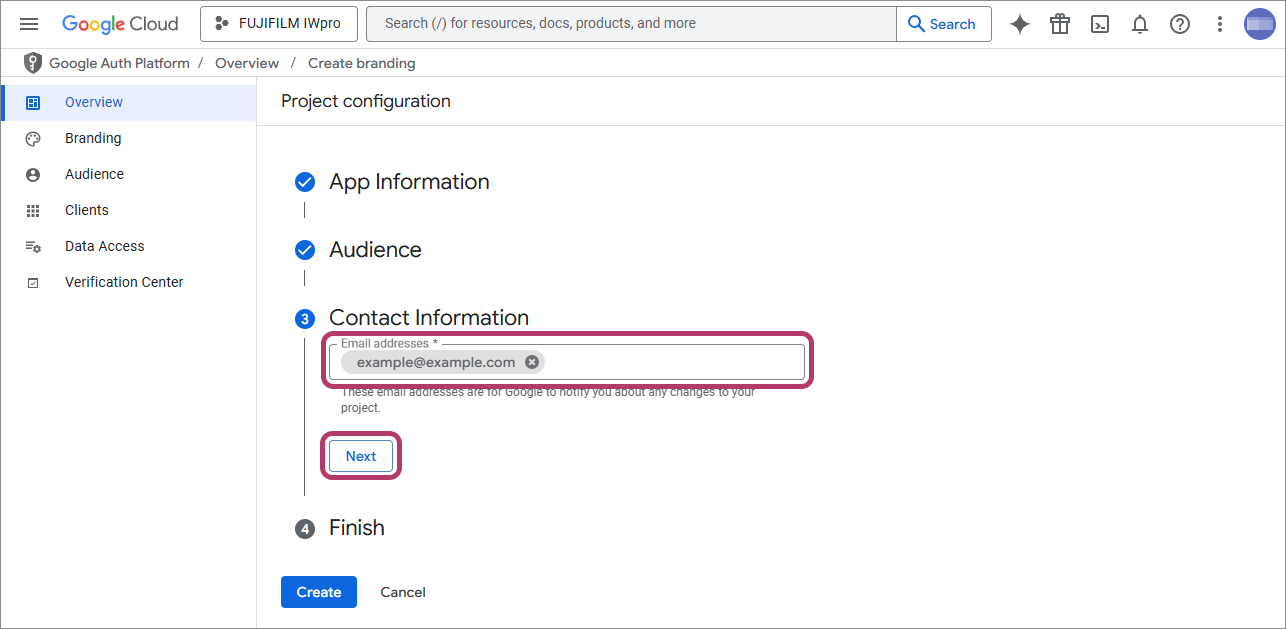
- Notifications regarding project changes from Google are sent to the e-mail address sent here.
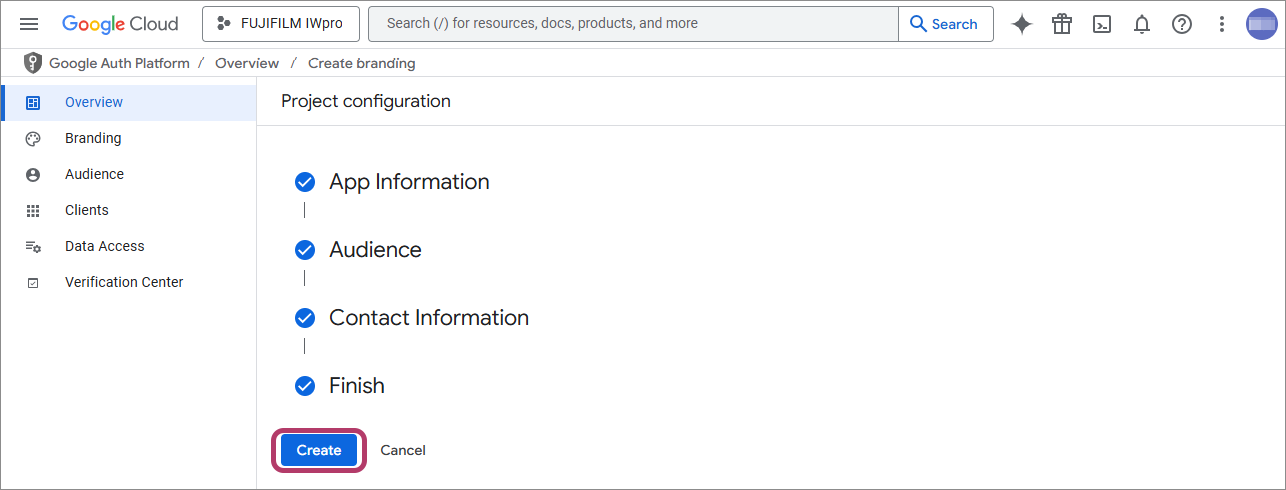
- Select the check box, then click [Continue].

- Click [Create].
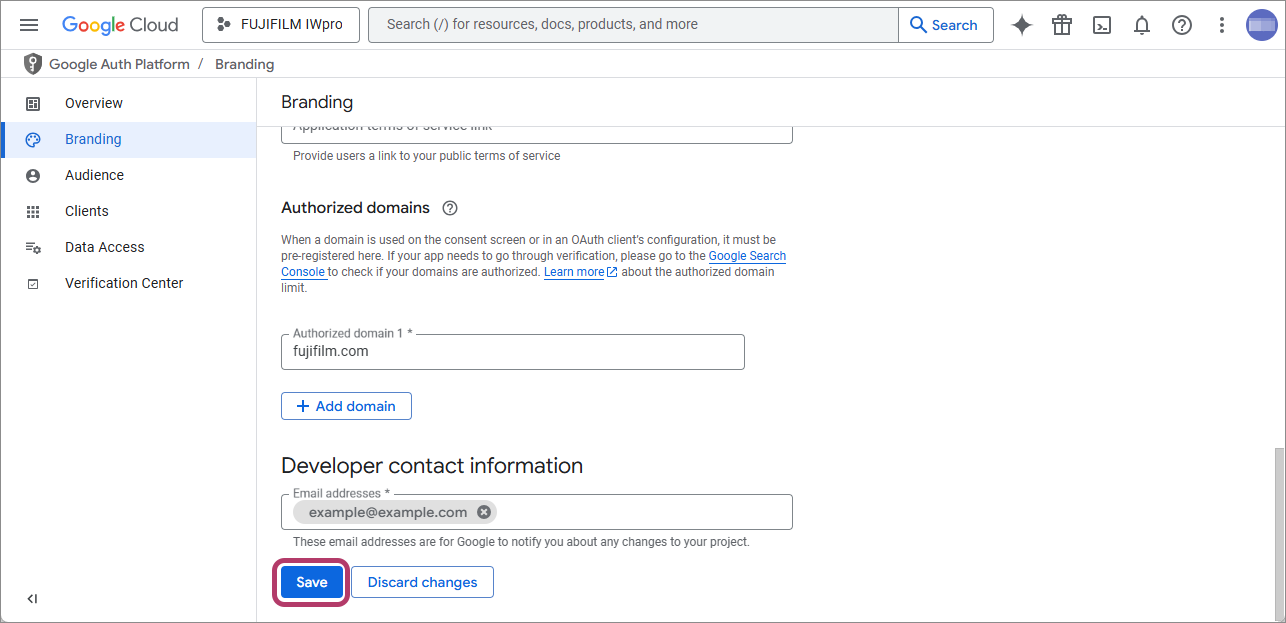
- Configure the authorized domains.
- Click [Branding].
- Click [Add domain] in [Authorized domains], then enter "fujifilm.com" in [Authorized domain 1].
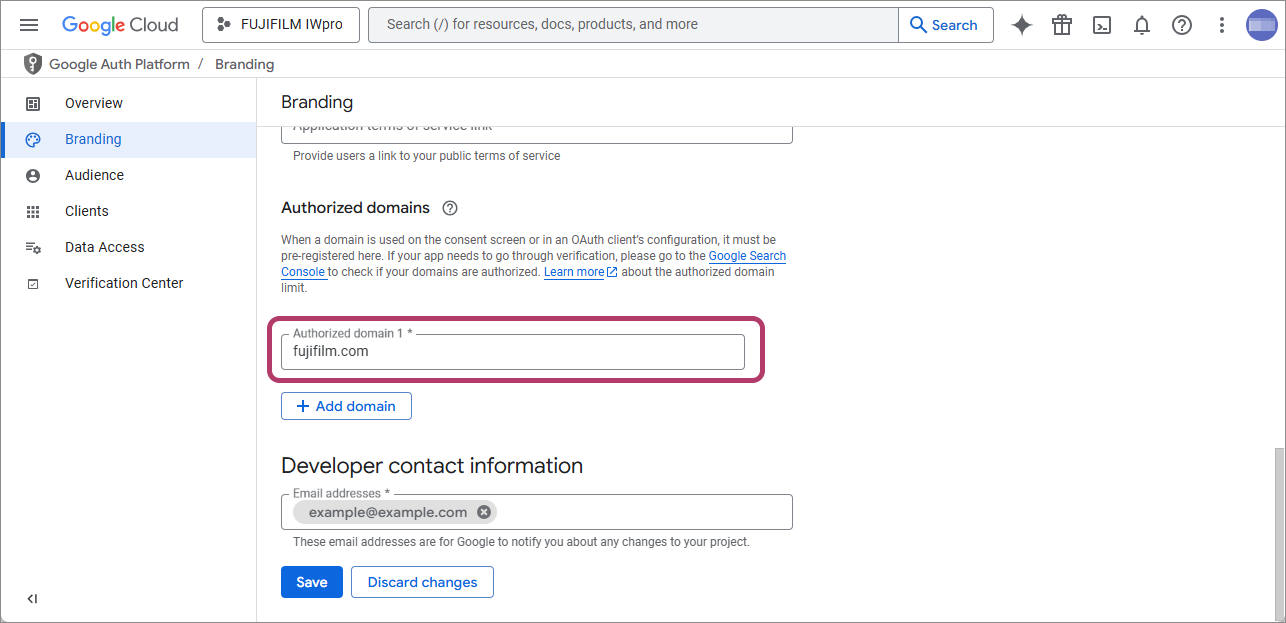
- Click [Save] on the bottom of the screen.
- Click [Branding].
- Configure the scope.
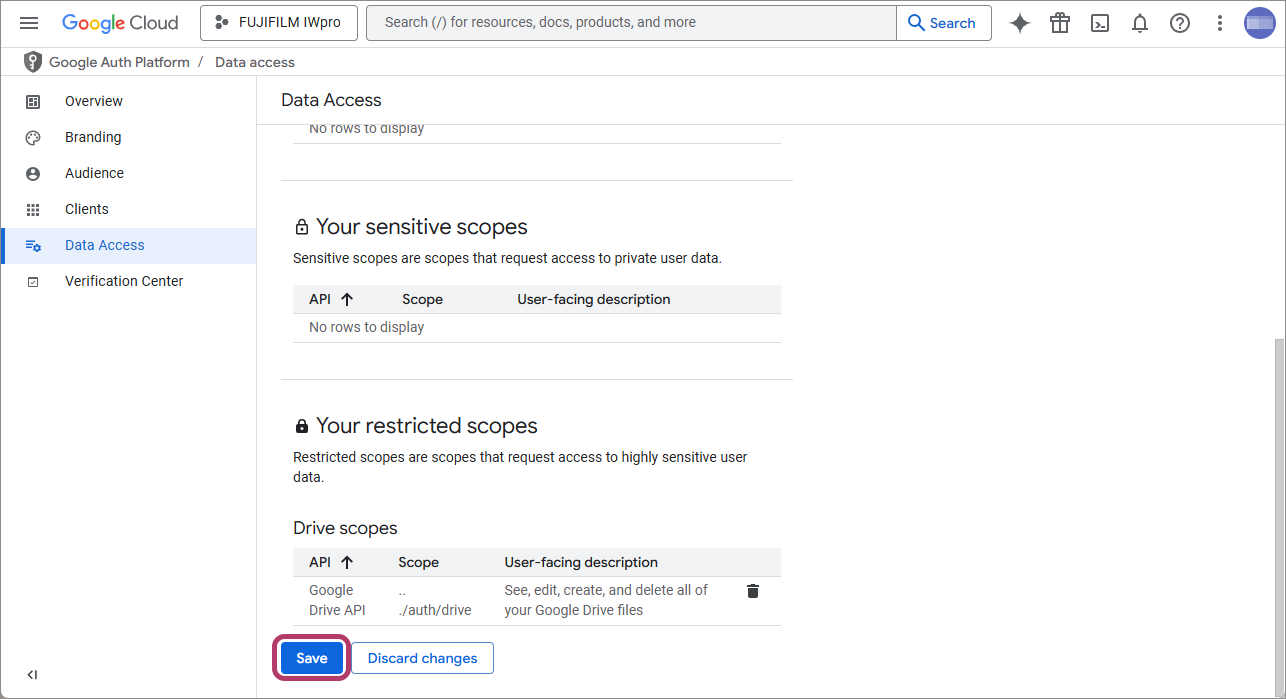
- Click [Data Access], then click [Add or remove scopes].
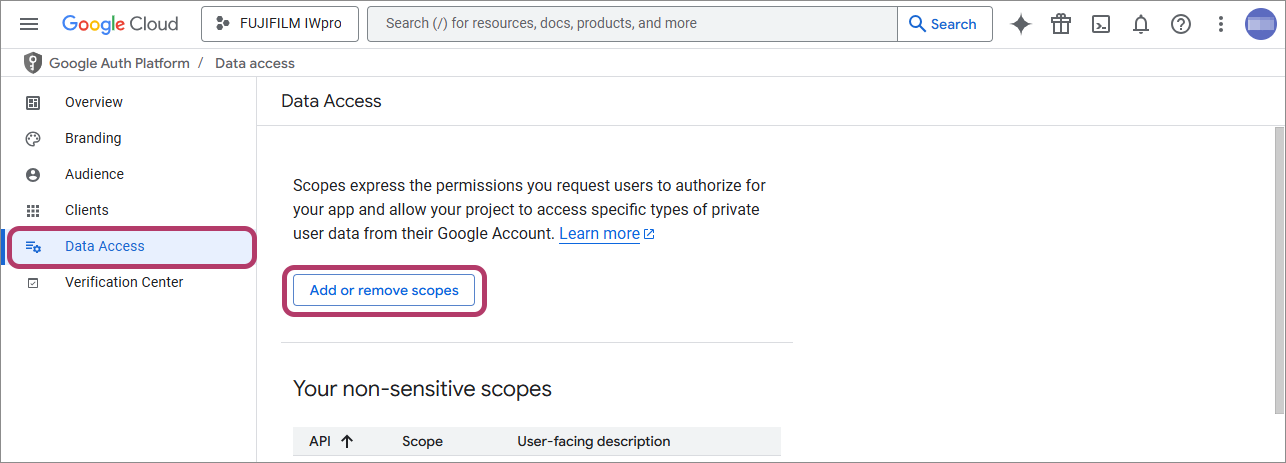
- Select the check box for the Google Drive API with [.../auth/drive] displayed in the [Scope] column, then click [Update].
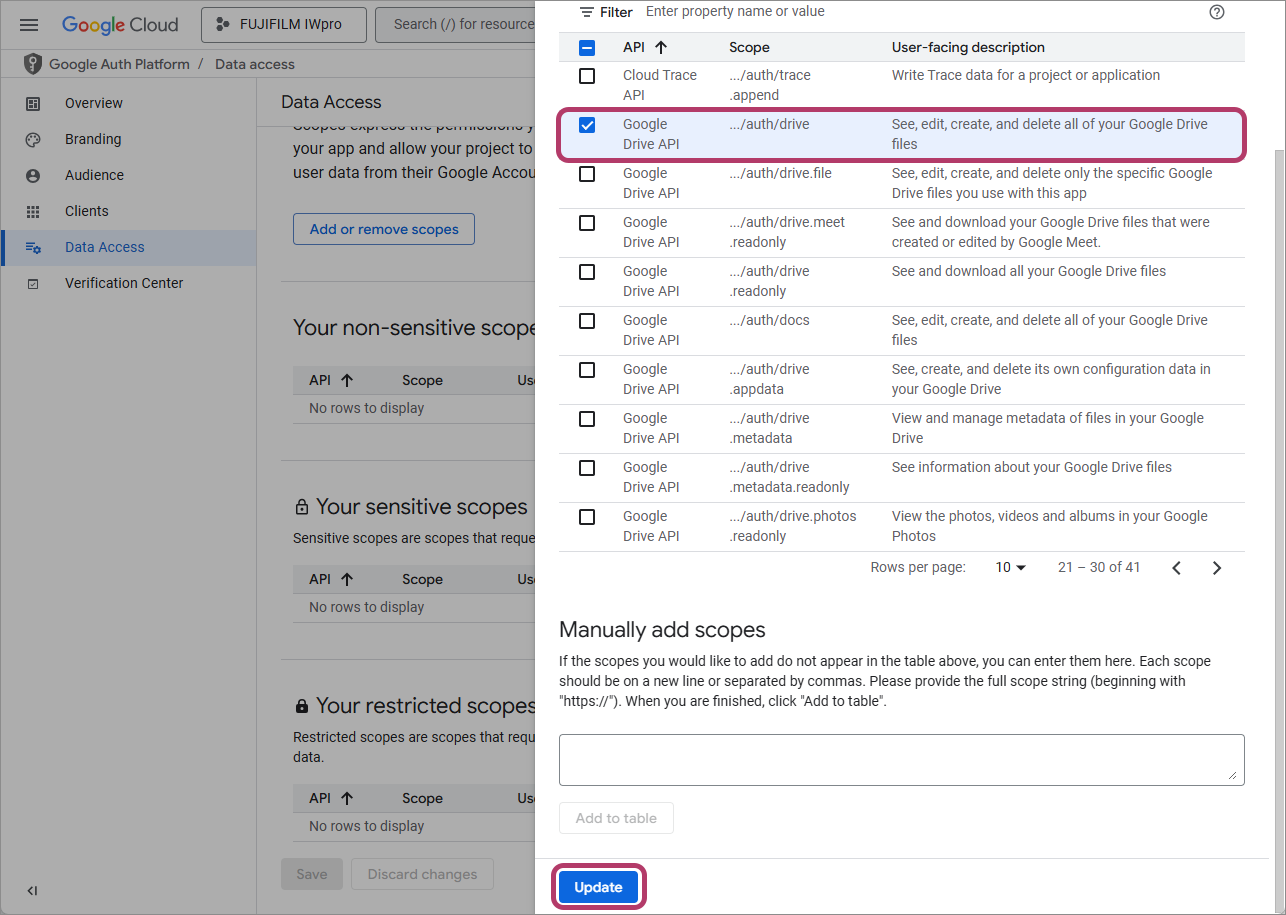
Return to the [Data Access] screen. - Click [Save] on the bottom of the screen.
- Click [Data Access], then click [Add or remove scopes].
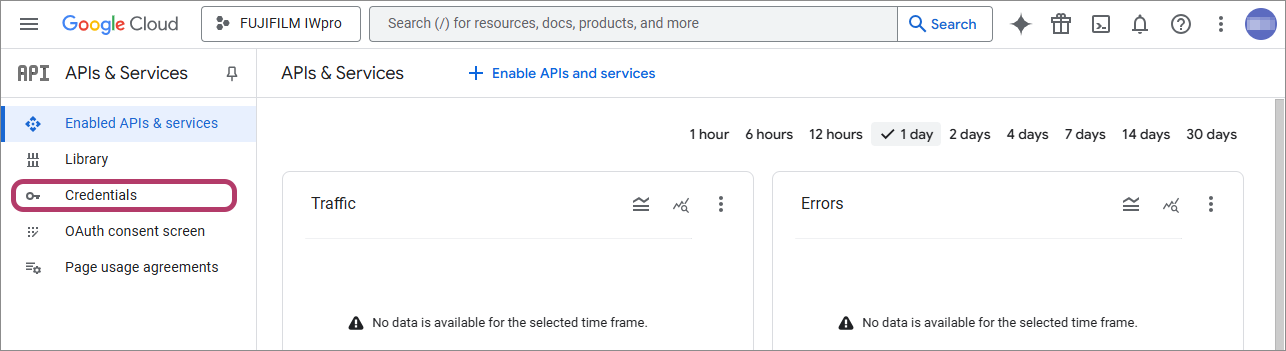
Configuring Authentication Information
- Click [
] (the navigation menu).
- Click [Dashboard] in [Cloud Overview].
- Click [Go to APIs overview].
The [API & Services] screen is displayed.
- Click [Credentials].
- Click [Create credentials] > [OAuth client ID].
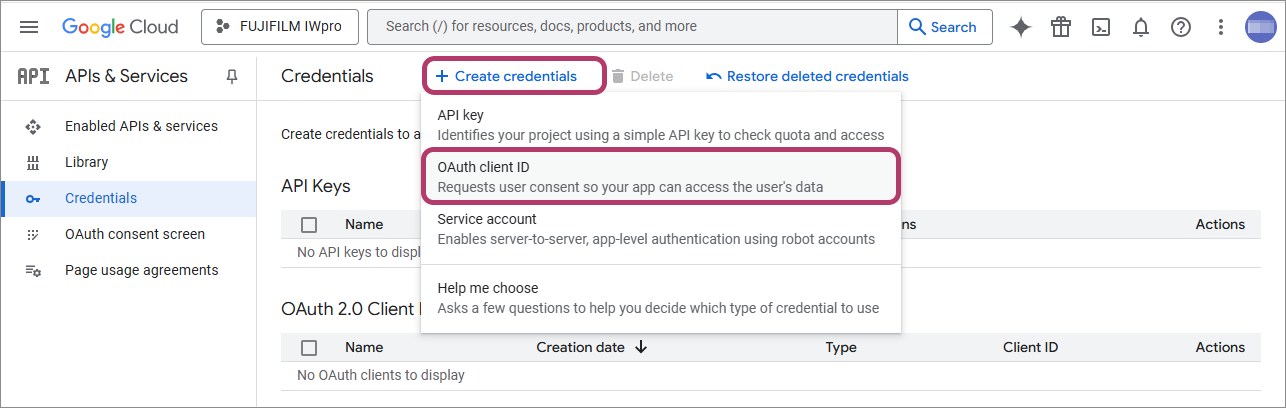
- Configure the following settings, and click [Create].
Item Input value Application type Web application Name Enter "FUJIFILM IWpro". Authorized redirect URIs Click [ADD URI], then enter the following URL.
https://direct-fb.fujifilm.com/ap2/service_tenant/access_cloud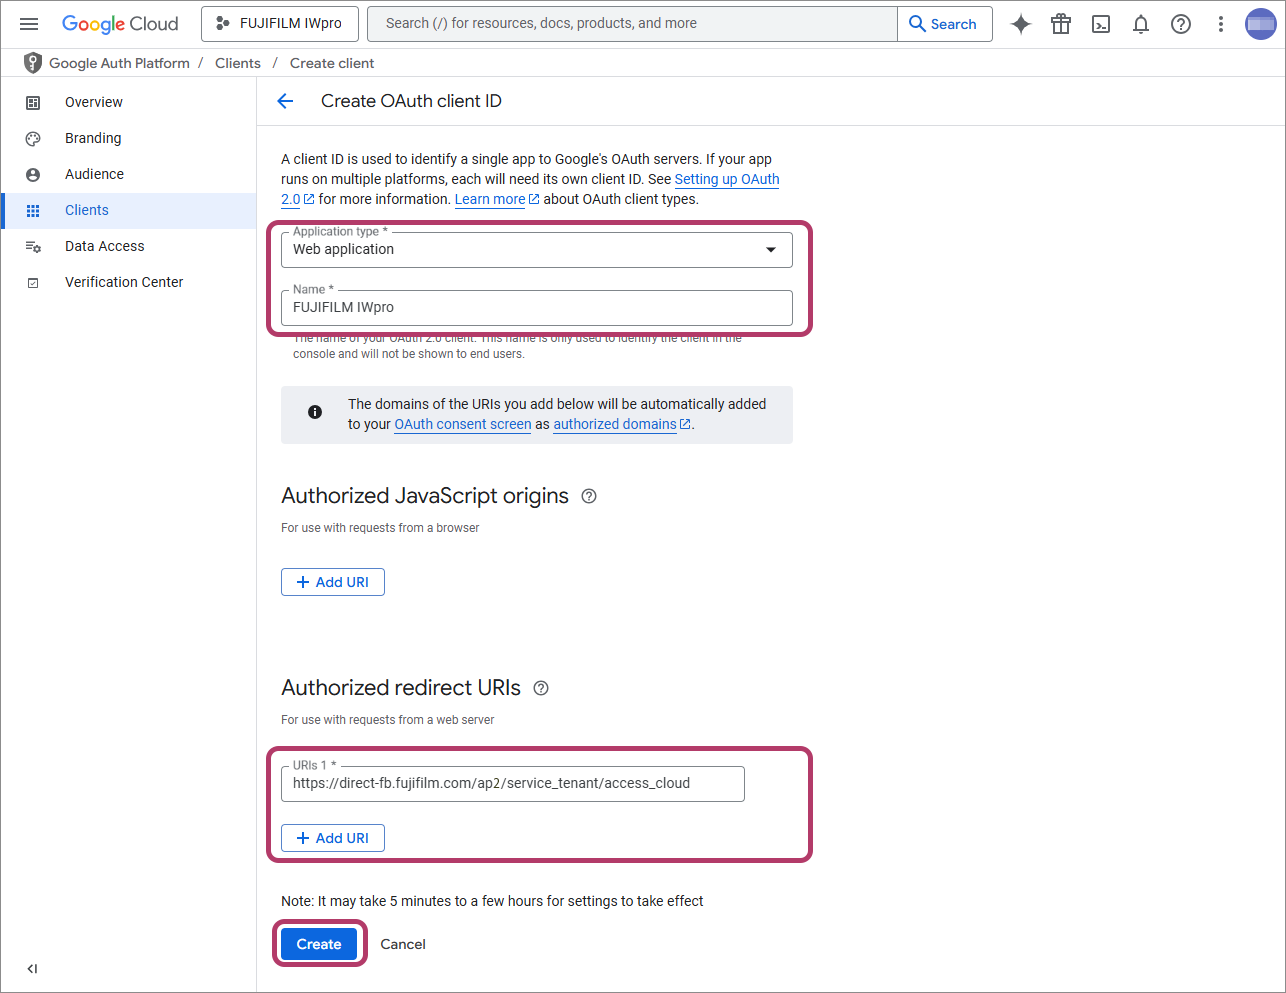
- Make a note of the values in [Client ID] and [Client secret], then click [OK].
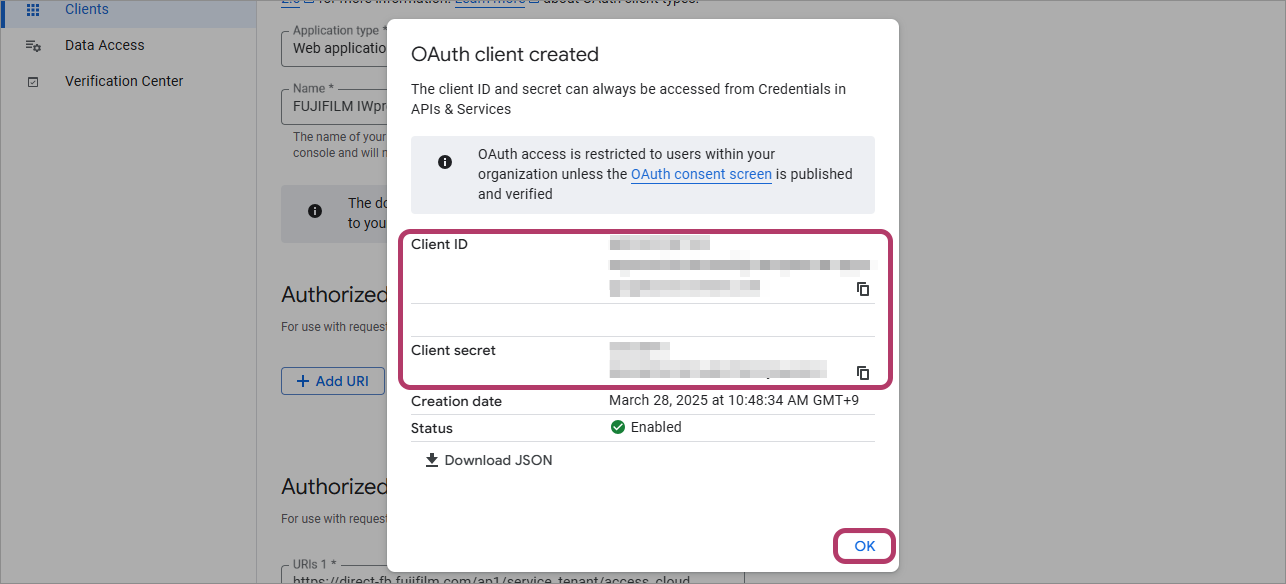
This completes the procedure for configuring Google Cloud Platform Console.
Close the screen of Google Cloud Platform Console.
Linking FUJIFILM BI Direct with Google Drive
Link FUJIFILM BI Direct with Google Drive.
- Log in to FUJIFILM BI Direct.
https://direct-fb.fujifilm.com/ap2/top
- If a screen prompting you to agree to the terms of use or privacy policy for FUJIFILM IWpro is displayed, check the displayed information and click [Accept and Proceed].
- When first using FUJIFILM BI Direct, FUJIFILM BI Direct registration is necessary. Register as shown on the screen.
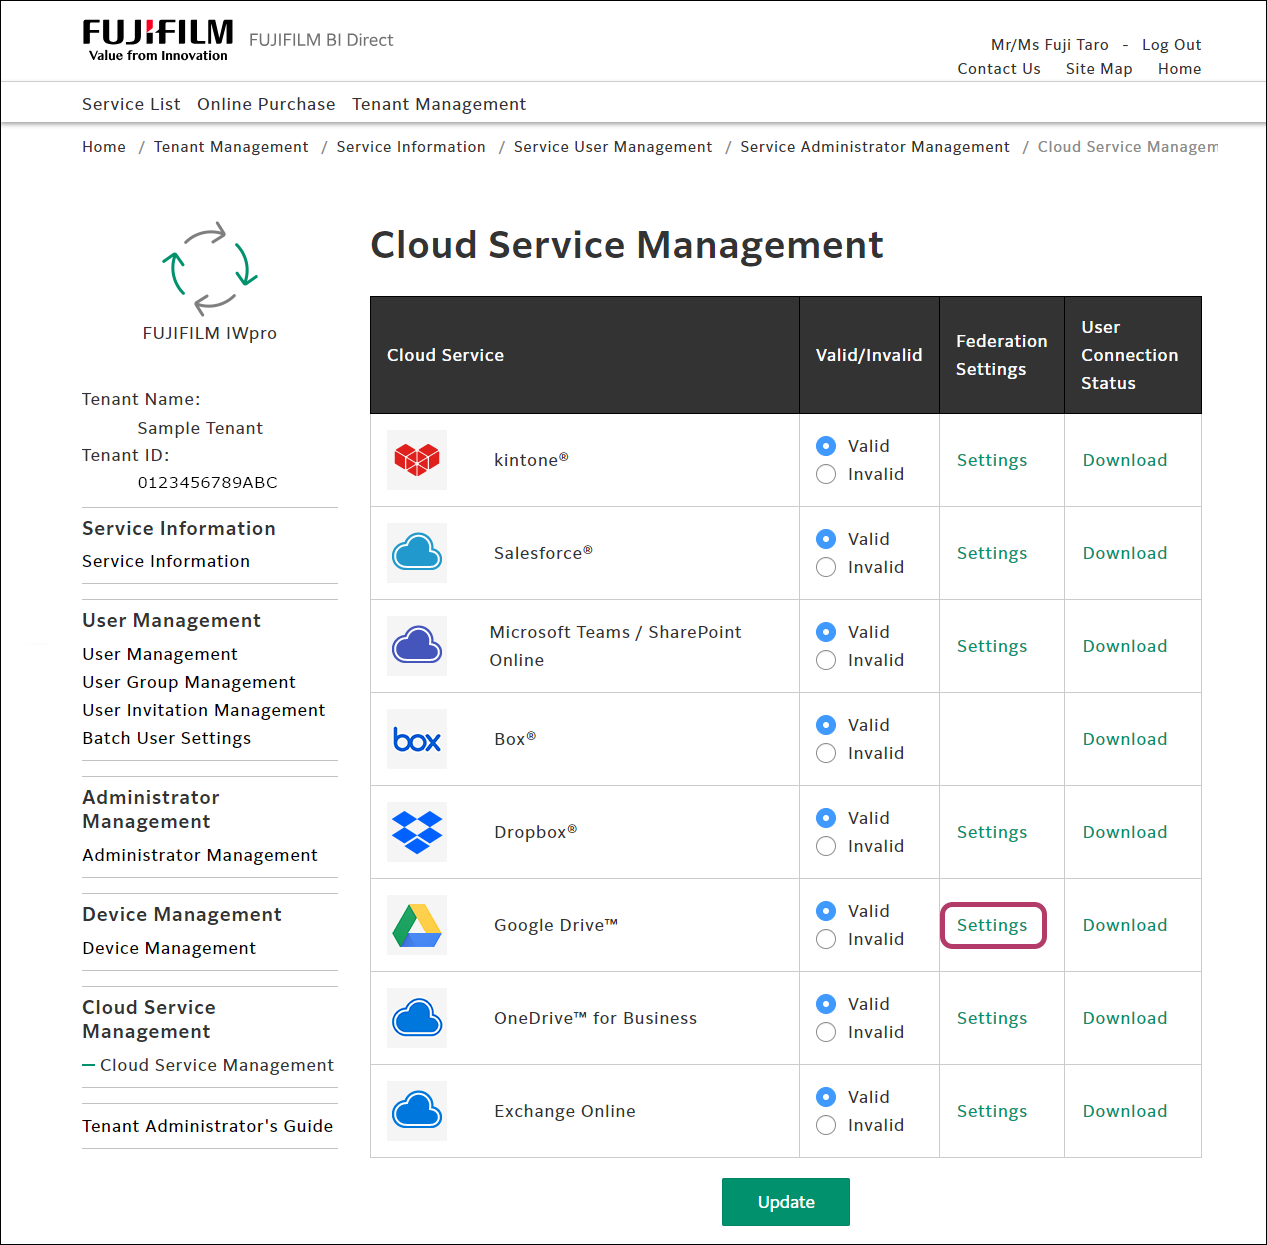
- Click [Tenant Management].
- Click [FUJIFILM IWpro] in the [Service] field.
- Click [Cloud Service Management] in [Cloud Service Management].
- Select [Settings] for [Google Drive
™].
- Configure the following settings, then click [Update].
Item Input value Application (Client) ID Enter the value in [Client ID]. Client Secret Enter the value in [Client secret]. 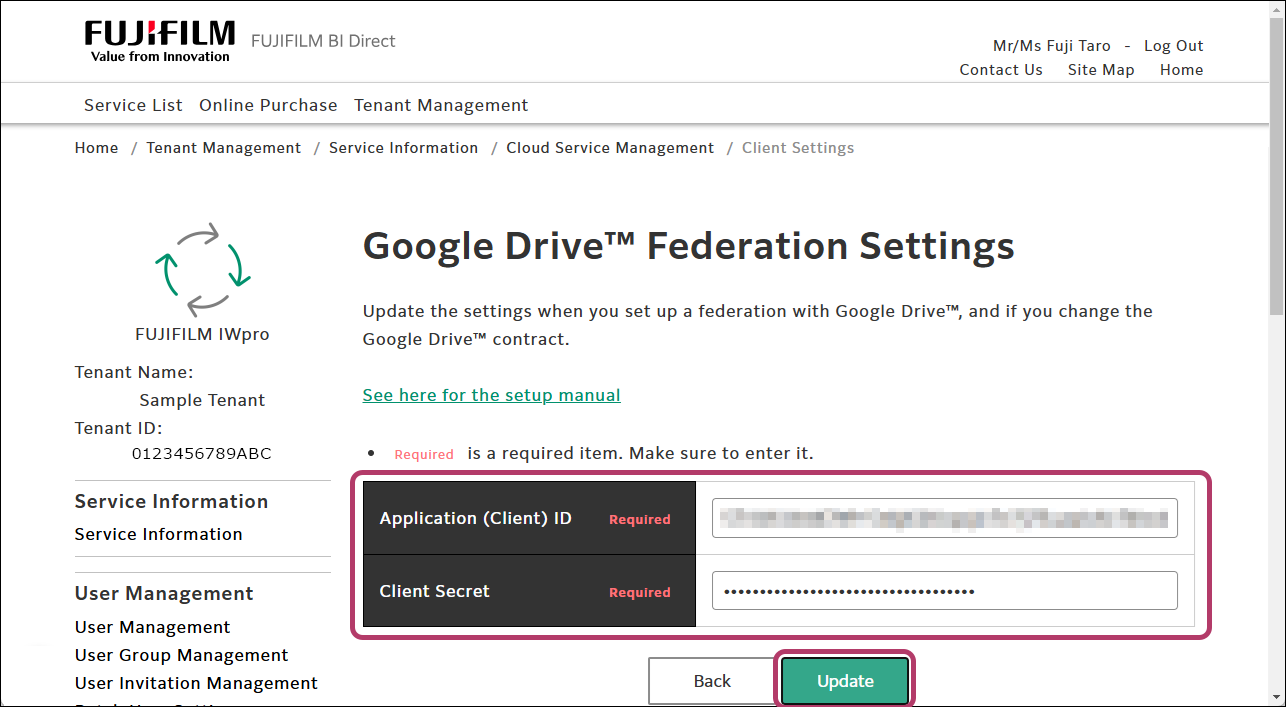
- Click [OK].

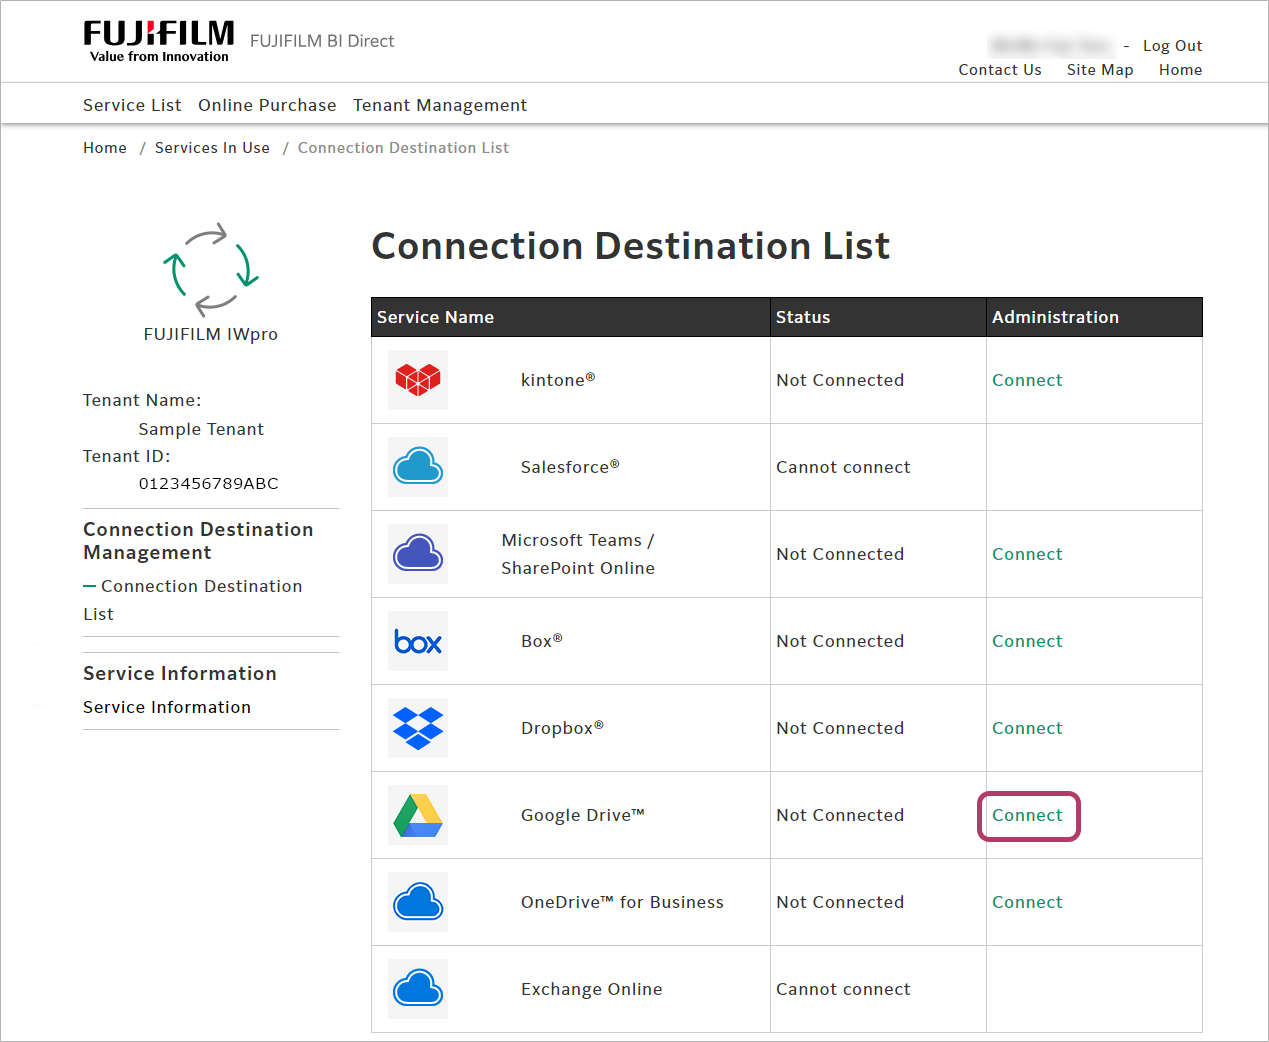
Connecting FUJIFILM BI Direct to Google Drive
To use Scan Delivery and Fax Delivery in Google Drive, configure the connection settings in FUJIFILM BI Direct.
- In [Connection Destination Management], click [Connection Destination List].
- Select [Connect] for [Google Drive
™].
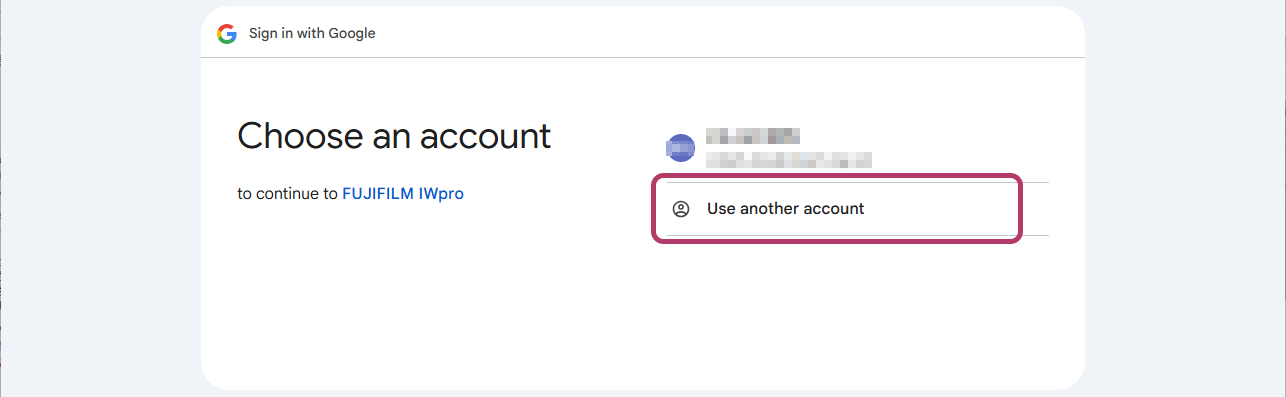
- Select the account for logging in to Google Drive.
- Click [Allow].
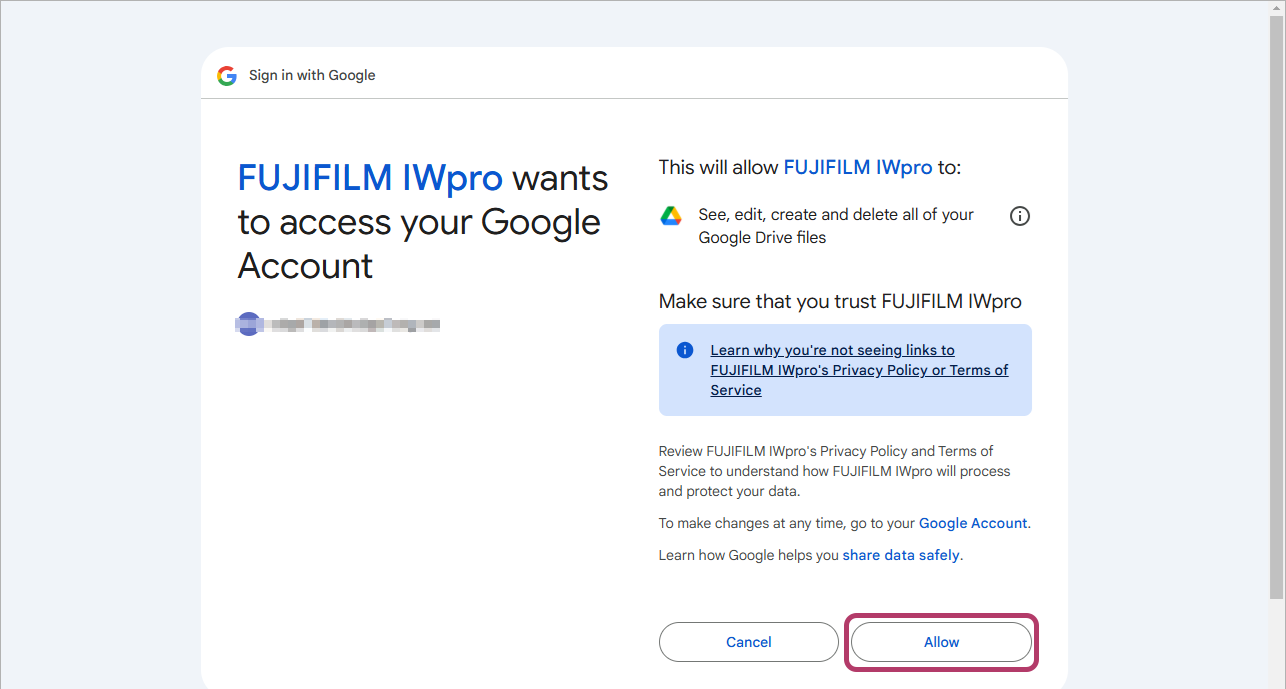
- A screen asking whether to remain signed in will be displayed. Click [No] or [Yes] as required.
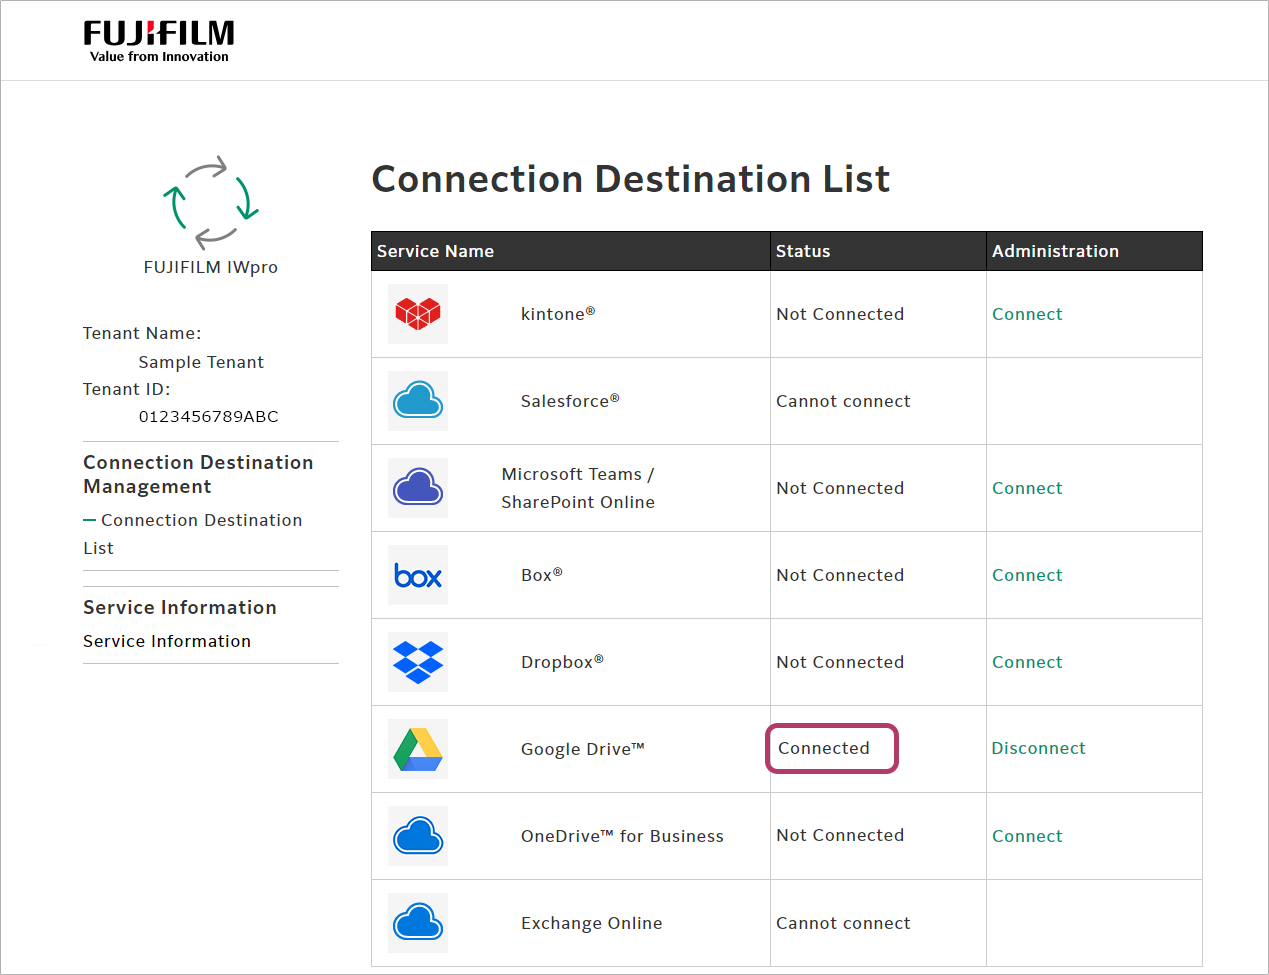
When the connection is completed, [Connected] will be displayed in the [Status] column.
Creating a Shared Folder
To share the FUJIFILM IWpro Scan Delivery or FUJIFILM IWpro Fax Delivery save location with multiple users, create a folder to share, and grant access rights to the users.
This completes the procedure for configuring Google Drive.
This completes step 1. Click [Next] to proceed to step 2.