Basic Settings of Document Evidence Definition
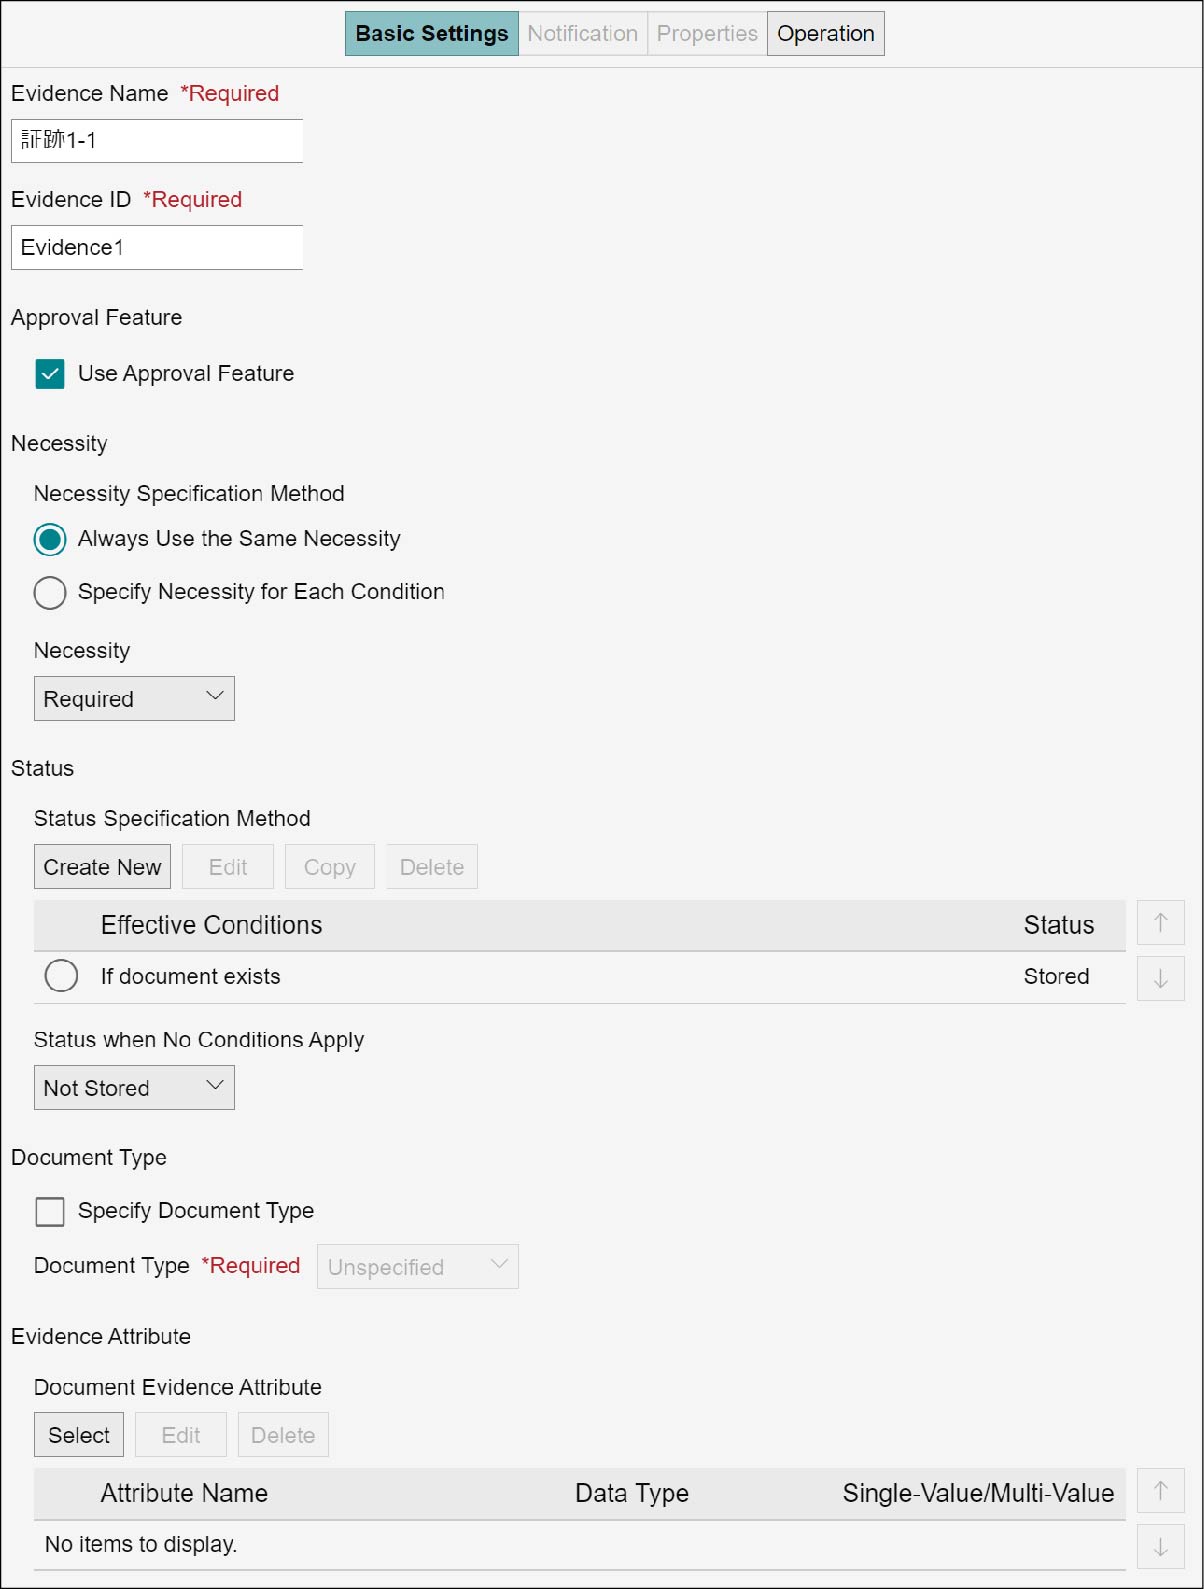
The document evidence definition sets the evidence name, evidence ID, necessity, and document evidence attribute. A new document evidence attribute can be created. You can edit and delete the created document evidence attribute. These operations are available in the [Basic Settings] tab on the business item definition structure editor screen. Display the [Basic Settings] tab by the following procedure.
1.
On the business item definition structure editor screen, select the evidence definition of step or group.
2.
Click the [Basic Settings] tab.
Note
When [Always Use the Same Necessity] is selected, the setting areas of [Necessity] will not be displayed.
Setting Document Evidence Definition
1.
Enter [Evidence Name] and [Evidence ID].
Note
- Enter [Evidence ID] using single-byte alphanumeric characters.
- Up to 128 characters can be entered in [Evidence Name] and up to 255 characters in [Evidence ID].
2.
To set the approval feature, select the checkbox of [Use Approval Feature].
Refer
To define the approval feature, see (Define Approval Feature).
3.
Select [Necessity Specification Method].
Note
- When you have selected [Always Use the Same Necessity], select the necessity from the pulldown menu.
- When you have selected [Specify Necessity for Each Condition], perform a selection from the [Effective Conditions] list.
- If necessity with each condition is not shown in the [Effective Conditions] list or when specifying a new effective condition, create anew. (Creating Necessity Effective Conditions)
4.
Set up [Status Specification Method].
Note
To define a status considered so that it does not satisfy any conditions set in [Status Specification Method], select from [Status when No Conditions Apply].
5.
Select the checkbox of [Specify Document Type] and click [Document Type].
Note
- You can only specify the document types that is set in the target cabinet in [Document Location Definition].
- This document type is automatically set for documents registered to the corresponding evidence from the process.
- If the document type is changed, it will be applied to documents registered after publication. It does not apply to documents that have already been registered.
6.
Select an attribute name in [Document Evidence Attribute].
Note
If [Document Evidence Attribute] is not shown in the attribute name list or when specifying a new attribute, add to the list. (Adding Document Evidence Attribute)
7.
When settings are complete, click [Save].
Defining Approval Feature
This function allows users with approval authority (approvers) to approve or reject documents registered in the process evidence by determining their contents.
Up to five approval steps can be created, and up to five approvers can be set for each step. Once approved by one approver, proceed to the next step. It ends when all steps set are approved or rejected by any one approver.
The progress of the approval can be checked from the [Approval Status] of the evidence, and the applicant is immediately notified of the determination result by e-mail. In addition, the applicant and business item administrator can withdraw approval requests that are in progress.
Note
The determination is either "Approve" or "Reject".
1.
Click the [Operation] tab.
2.
Select [Approval Request] under [Operation on Evidence].
3.
Enter the operation name and operation ID, and click [OK].
4.
Enter [Request Name].
5.
Select [All Documents] or [First Document] for [Documents for Approval].
6.
Click [Add] of [Approval Route].
A menu for specifying approvers appears.
Specifying Approvers
Approvers can be specified in one of three ways.
Note
- If multiple approvers are required, set [Approver 2], [Approver 3] and so on.
- Different methods of specifying approvers can be specified for each step.
Specifying from among Candidates
1.
Under [Approver Selection] in [Approver 1], select [Specify from Candidates].
2.
Click [Add].
The [Address Book] screen appears.
3.
Enter [Search Targets], [Search Conditions], and [Combination], and specify candidates from the users displayed in [Search Results].
4.
Click [Add].
The [Add Results] screen appears.
5.
Click [Close].
The specified user is displayed in [Approver 1].
6.
If more than one approver is needed, specify them from [Add].
7.
Click [Save].
The [Save Business Item Definition] screen appears.
8.
Click [OK].
Specifying from Properties
1.
Under [Approver Selection], select [Specify from Properties].
2.
Click [Select].
The [Select Property] screen appears.
3.
From the displayed property names, check the property to be assigned to the approver, and click [Select].
The specified property is displayed in [Approver 1].
4.
Click [Save].
The [Save Business Item Definition] screen appears.
5.
Click [OK].
Specifying from Address Book
1.
Under [Approver Selection], select [Specify from Address Book].
2.
Click [Save].
The [Save Business Item Definition] screen appears.
3.
Click [OK].
Creating Necessity Effective Conditions
A new effective condition for necessity can be created. You can edit, copy, and delete the created effective condition.
Note
There are three types of necessity of evidence: required, optional, and not required. In addition to setting the necessity, you can update the necessity of the evidence depending on the condition of the case.
Creating Effective Conditions
1.
Click [Create New] of [Necessity Specification Method].
The [Edit Conditional Necessity] screen appears.
2.
Set [Combination] and other items, and click [OK].
To the [Necessity Specification Method] list, the created effective condition will be added.
Editing Effective Conditions
1.
From the [Necessity Specification Method] list, select the effective condition you want to edit, and click [Edit].
The [Edit Conditional Necessity] screen appears.
2.
Edit [Combination] and other items, and click [OK].
In the [Necessity Specification Method] list, the edited effective condition will be updated.
Copying Effective Conditions
1.
From the [Necessity Specification Method] list, select the effective condition you want to copy, and click [Copy].
To the last line of [Necessity Specification Method] list, the copied effective condition will be added.
Deleting Effective Conditions
1.
From the [Necessity Specification Method] list, select the effective condition you want to delete, and click [Delete].
The [Confirm Deletion] screen appears.
2.
Click [OK].
The selected document evidence attribute becomes deleted.
Note
Deleting a selected [Effective Conditions] will result in a condition where nothing is selected. Select [Effective Conditions] again.
Creating a Condition Used to Determine the Evidence Status
A new condition used to determine the evidence status can be created. The created condition can then be edited, copied or deleted.
Note
Evidence can have the following statuses: Stored, In Progress and Not Stored. In addition to setting a fixed condition, it is possible to change condition depending on the current evidence status.
Creating a Condition Used to Determine Status
1.
Click [Create New] for [Status Specification Method].
The [Edit Status] screen appears.
2.
Set up items such as [Combination], and click [OK].
The created condition is displayed in the [Status Specification Method] list.
Editing a Condition Used to Determine Status
1.
Click [Edit] for [Status Specification Method].
The [Edit Status] screen appears.
2.
Set up items such as [Combination], and click [OK].
The created condition is displayed in the [Status Specification Method] list.
Copying a Condition Used to Determine Status
1.
Click [Copy] for [Status Specification Method].
The copied condition is appended to the last row in the [Status Specification Method] list.
Deleting a Condition Used to Determine Status
1.
Select a condition to delete from the [Status Specification Method] list, and click [Delete].
The [Confirm Deletion] screen appears.
2.
Click [OK].
The selected condition is deleted.
Note
Deleting a selected [Effective Conditions] will result in a condition where nothing is selected. Select [Effective Conditions] again.
Adding Document Evidence Attribute
A document evidence attribute can be added to the list. You can edit and delete the added evidence attribute.
Creating Document Evidence Attribute
1.
In [Document Evidence Attribute], click [Select].
The [Select Document Attribute] screen appears.
2.
Select the checkbox of the document attribute name you want to add, and click [Select].
To the [Document Evidence Attribute] list, the selected attribute will be added.
Editing Document Evidence Attribute
1.
From the [Document Evidence Attribute] list, select the attribute name you want to edit, and click [Edit].
The [Edit Document Evidence Attributes] screen appears.
2.
Edit [Attribute Name] and other items, and click [OK].
In the [Document Evidence Attribute] list, the edited attribute will be updated.
Deleting Document Evidence Attribute
1.
From the [Document Evidence Attribute] list, select the attribute name you want to delete, and click [Delete].
The [Confirm Deletion] screen appears.
2.
Click [OK].
The selected document evidence attribute becomes deleted.