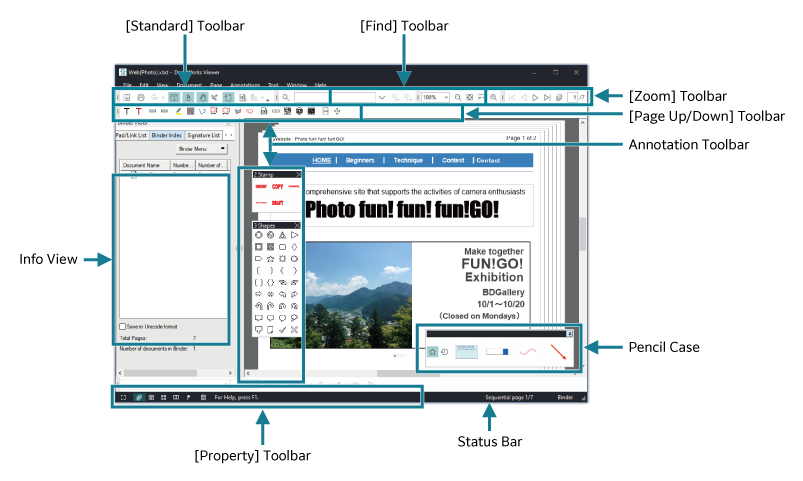
Make-up of the Viewer Window
Viewer is largely made up of a view, toolbars, and a status bar.

[Standard] Toolbar
A collection of buttons for performing frequently used functions.
[Page Up/Down] Toolbar
A collection of buttons for turning pages.
[Zoom] Toolbar
A collection of buttons for changing the zoom ratio of a page.
[Find] Toolbar
Has the function to search for pages.
[Annotation Toolbar]
A collection of buttons for pasting annotations.
Pencil Case
A set of the frequently used Annotation Toolbar and recently used annotations.
[Property] Toolbar
A collection of buttons for changing various properties including the color of annotation.
[Status Bar]
Shows a message, a page number, and the like.
There is a button for switching between list view and thumbnail view at the left end.
There is a button for switching between list view and thumbnail view at the left end.
[InfoView]
Displays the following information on the current document or page.
- [NotePad/Link List]
- [Binder Index]
- [Signature List]
- [Table of Contents]
- [OCR Result]
- [Page Properties]
- Text to be read by software that reads the screen content out loud
Switching the View
This topic describes how to switch between the views of Viewer.
Switching the view
Procedure
1.
Select [Document], [Page Sorter], [Original Data], [Page Sorter and Document], [Full Screen], or [Split Document View] from the [View] menu.
A check mark to the left of the menu item indicates the currently selected view.
- You can switch the view mode using the button at the left of the status bar.
- When in the full screen view, you can use the following operations to return to the Viewer window.
- Press the <Esc> key.
- Press the <Enter> key on the last page. Or click on the page.
- Press the <Shift> +<Enter> keys on the first page. Or click on the page while pressing the <Shift> key.
Switching between "Display Thicknes"s and "Continuous Page" in document view
Selecting the [View as Continuous Page] check box from the [View] menu switches the document display format to "Continuous Page". Clearing the [View as Continuous Page] check box switches the format to "Display Thickness".
- In the "Continuous Page" view, selecting [View as Facing Page] from the [View] menu displays facing pages side by side on the screen.
- In the Facing Page view, you can select [Left Bind] or [Right Bind] in [Page Bind] from the [View] menu. You can select [Insert Cover Page] to insert a virtual cover page that precedes the first page of text. This allows you to adjust the odd and even pages alignment for the facing pages.
Note
Selecting [Page Viewer] from the [View] menu displays the page image in the [Page Viewer] dialog box.
In the [Page Viewer] dialog box, the displayed page cannot be edited.
In the [Page Viewer] dialog box, the displayed page cannot be edited.